Deep Sky Image Processing in Photoshop
In this deep sky image processing tutorial, I’ll be combining all of the data I was able to collect on the Orion Nebula this winter. This step-by-step tutorial should be useful to anyone processing a bright nebula with Adobe Photoshop.
As we transition into spring, a new array of deep-sky imaging targets will present themselves. The winter astrophotography targets in the Orion constellation will have to wait another year to get photographed.
The camera used for this image was a Canon EOS Rebel T3i (600D), an excellent choice for beginners looking to dive into deep sky astrophotography. The newer Canon Rebel series DSLR’s (such as the T7i) are also a great choice.
The telescope used for this photo was an Explore Scientific ED80 APO refractor. If you’re looking for more options, be sure to see my complete list of the telescopes for astrophotography I recommend.
The telescope used for this image. Explore Scientific ED80.
Deep Sky Image Processing Walkthrough
The total amount of detail I was able to capture on the Orion Nebula and Running Man Nebula this winter was 3 Hours and 8 minutes of broadband, color RGB data. I will be incorporating 2 hours and 40 minutes of Ha (narrowband) data into the final image using the HaRGB processing technique.
Some of the images used in my final photo were shot during the AstroBackyard YouTube video: Let’s Photograph the Orion Nebula. The data should like quite similar to anyone capturing the Orion Nebula using a DSLR camera from the city.
DeepSkyStacker (Pre-Processing)
We’ll start with the Autosave.tif file produced by DeepSkyStacker after registering, stacking, and calibrating my sub-exposures.
The screenshot below shows the results of registering and stacking 4 nights’ worth of imaging from my backyard. This winter has been plagued with numerous cloudy nights, so I had to capture photons here and there, under varying sky conditions.
Yes, it is very white! That’s light pollution for you.
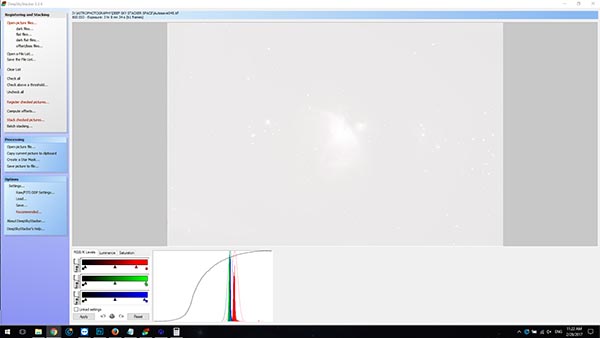
The photo sets from each imaging session were loaded into the group tabs of DeepSkyStacker. My modified Canon T3i camera was set to ISO 800 for each imaging session, but I bumped the exposure time up to 3.5 minutes for the fourth and final set.
Using the group tabs in DSS
- Dec 22, 2016 – 23 frames – 180″ @ ISO 800
- Feb 2, 2017 – 24 frames – 180″ @ ISO 800
- Feb 3, 2017 – 10 frames – 180″ @ ISO 800
- Feb 27, 2017 – 11 frames – 210″ @ ISO 800
Image sets 1-3 were stacked using darks, bias and flat calibration/support frames. The final and fourth set did not use flat frames as I was not able to shoot them the morning after the imaging session.
I do not make any adjustments to the stacked image in DeepSkyStacker. I bring the 32-bit Autosave.tif file into Adobe Photoshop for all post-processing.
Processing in Adobe Photoshop
I use two Photoshop Plugins in this tutorial, Astronomy Tools Action Set, and Gradient Xterminator. See all of the astrophotography software I use here.
Cropping/Rotating the file in Photoshop
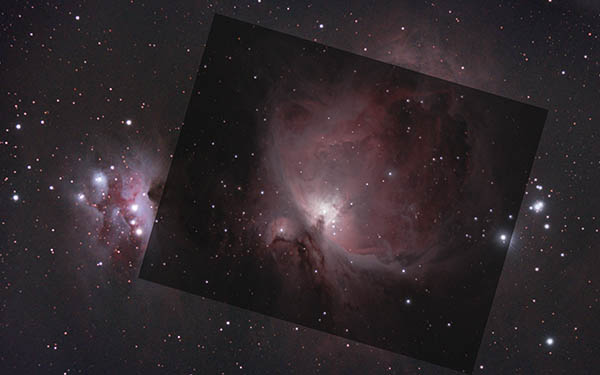
The first thing I like to do is to rotate and crop the image. A temporary levels adjustment was made to get a better look at the edges of the frame. As you can see, my frames rotated and shifted slightly between the imaging sessions. This creates an unusable sky at the edges of the image, so I will crop the image to about 85%. In the future, I plan to incorporate a plate-solving software such as AstroTortilla to help line up my images over multiple nights.
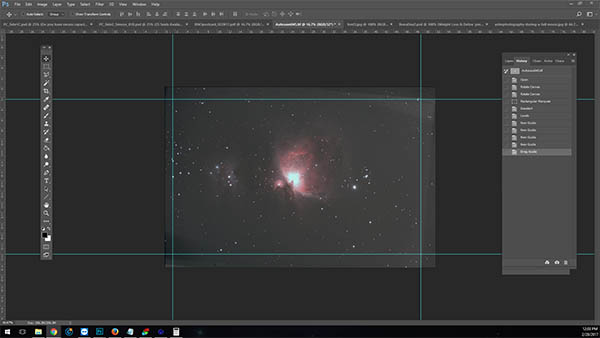
To save some of the outer regions around the nebula, I will have to repair some of the outer background sky using the healing brush, and the content-aware fill tool in Photoshop. Ideally, you would want to keep as much of your original frame as possible. Once I have cropped the image, I will adjust the black point of the image.
Levels Adjustment / Setting Blackpoint
As you can see in the image below, the histogram shows that the majority of the image data is contained in the mid-level tones. I will move the slider to the left of the histogram over until it touches the information contained within the image. This will darken the background sky and increase the contrast of the original image.
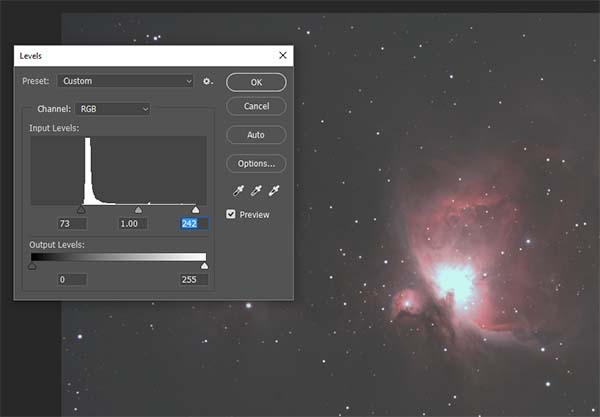
The slider to the right of the data was moved inwards as well. It’s important that you do not clip the data and lose any pixel information. You may notice that the core of the Orion Nebula is completely white and “blown out”, I will correct this issue later on.
Before setting the initial black-point, I will give the image a semi-aggressive curve stretch to reveal more of the outer nebulosity. This will also discern where the nebula ends and the background sky begins. Before Photoshop will let us make this adjustment, we will need to convert the image from a 32-bit file to a 16-bit file.
Image > Mode > 16 Bits/Channel
An HDR Toning window will open up. Avoid choosing the tempting default preset of Local Adaptation, and instead, select Exposure and Gamma from the Method selection area. Leave the default exposure and gamma settings. As this tutorial moves on, we will be creating our own HDR (High Dynamic Range) version of the Orion Nebula using very specific actions and settings.
At this point, you can adjust the levels once more, as there is likely empty space to the left of the data in the histogram again. You may also choose to create a copy of your original layer, or create a new adjustment layer to work from. Having snapshots of your image at each stage of the processing workflow will help you go back and fine-tune your edits. Personally, I like to use a mixture of new layer copies using the History feature of Adobe Photoshop.
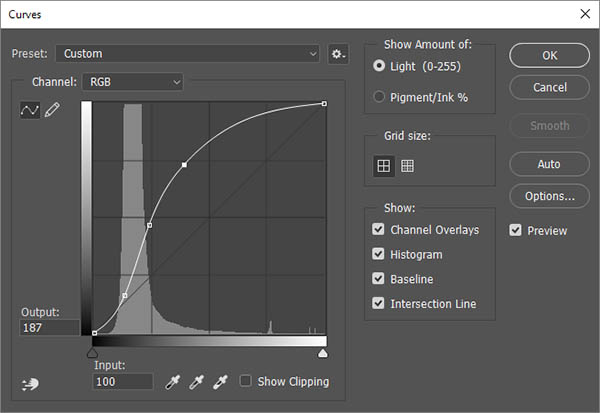
Here is what my initial curve stretch looks like:
The curves stretch I applied brought forward the fainter details of the outer nebulosity.
Here is a little trick I like to use: With the curves window open, hold down CTRL, and click an area of the nebula you want to bring forward. This will plot a point on the histogram you can pull from to stretch that particular tonal range. You can also plot an additional point of a neutral area of background sky, and know that you are pulling data forward from only the nebula itself, and not the space around it.
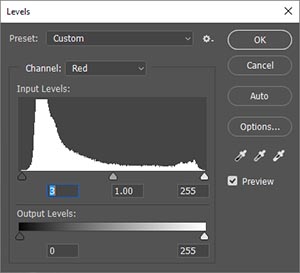
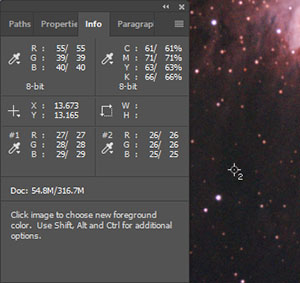
Using the Info window, adjust the left-hand slider on each RGB level until the values are balanced. A background sky with Red/Green/Blue values of about 30/30/30 is a good starting point.
Creating a star mask
If you don’t want to risk the chance of brightening the stars in your image and blowing them out, try using a layer mask to protect them from growing in size and intensity. The art of stretching the deep-sky object, but not the stars is a constant challenge when processing astrophotography images.
You can create this mask by using the Color Range tool. Select > Color Range.
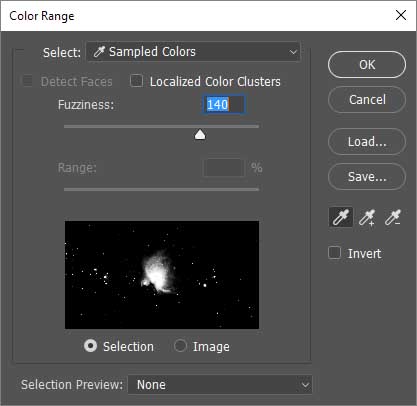
You will have to experiment with the fuzziness slider to select your intended amount of stars. In my example, I used a value of 140. After the stars have been selected, I suggest softening the selection for a more natural blend in the mask. To do this:
Select > Modify > Expand (2 Pixels)
Select > Modify > Feather (3 Pixels)
Again, these values will vary based on your image scale. If you are shooting wide field through a Canon T3i or similar model, these settings should work well.
Like many tasks in Photoshop, there are numerous ways to accomplish a layer mask adjustment. For this step, I prefer to invert the selection of stars (Select > Inverse) and make my curve adjustment to all areas of the image except the star mask I created.
Here is what my image of the Orion Nebula looks like at this stage:
I cropped the image in a little more and used Gradient Xterminator around the edges of the DSO to balance the background sky. Again, the core is still blown out at this stage. I will add 2 additional stacks of 15 and 30-second images of the bright core to reveal the full range of detail in the Orion Nebula.
Astronomy Tools Action Set
At this stage of my image processing workflow, I will use my first action from Noel Carboni’s action set. The action is called Local Contrast Enhancement.
This action does a great job at sharpening details and increasing the contrast of the deep-sky object. It is wise to create a new layer with this action applied, so you can toggle the effect on and off. For my image, I am going to apply a layer with this action at 75% opacity. I have also created a mask on this layer so that it does not affect the areas of space where I do not want to increase the contrast.
Directly after this action, I prefer to run Enhance DSO and Reduce Stars. This action can takes up to a minute or more to complete, depending on your image and the computer you are using. Again, a new layer using this action is recommended, as this action can dramatically change the look of your image.
Here is a before/after look at my image after running Local Contrast Enhancement and Enhance DSO and Reduce Stars:
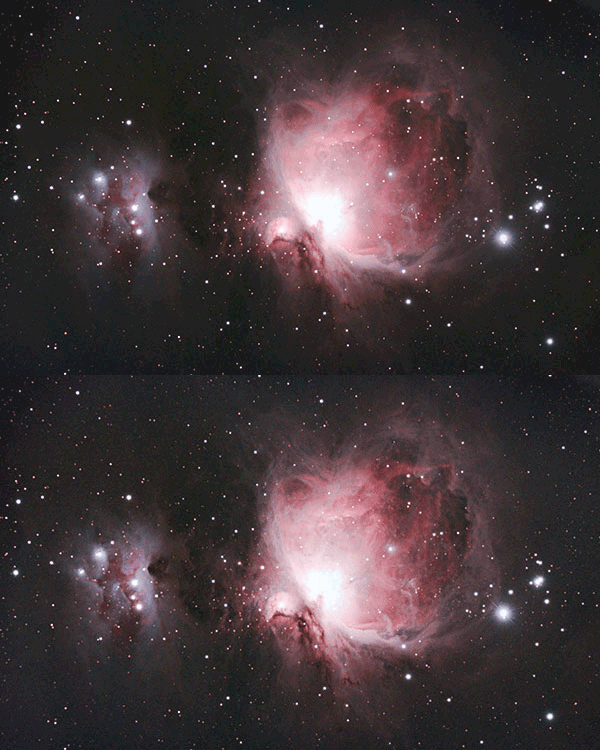
To make a new adjustment layer with all previous actions and adjustments made, use the keyboard shortcut: CTRL + ALT + SHIFT + N + E. This is a very helpful technique to use as your continue to add adjustment layers to your image.
Applying the “Tamed Core” Layer
At this stage, I will apply a pre-processed stack of shorter exposures to the image. To capture these images I shot a series of 15-second and 30-second exposures with the goal of collecting detail in the brightest areas of the Orion Nebula. A good indicator of this dynamic range in values is the ability to discern the individual stars in the Trapezium.
The short exposures were stacked in DeepSkyStacker using dark, bias and flat frames just as the primary image was.
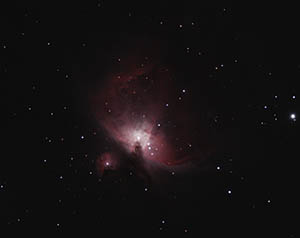
Blending the two images will be a lot easier if they have been pre-processed in the same manner. Some may argue that combining the core should have taken place much earlier in the process. However, this timing of this workflow works best for my personal taste. With so many opinions about how to properly process a deep sky image, I prefer to lean towards the workflow that I enjoy most. This way, I can enjoy the hobby for years to come.
Here’s where it gets fun
Select the image of the detailed core, and paste it onto your original image as a new layer. Rather than using a traditional mask method, I like to use a feathered eraser brush at an opacity of 15%. This allows me to subtly remove the unwanted data on the top layer (the core), one brush stroke at a time.
When I need to see the faint details of the edges of the core layer, I simply create a 100% white layer and place it as the layer below. The amount of brightness of the core is a matter of taste. This aspect of the image has varying points of view as to how an HDR Orion Nebula is “supposed to look”.
I personally think that the Orion Nebula should have a bright core! With the right amount of blending it is possible to show the full range of detail and keep the core as the brightest area of the image. Flattening core to a lower brightness than the outer nebulosity can give the nebula a plastic look.
Layering in the core can take a long time if you are particular about the overall look of your image. I used several copies of both stacks of shorter exposures to gradually work the new core into my existing image.
Final Processing Steps
With the full dynamic range captured in the image (depending on who you ask), I can now go ahead and make my final image processing steps to further increase the color and detail of the image.
Increase Vibrance and Saturation
To increase the saturation of the Nebula without bringing noise and unwanted color from the background sky, I’ll use the Select Color Range tool again. This time, use the eyedropper to select the color from the nebula you wish to intensify. I choose the mid-level pink areas of Orion.
You may also want to run some actions on your image such as Increase Star Color, and Make Stars Smaller. As always, apply these actions to a new layer so that you can control the amount of the adjustment using the opacity slider. I will often use both of these actions, in small amounts.
Adding a layer of H-Alpha
This is where the image really starts to “pop”. I shot over 2 hours worth of data through a 12nm Astronomik clip filter with my Canon T3i. I will combine this data with the RGB image we just processed using the HaRGB processing technique outlined in this tutorial:
Deep Sky Image Processing in HaRGB – Tutorial
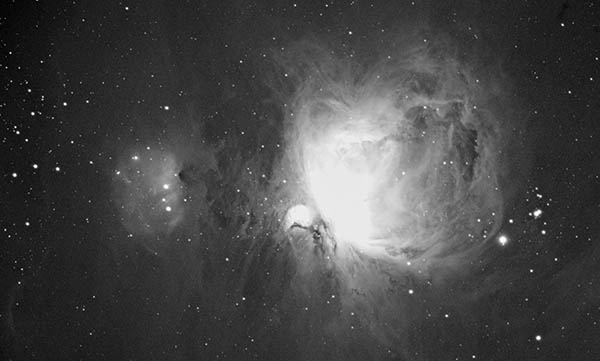
The image above is 32 X 5-minute subs @ ISO 1600
If you are interested learning how to shoot H-Alpha with your DSLR camera, read my post on how a DSLR Ha Filter can improve your astrophotography.
Without explaining every detail in the HaRGB tutorial I linked above, the premise is basically to add the Ha as a luminosity layer at about 75% over your original color image.
Because the data in the core of the H-Alpha version of Orion was blown out, it is important to note that I removed this area of the Ha luminosity layer, so that I did not lose any detail in the final composite image. By turning the Ha layer off and on, you can determine which areas of the nebula are being improved, and which areas are losing detail and/or color. I prefer to create another layer mask using the Ha layer, leaving only the key improvement areas at the full 75% opacity.
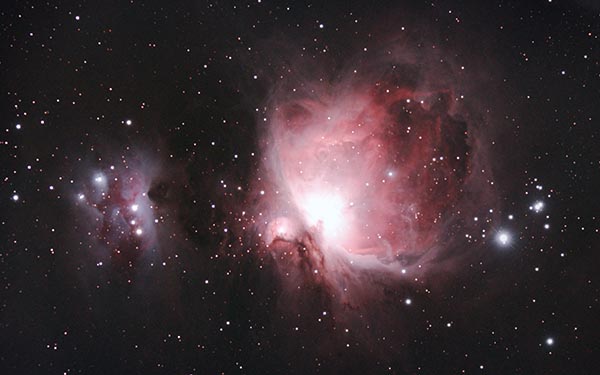
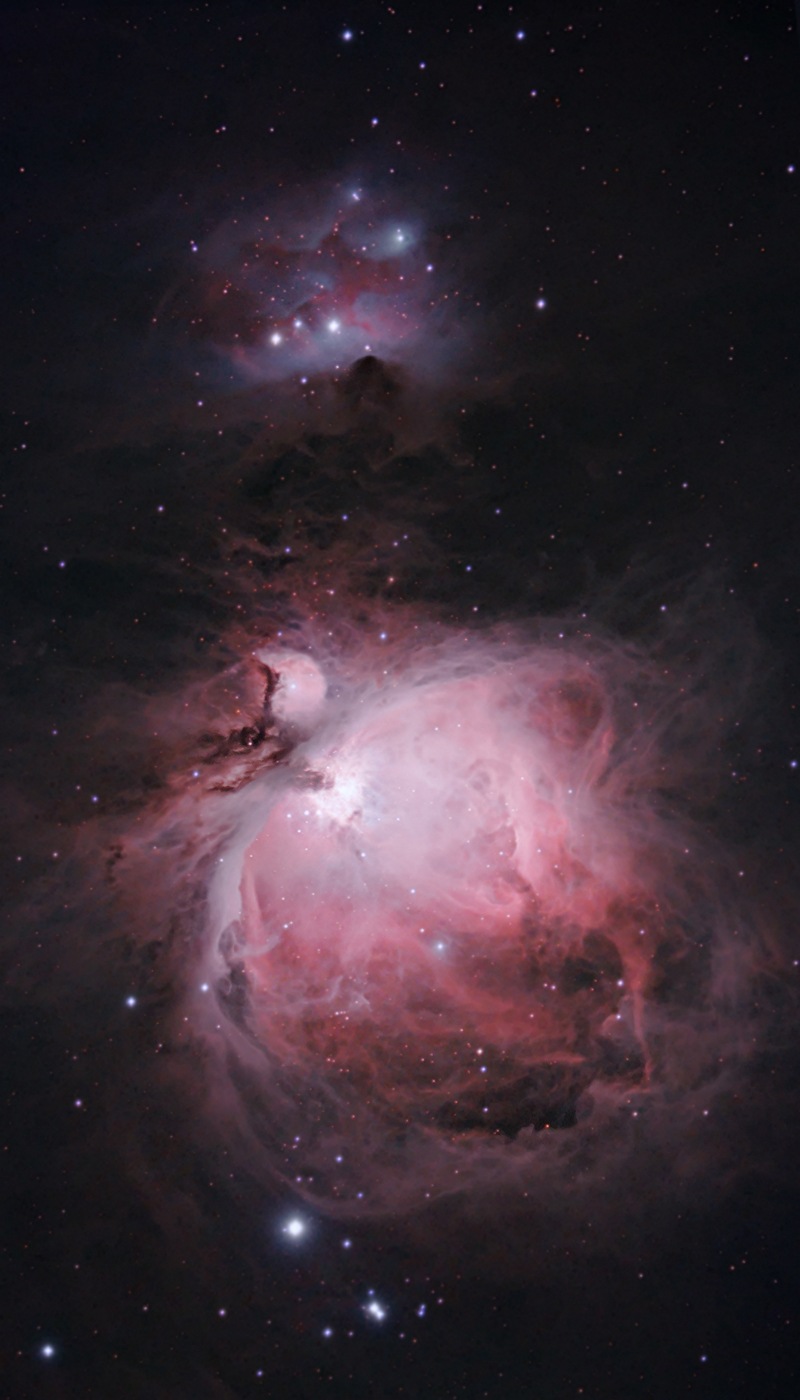
Below is my final image of the Orion Nebula using the processing methods outlined above:
Final Image Details:
Hardware:
Mount: Sky-Watcher HEQ5 Pro Synscan
Telescope: Explore Scientific ED102 CF
Imaging Camera: Canon T3i (600D) Modified
Filters: Hutech IDAS LPS, Astronomik 12nm Ha
Flattener/Reducer: William Optics FF III
Guide Scope: Orion Mini 50mm, Starwave 50mm
Guide Camera: Meade DSI, Altair Astro GPCAM2 AR0130
Software:
Image Acquisition: BackyardEOS
Autoguiding: PHD2 Guiding
Registering/Stacking: DeepSkyStacker
Image Processing: Adobe Photoshop
Exposure Details:
RGB: 3 Hours, 8 Minutes (55 frames)
Ha: 2 Hours, 40 Minutes (32 frames)
Total Integrated Exposure: 5 Hours, 48 Minutes

This winter was a memorable one for me. By sharing my experiences in the backyard on this blog and on YouTube, I was able to connect with fellow backyard astronomers on a deeper level. There may not have been many clear nights, but the ones that were felt extra special. Until next time, clear skies!
Deep Sky Image Processing Help:
Video Tutorial: Deep Sky Image Processing in Photoshop
Astrophotography Image Processing Video (YouTube)

Wow you just answered a big question for me. Your initial histogram shows your data to be right from middle whereas mine are usually falling far to the left but then I only stacked individual nights. So I need to take all my nights and stack together.
I’m guessing after reading the article you sent me that I was exposing more for overall light (LP) rather than target data that I might have underexposed a lot of nights.
Questions
A lot of my nights (because I was new to this and learning) were of different ISO settings. Does this mean I cannot use them all?
If DSS does not allow you to stack different ISO shots in one stack can I stack them individually and then combine them?
Can you stack a series of stacked images?
When DSS creates master frames should I save them and if so how do I use them later.
Great post thank you. Now that I screwed up an entire season let’s hope I learned enough to have a good galaxy season
Howdy Sean,
Yes, you would stack your subs of the same ISO together in separate groups in DSS. I have never stacked a series of stacked images – when I am adding data to a particular image I stack all of the individual subs again in groups. I don’t use the master frames for anything. I believe you can use the master dark for future stacking – rather than adding individual darks as long as they match temp and exp. length wise – but I just always stack each dark sub to be safe. Thanks and good luck this Spring!