Seestar S30 Pro Review: The Best Smart Telescope Yet
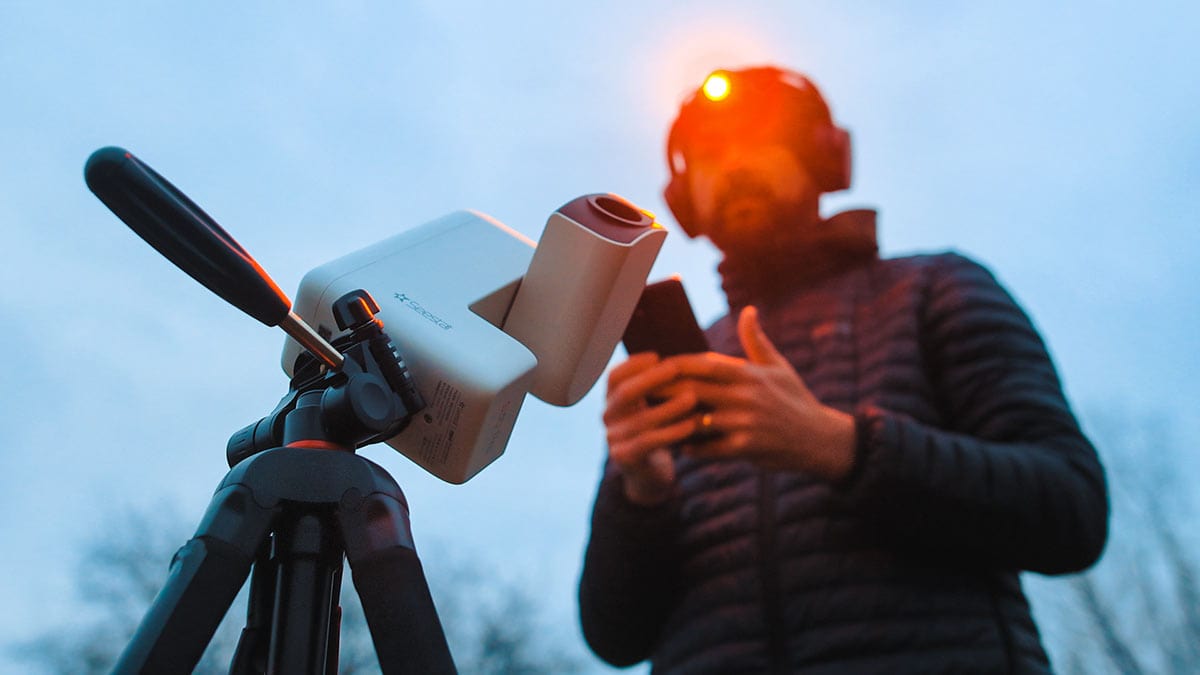
After using the Seestar S30 Pro extensively in my backyard for more than a month, I’ve developed a solid feel for what it can and can’t do. Galaxies, Nebulae, the Sun, EQ mode, Timelapses – you name it, I’ve put it through its paces.
This review is based on real-world use, not first impressions. ZWO provided this S30 Pro prototype for testing, and I’ve captured a wide range of images with it so you can see exactly what it’s capable of. As always, these are my honest opinions, with no input from the manufacturer or video sponsor.
By the end of this review, you’ll have everything you need to decide whether the Seestar S30 Pro is the right smart telescope for you, and whether it truly lives up to the hype.
What Is the Seestar S30 Pro?
The Seestar S30 Pro is ZWO’s upgraded version of the original Seestar S30 smart telescope. It is an ultra-compact, smartphone-controlled smart telescope designed to make astrophotography simple, fast, and genuinely fun.
You select a target (galaxy, nebula, the Moon, or even the Sun) and the telescope handles the rest. It automatically finds the object, focuses, and begins capturing images.
As it works, the image gradually builds on your phone or tablet screen in real time using a process called live stacking. The longer it runs, the brighter and more detailed the image becomes. Watching an object slowly reveal itself this way never gets old.
There’s no eyepiece on the Seestar S30 Pro. Everything happens digitally, through the app.
If you are new to astrophotography, the appeal is obvious. Instead of learning polar alignment, guiding, focus, and stacking from scratch, the Seestar S30 Pro handles pointing, focusing, tracking, and live stacking automatically.
But the S30 Pro is not just for beginners. The hardware and software upgrades are aimed squarely at people who care about deep-sky data quality, especially under light-polluted skies.
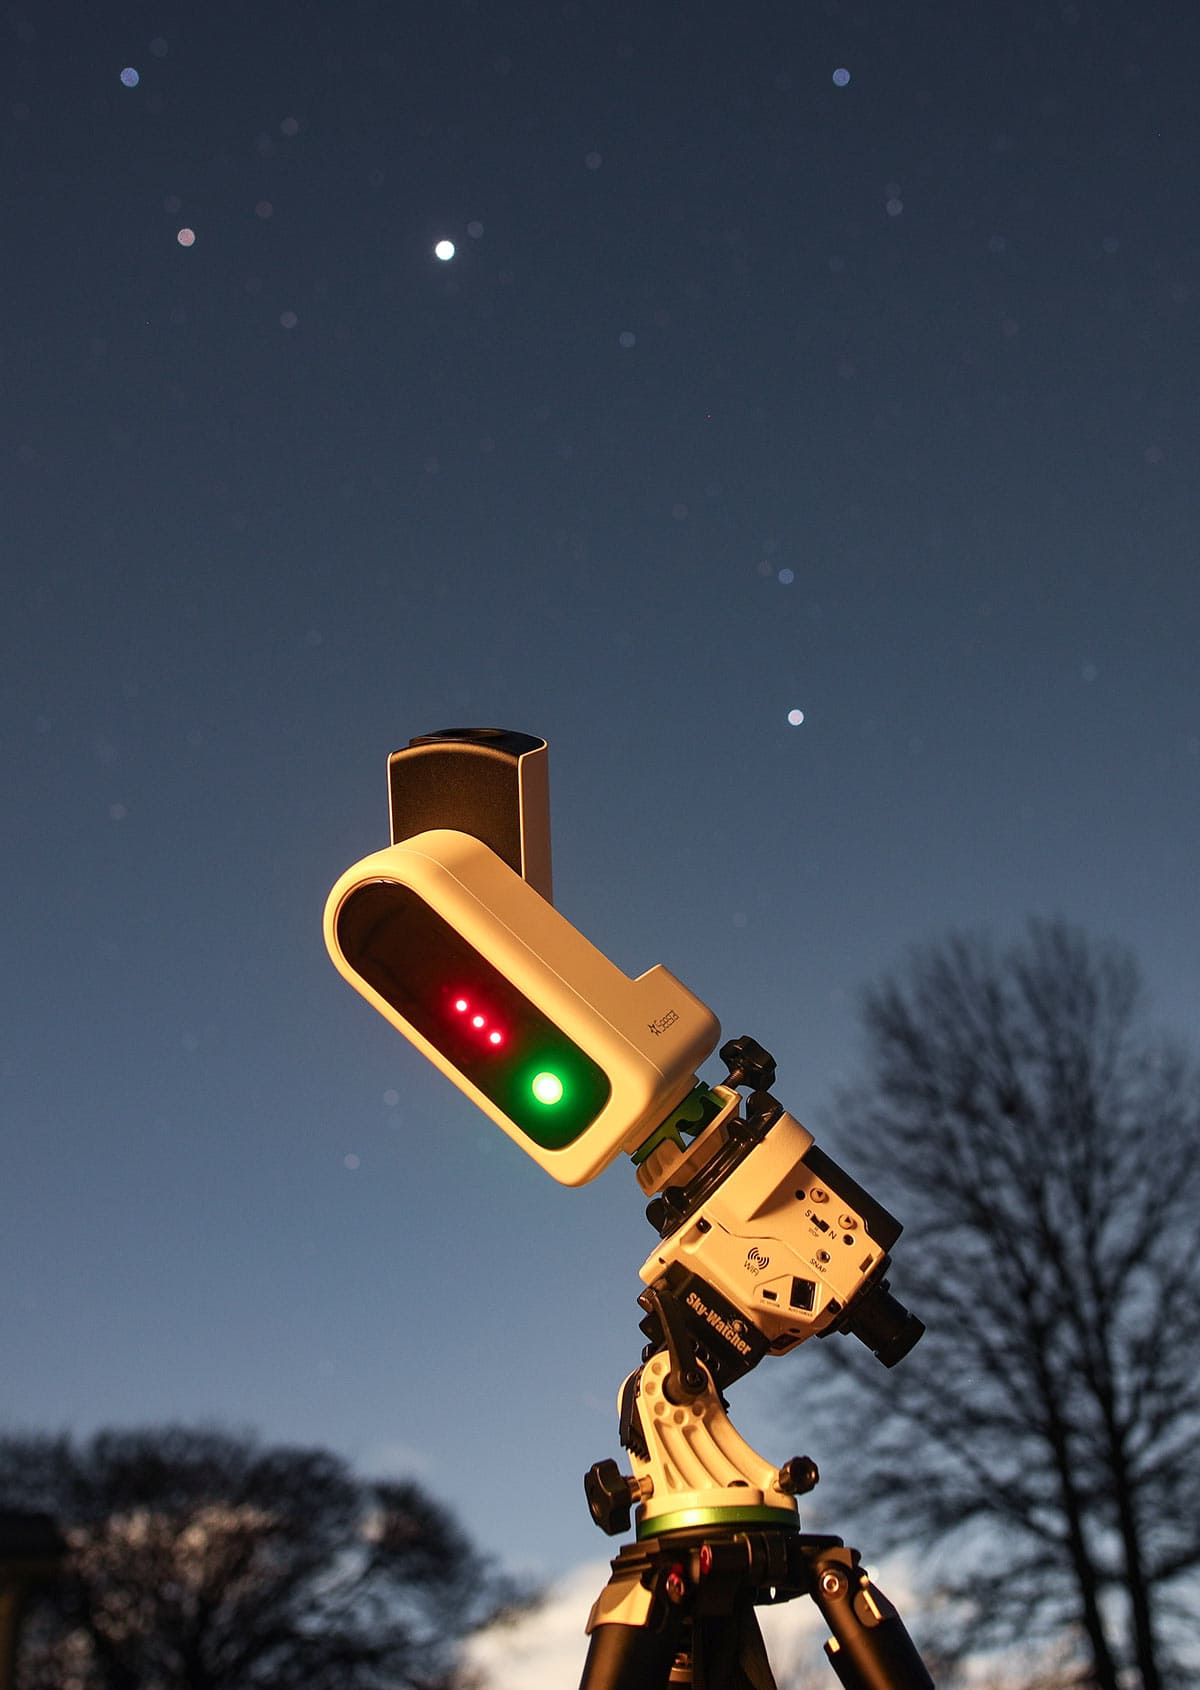
Using the Seestar S30 Pro in EQ mode on a wedge mount.
Fast Facts: Seestar S30 Pro
- Type: All-in-one smart astrophotography telescope
- Main Aperture: 30 mm
- Focal Length: 160 mm
- Focal Ratio: f/5.3
- Sensor: Sony IMX585
- Resolution: 3840 × 2160 (4K)
- Pixel Size: 2.9 microns
- Internal Storage: 128 GB
- Optics: Quadruplet design for better edge correction
- Tracking: Alt-az by default, equatorial mode with a wedge
- Best for: Deep-sky imaging from light-polluted skies
- Typical battery life: About 5–6 hours in real-world use
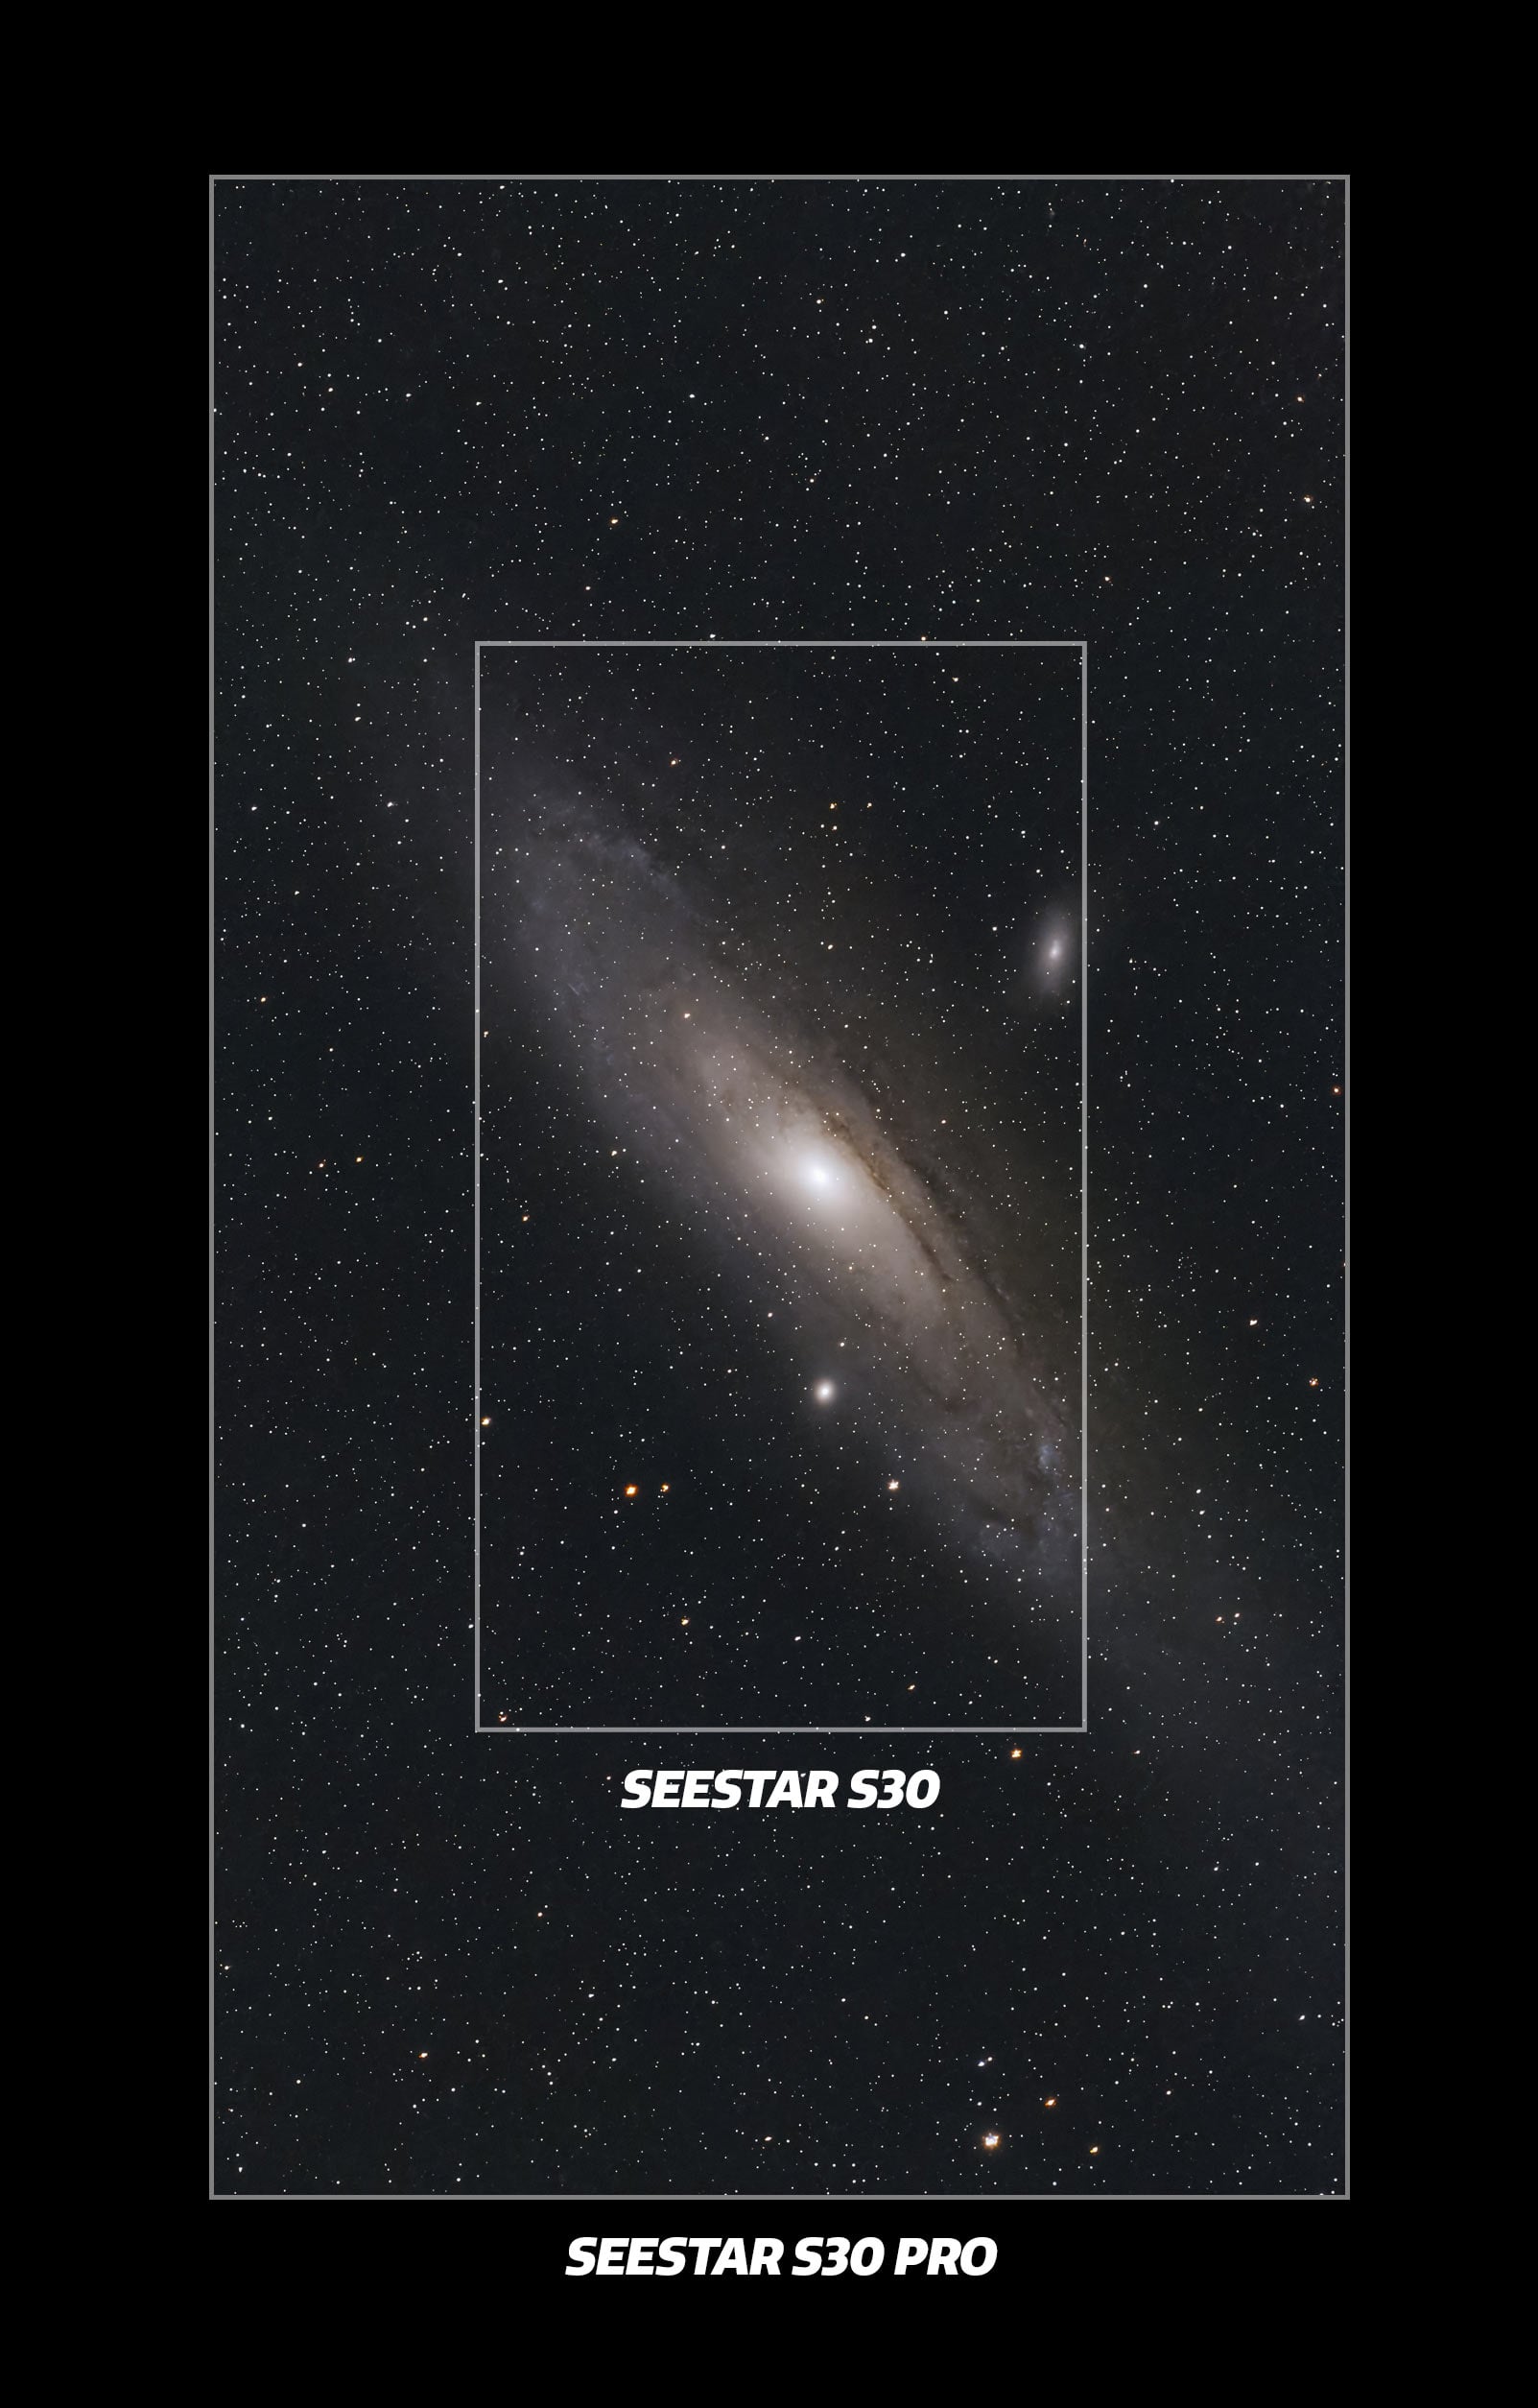
These are large, high-resolution images for a smart telescope – four times larger than the original S30’s output. The jump to 4K makes a real difference, especially when viewing images on a large screen or printing them.
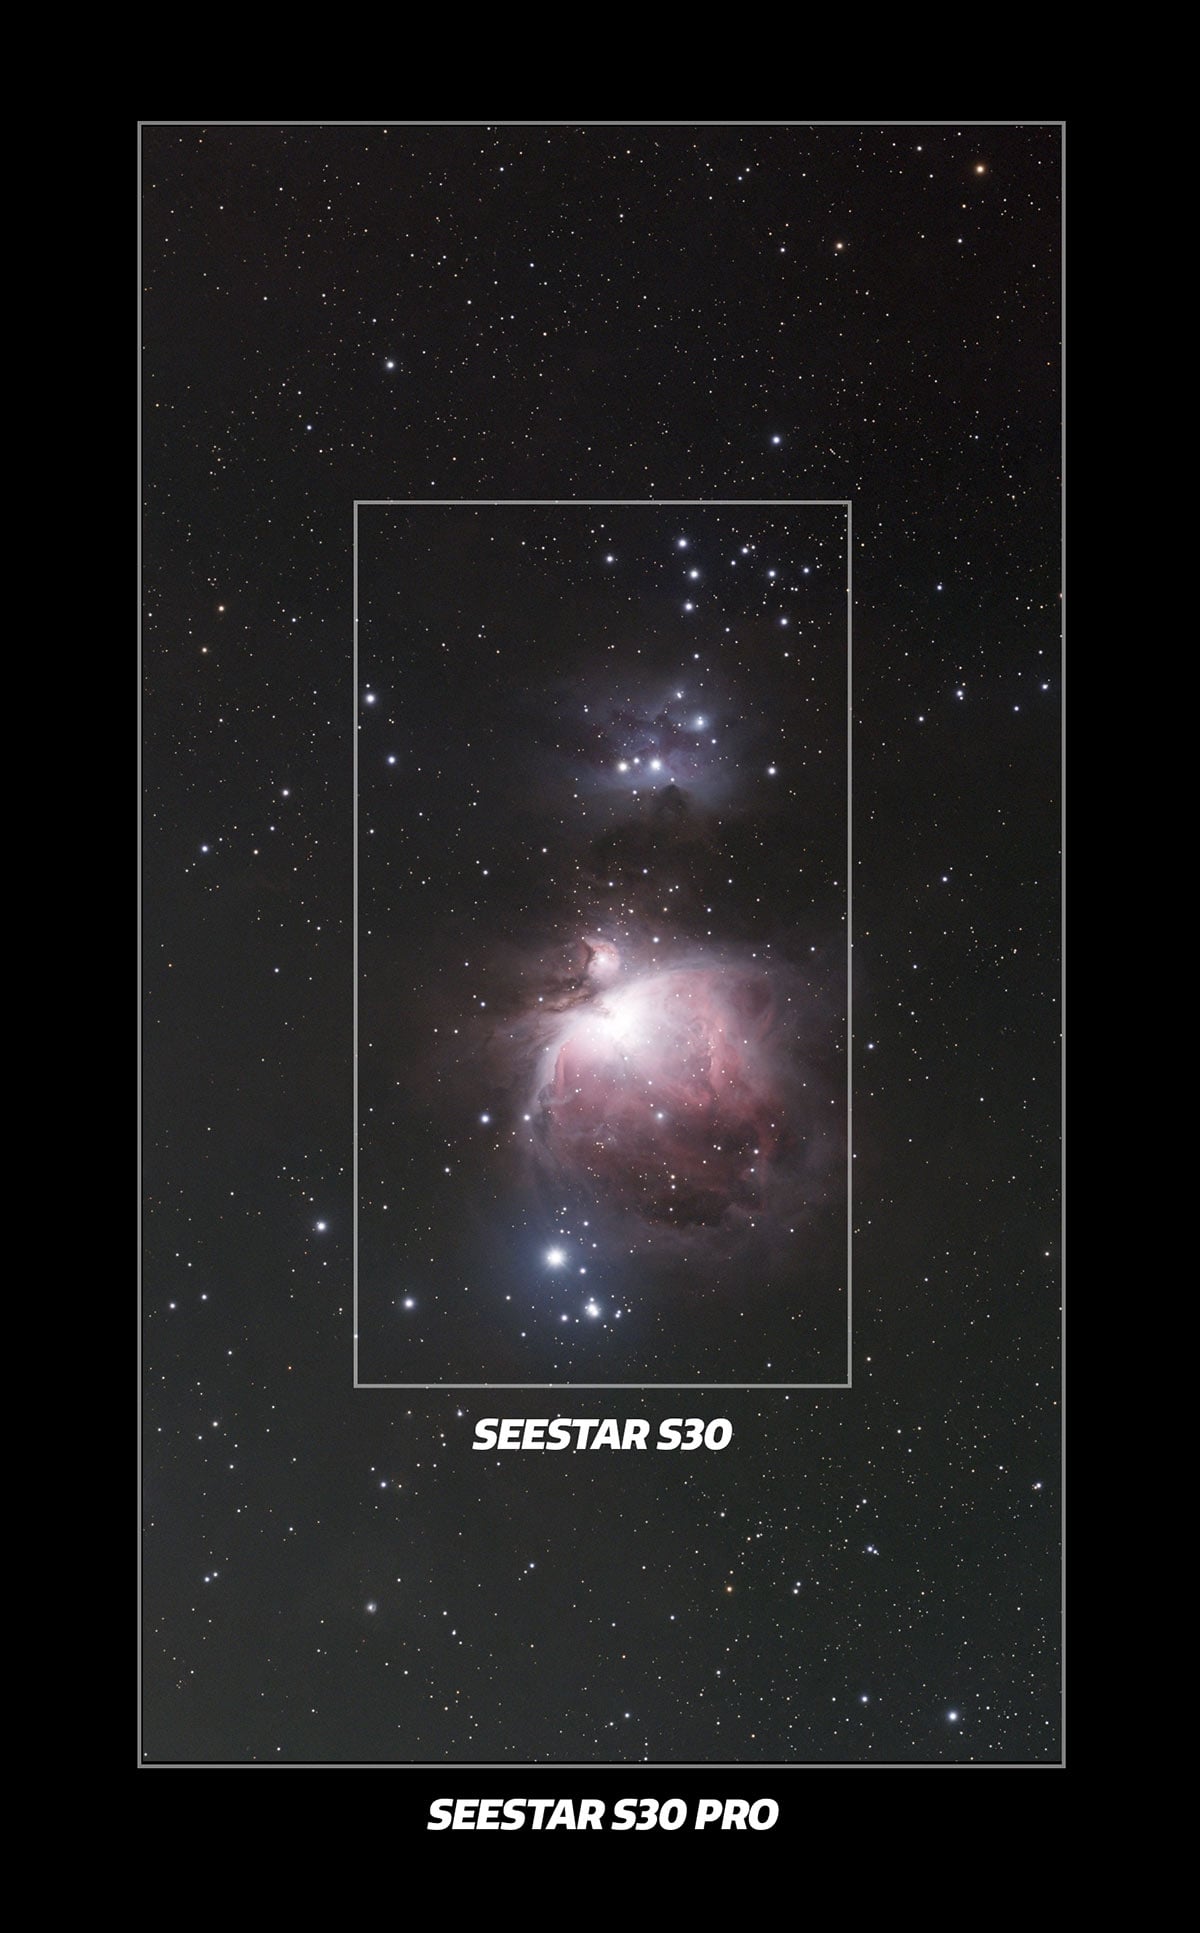
Look at the dramatic difference in the field of view between the original S30 and the S30 Pro.
What’s New in the Pro Version?
At first glance, the Seestar S30 Pro looks almost identical to the original S30. The size and weight are nearly the same. The differences, however, are where things get interesting.
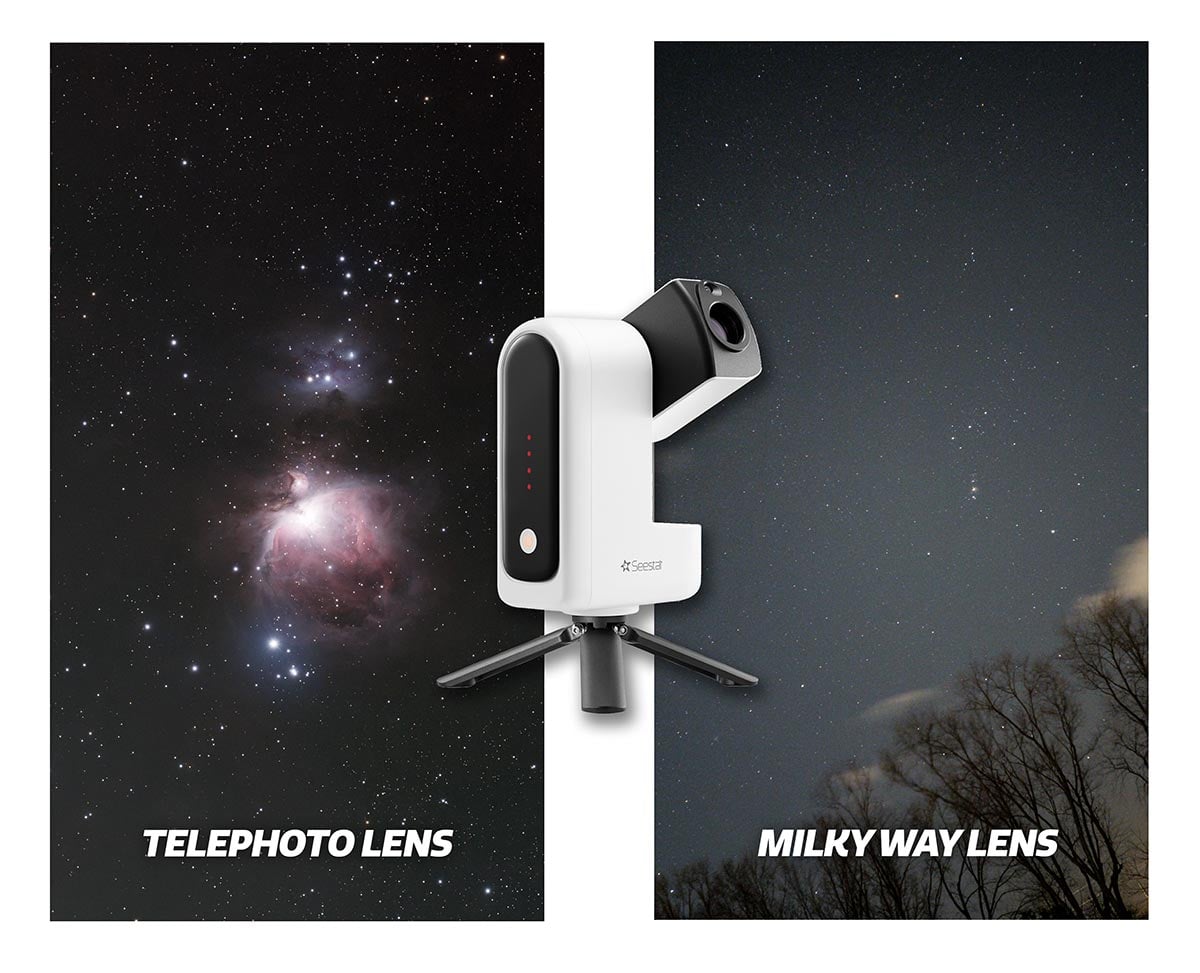
The Pro version introduces several meaningful upgrades that directly impact image quality and versatility. One of the biggest additions is an expanded imaging mode that allows for wide-angle Milky Way photography and timelapses using a secondary camera.
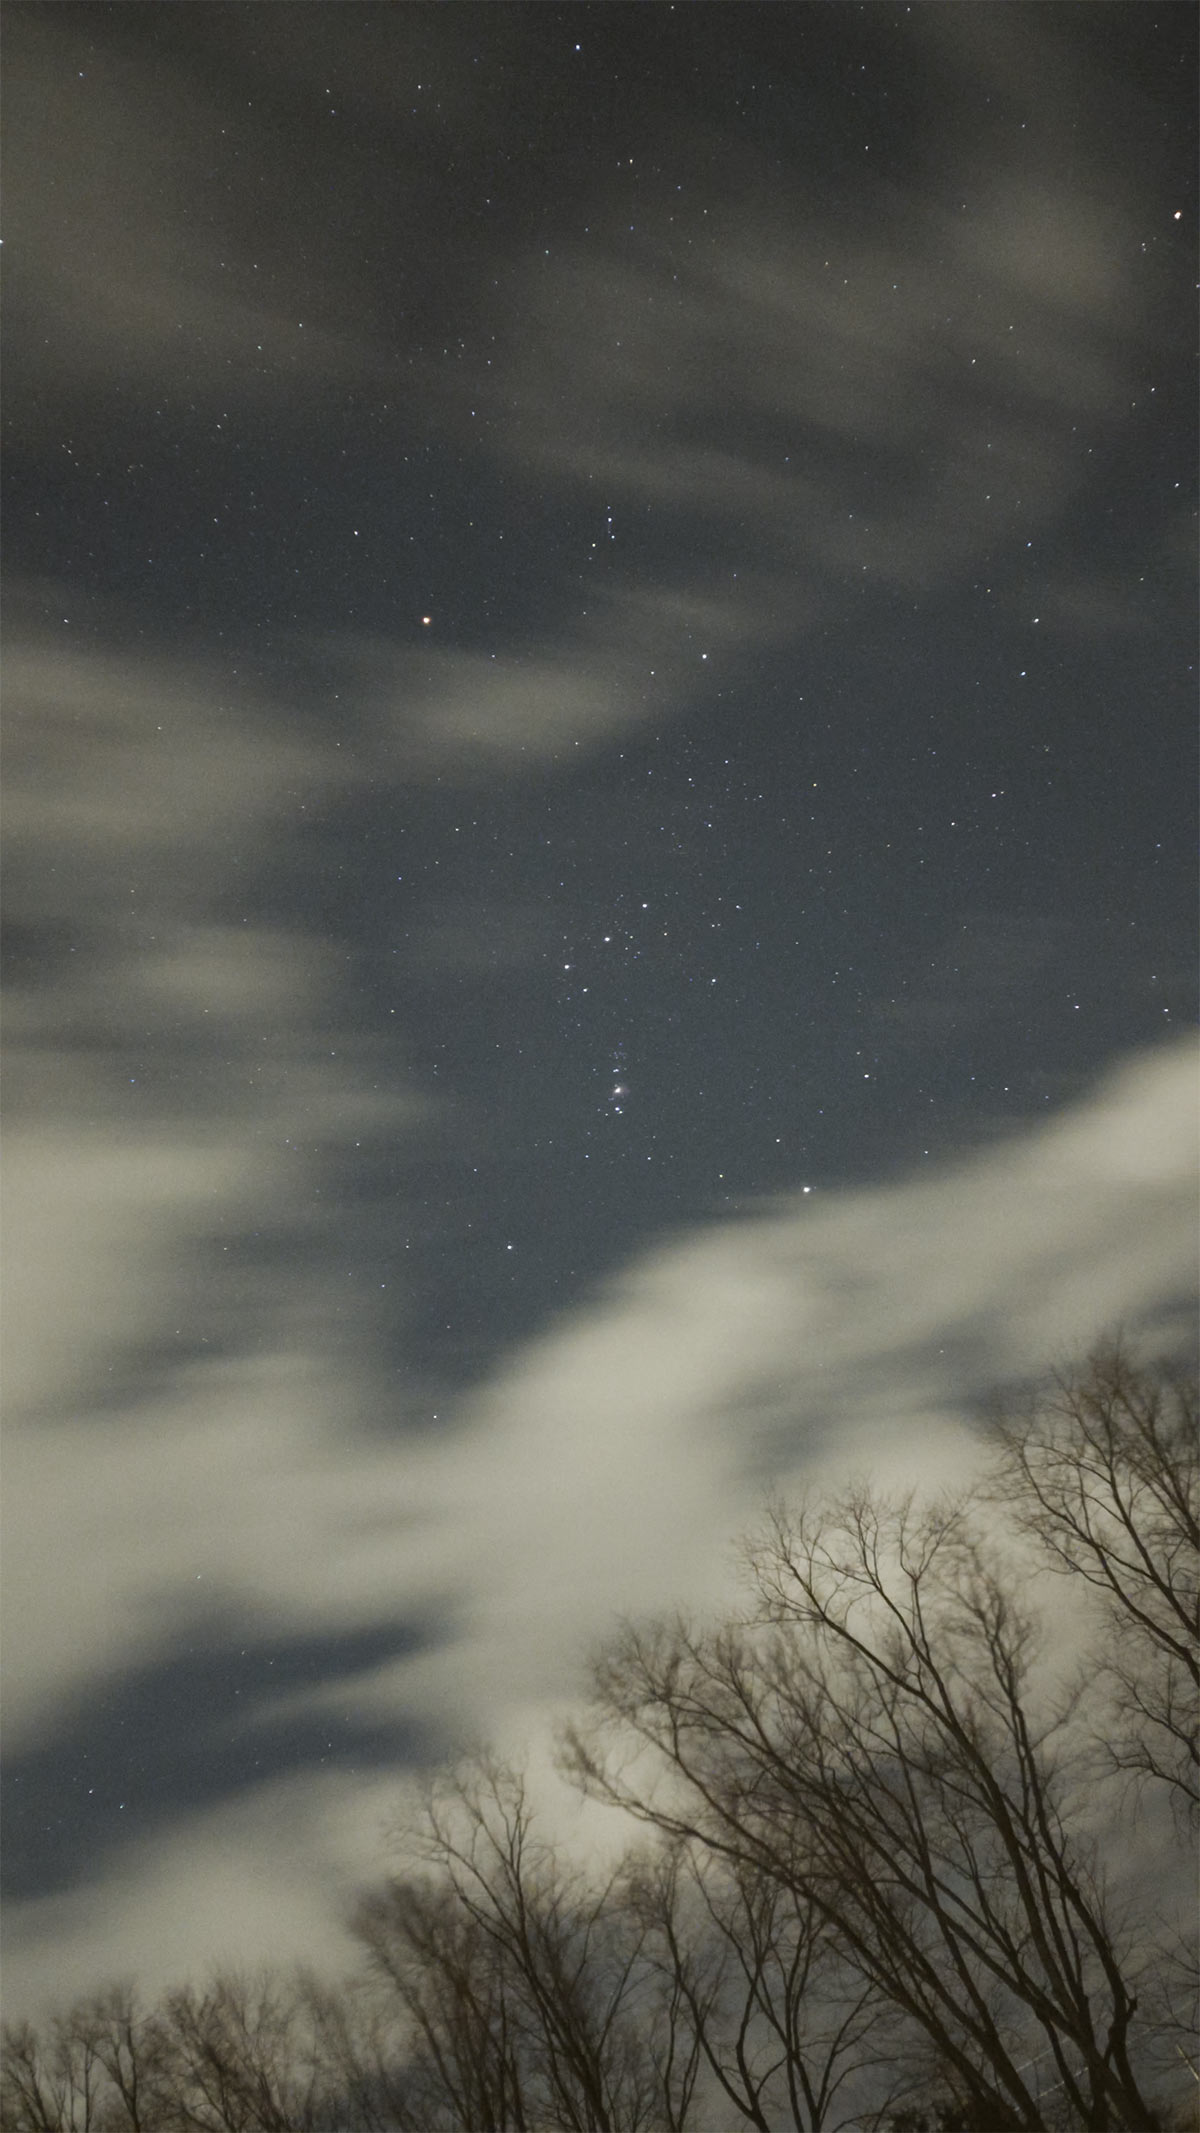
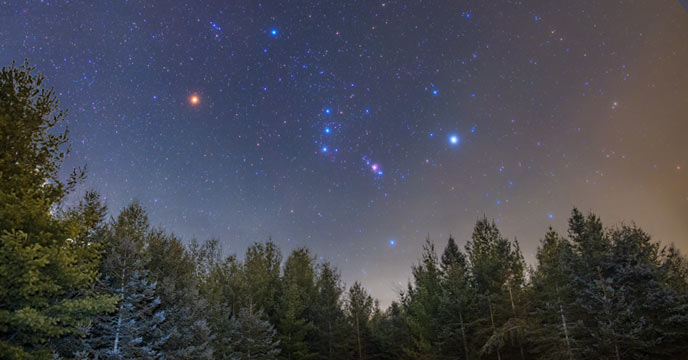
A single frame on the constellation Orion using the ‘Milky Way’ mode on the Seestar S30 Pro.
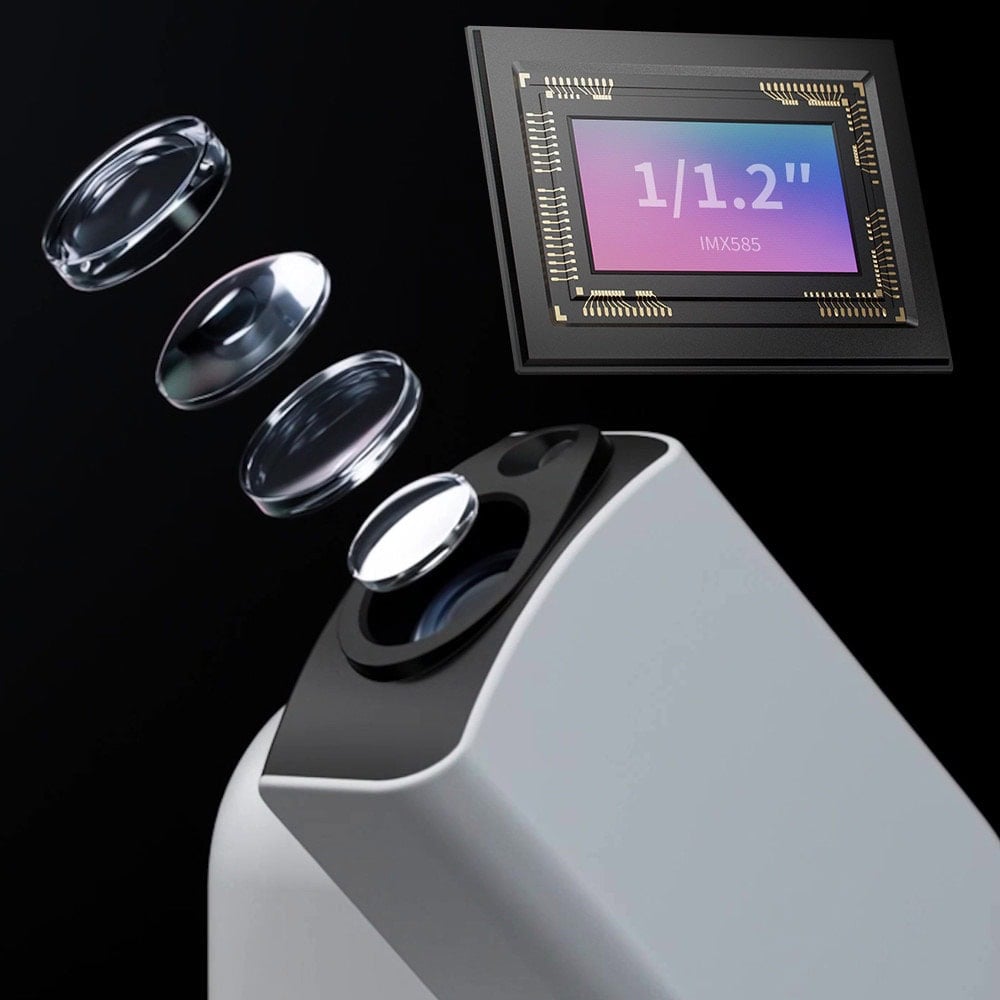
On the hardware side, the S30 Pro features a quadruplet APO refractor paired with a Sony IMX585 sensor – a combination that works exceptionally well.
This is the same sensor used in dedicated astrophotography cameras like the ASI585MC Air, which says a lot about the imaging potential packed into such a small device. The optics are well matched to the sensor, delivering sharp stars from edge to edge. For a 30mm aperture telescope, the image quality is genuinely impressive.
Seestar S30 Pro Additions:
- Equatorial tracking mode support when used on a wedge
- Improved internal stabilization and tracking
- Refined internal filtering for better deep-sky performance
- Expanded imaging modes, including better support for RAW-like data
- Wide-angle Milky Way photography and timelapses
In practice, this means longer effective exposures, cleaner stars across the frame, and better results on emission nebulae from bright skies. It is not just a single feature upgrade; it is the way all of these improvements work together that separates the S30 Pro from the original S30.
| Spec | Seestar S30 Pro | Seestar S30 (Original) |
|---|---|---|
| Primary optics (tele) | 30mm aperture • 160mm focal length • f/5.3 • 4-element APO (ED) | 30mm aperture • 150mm focal length • f/5 • APO triplet (ED) |
| Primary (tele) sensor | Sony IMX585 (1/1.2″) | Sony IMX662 (1/2.8″) |
| Primary (tele) resolution | 3840 × 2160 (8.3MP) | 1920 × 1080 (2MP) |
| Secondary lens (wide-angle) — purpose | Wide imaging (Milky Way/nightscape), plus framing/assist | Framing/positioning assist + daytime scenery (not the main DSO camera) |
| Secondary lens (wide) — focal length | 6mm | Not officially specified (ZWO publishes FOV + resolution, but not focal length) |
| Secondary (wide) sensor | Sony IMX586 | “Color” wide sensor (model not specified in published spec sheets/manual) |
| Secondary (wide) resolution | 3840 × 2160 (8.3MP) | 1920 × 1080 (manual) / 1080 × 1920 (some spec sheets list same array) |
| Secondary (wide) field of view | 63° | 23.2° |
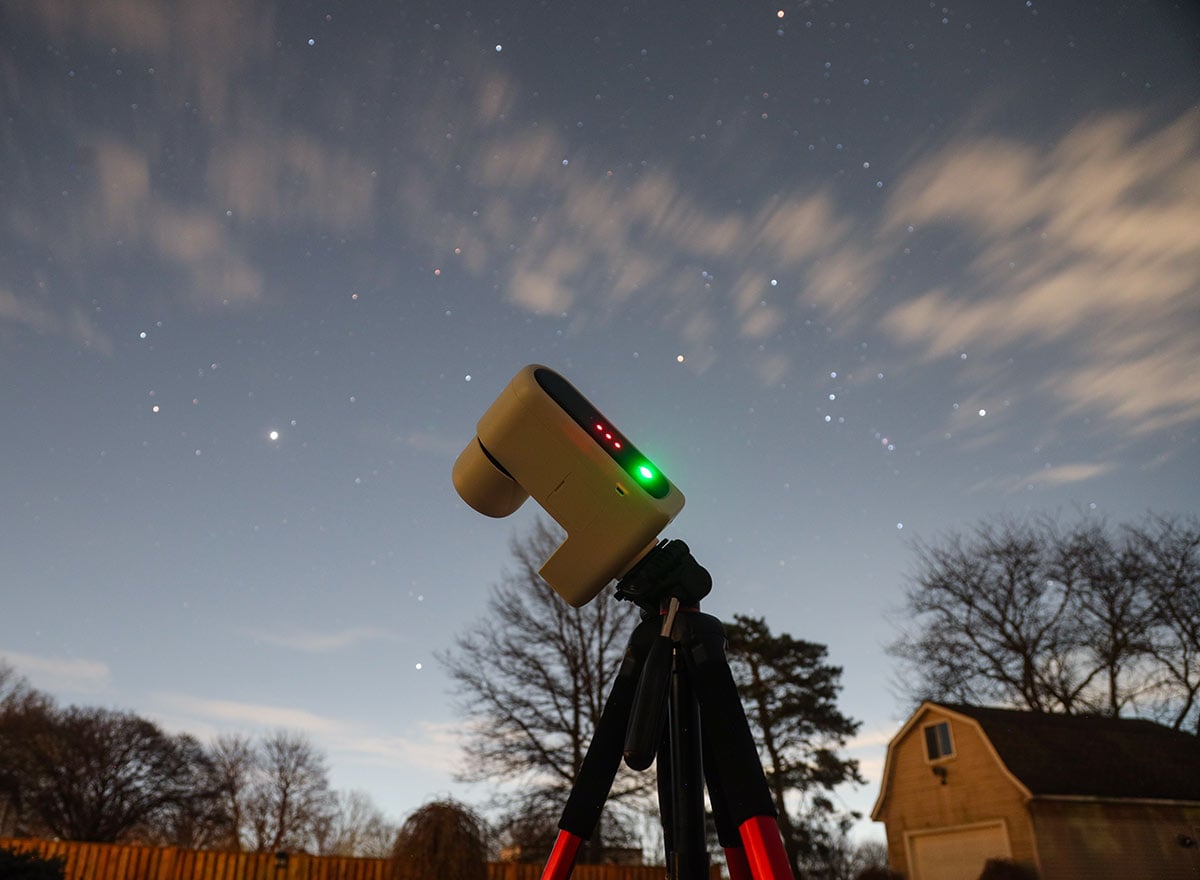
The Seestar S30 pro Tracking the night sky during one of my test sessions.
What’s Included in the Box?
The Seestar S30 Pro arrives in a compact soft case, and I actually prefer that to a hard shell. Soft cases do not protect as much as a hard case, but they are easier to live with. Most importantly, they actually get used, which matters a lot for a grab-and-go instrument.
If something is easy to grab on the way out the door, you end up using it more, and that is where smart telescopes really shine.
Inside the case you will find:
- The Seestar S30 Pro smart telescope
- A compact metal tabletop tripod
- A USB-C cable for charging and file transfer
- An included solar filter
Unlike the DWARF Mini, the S30 Pro includes a tripod, and it’s one of the most overbuilt tabletop tripods I’ve seen. It is solid, metal, compact, and totally fine for casual use and quick imaging sessions. It’s excellent for portability, but it sits quite low, so good sky clearance is important.
For serious deep-sky imaging, especially if you plan to use equatorial mode, a sturdier tripod with a solid head will make a noticeable difference in stability and sharpness.
Telescope Optics: Telephoto and Wide-Angle
At the heart of this telescope is a 30 mm main aperture and a 160mm focal length optical system. The sensor is the Sony IMX585, which is a proven performer in astrophotography. The optics are a quadruplet design, aimed at keeping stars round and well corrected across the frame, even with a relatively wide field of view.
This matters because wide-field smart telescopes often struggle with star shape at the edges, especially when pairing a larger sensor with optics that cannot fully correct the field. With the Seestar S30 Pro, ZWO is clearly aiming for better correction from corner to corner while still keeping the scope small, light, and realistically priced.
The Seestar S30 Pro uses two cameras:
- A main longer focal-length telescope camera for deep-sky objects, the Moon, planets, and the Sun
- A wide-angle camera for Milky Way shots, meteor showers, aurora, and sky monitoring
The wide-angle camera uses an IMX586 sensor, also capable of 4K capture. This secondary camera is incredibly useful, whether you’re scouting the sky, monitoring clouds, or experimenting with wide-field imaging.
The telescope automatically chooses which camera to use based on the selected mode. You do not have to think about it; you just choose the target, and the system handles the rest.
The Seestar App Experience
The app experience is exactly what you want from a modern smart telescope.
You power on the scope, open the app, connect, and you are basically ready to go. There is even NFC pairing, so you can tap your phone to start the connection.
There’s no polar alignment required in standard mode, no manual focusing, and no star hopping. This “point-and-shoot” approach is ideal for beginners.
Once connected, you simply pick a target from the catalog and let the scope do its thing.
Picking a Target and Letting It Run
Let us say you choose the Orion Nebula, which is an ideal target for a smart telescope. The app shows its altitude and direction, which is genuinely useful when you are dealing with trees, buildings, or a balcony.
You tap “Go,” and the Seestar S30 Pro slews to the target, calibrates, autofocuses, and starts stacking short exposures, usually around ten seconds at a time (by default). If a frame has tracking issues, wind shake, or star trailing, it is automatically rejected. You do not have to babysit any of this; the scope manages frame quality in the background.
One of my favorite aspects is that you do not need to keep the app open. Processing happens inside the telescope, not on your phone. You can walk away, come back later, and see how the image has improved while you were inside. On cold nights or busy evenings, that is a huge quality-of-life improvement.
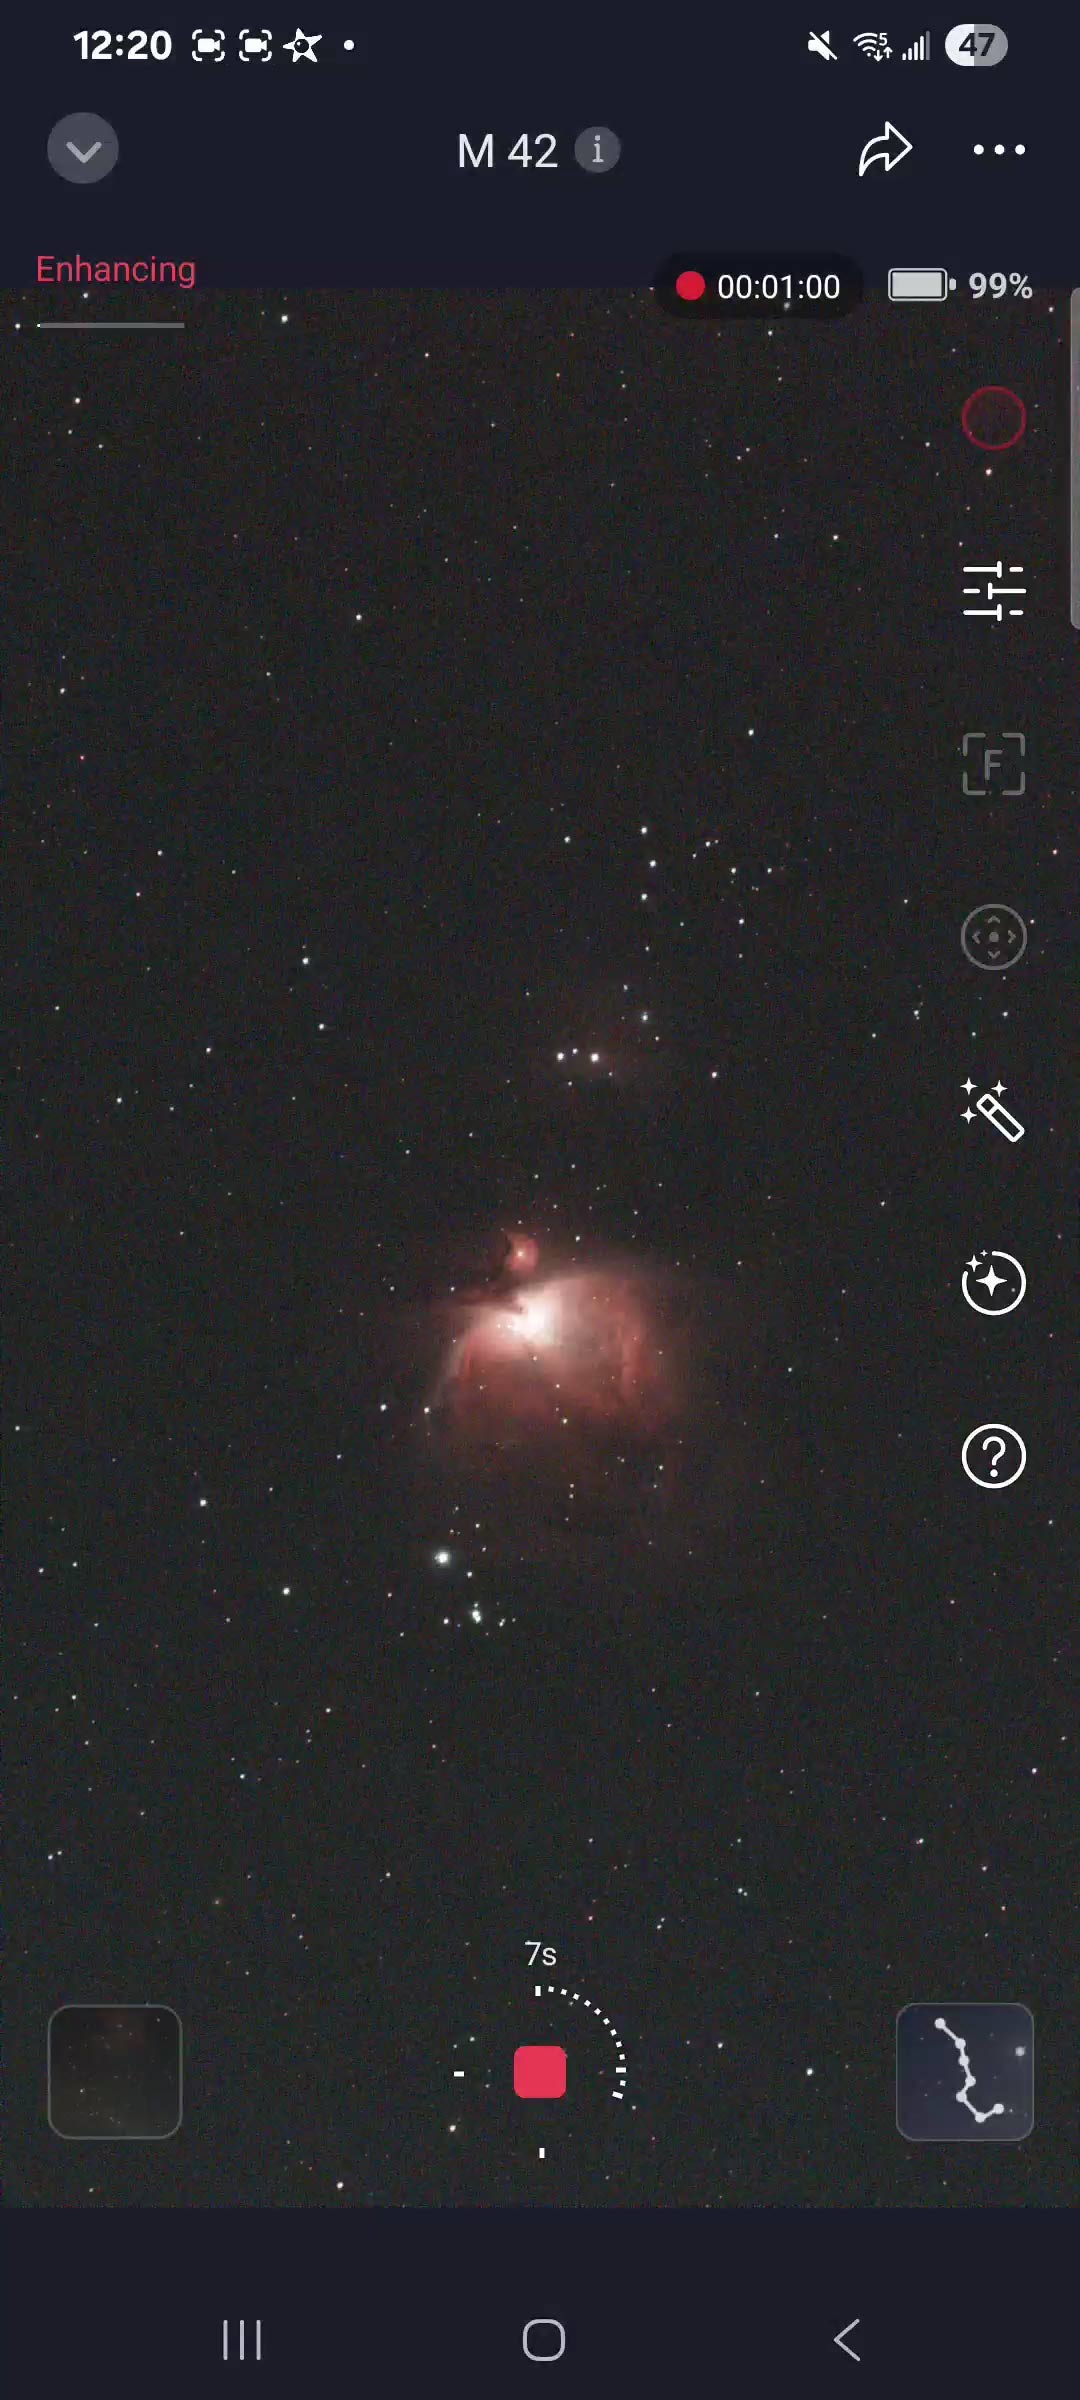
Capturing the Orion Nebula in deep-sky imaging mode with the light pollution filter (dual band) in place.
Plan Mode and Mosaic Mode
The Seestar S30 Pro includes a ‘Plan mode’ that can automate an entire night of imaging. You build a schedule with one target after another, start the plan, close the app, and check back later to see your progress. It is incredibly convenient and one of the reasons these systems are so fun and easy to use.
One thing I would love to see improved is per-target exposure control inside ‘Plan mode’. Right now, you cannot change exposure length depending on the object, which would be especially helpful when switching between galaxies and bright emission nebulae. Even so, ‘Plan mode’ is extremely useful as it is, and I use it regularly.
‘Mosaic mode’ is another powerful feature. The Seestar S30 Pro can automatically create mosaics of larger nebulae, such as the Rosette or North America Nebula. Mosaics take longer to complete, but they increase final resolution and give you more flexibility in framing wide, detailed compositions.
Filters, File Formats, and Data Handling
The S30 Pro includes built-in UV and IR cut filters inside the optical train, as well as a dual-band-style filter optimized for emission nebulae. Because the system is closed, you cannot add external filters, which is expected for this category of smart telescope.
The good news is that the internal filters are well tuned for light-polluted city skies, especially for nebulae where filtering and stacking pay off very quickly.
For data formats, the Seestar S30 Pro supports saving FITS files in its deep-sky imaging modes. That means you can capture data with the telescope and then stack it using the image-stacking software of your choice (I use PixInsight most often).
Some modes still save JPEGs or video formats, depending on the target and mode, but the main astrophotography modes support RAW-like data for serious editing.
Internal storage is limited (128 GB) but reasonable for several full imaging sessions. FITS files and video clips can fill that space quickly, so you need to manage them. The easiest approach is to transfer your data after each session instead of letting it accumulate on the internal storage.
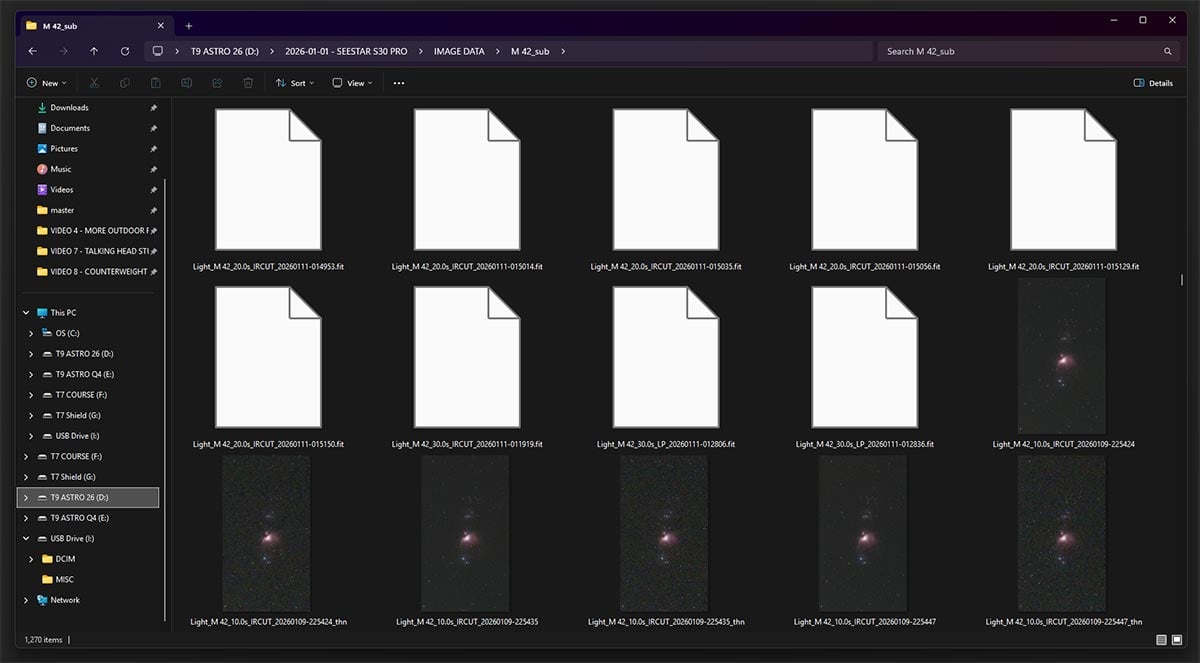
Tip: For the best possible image quality, be sure to stack the FITS files captured by the Seestar S30 Pro. Stacking improves detail, reduces noise, and gives you far more control over the final look than the built-in JPEG.
Solar Imaging with the Seestar S30 Pro
The Seestar S30 Pro includes a solar filter, and solar imaging is genuinely fun with this setup.
The scope uses a secondary wide-field lens as a solar finder. At first glance, it looks like the solar filter blocks that lens entirely, but the black area is actually slightly transparent, allowing the system to locate the sun safely for alignment. This makes solar centering quick and easy, even for complete beginners.
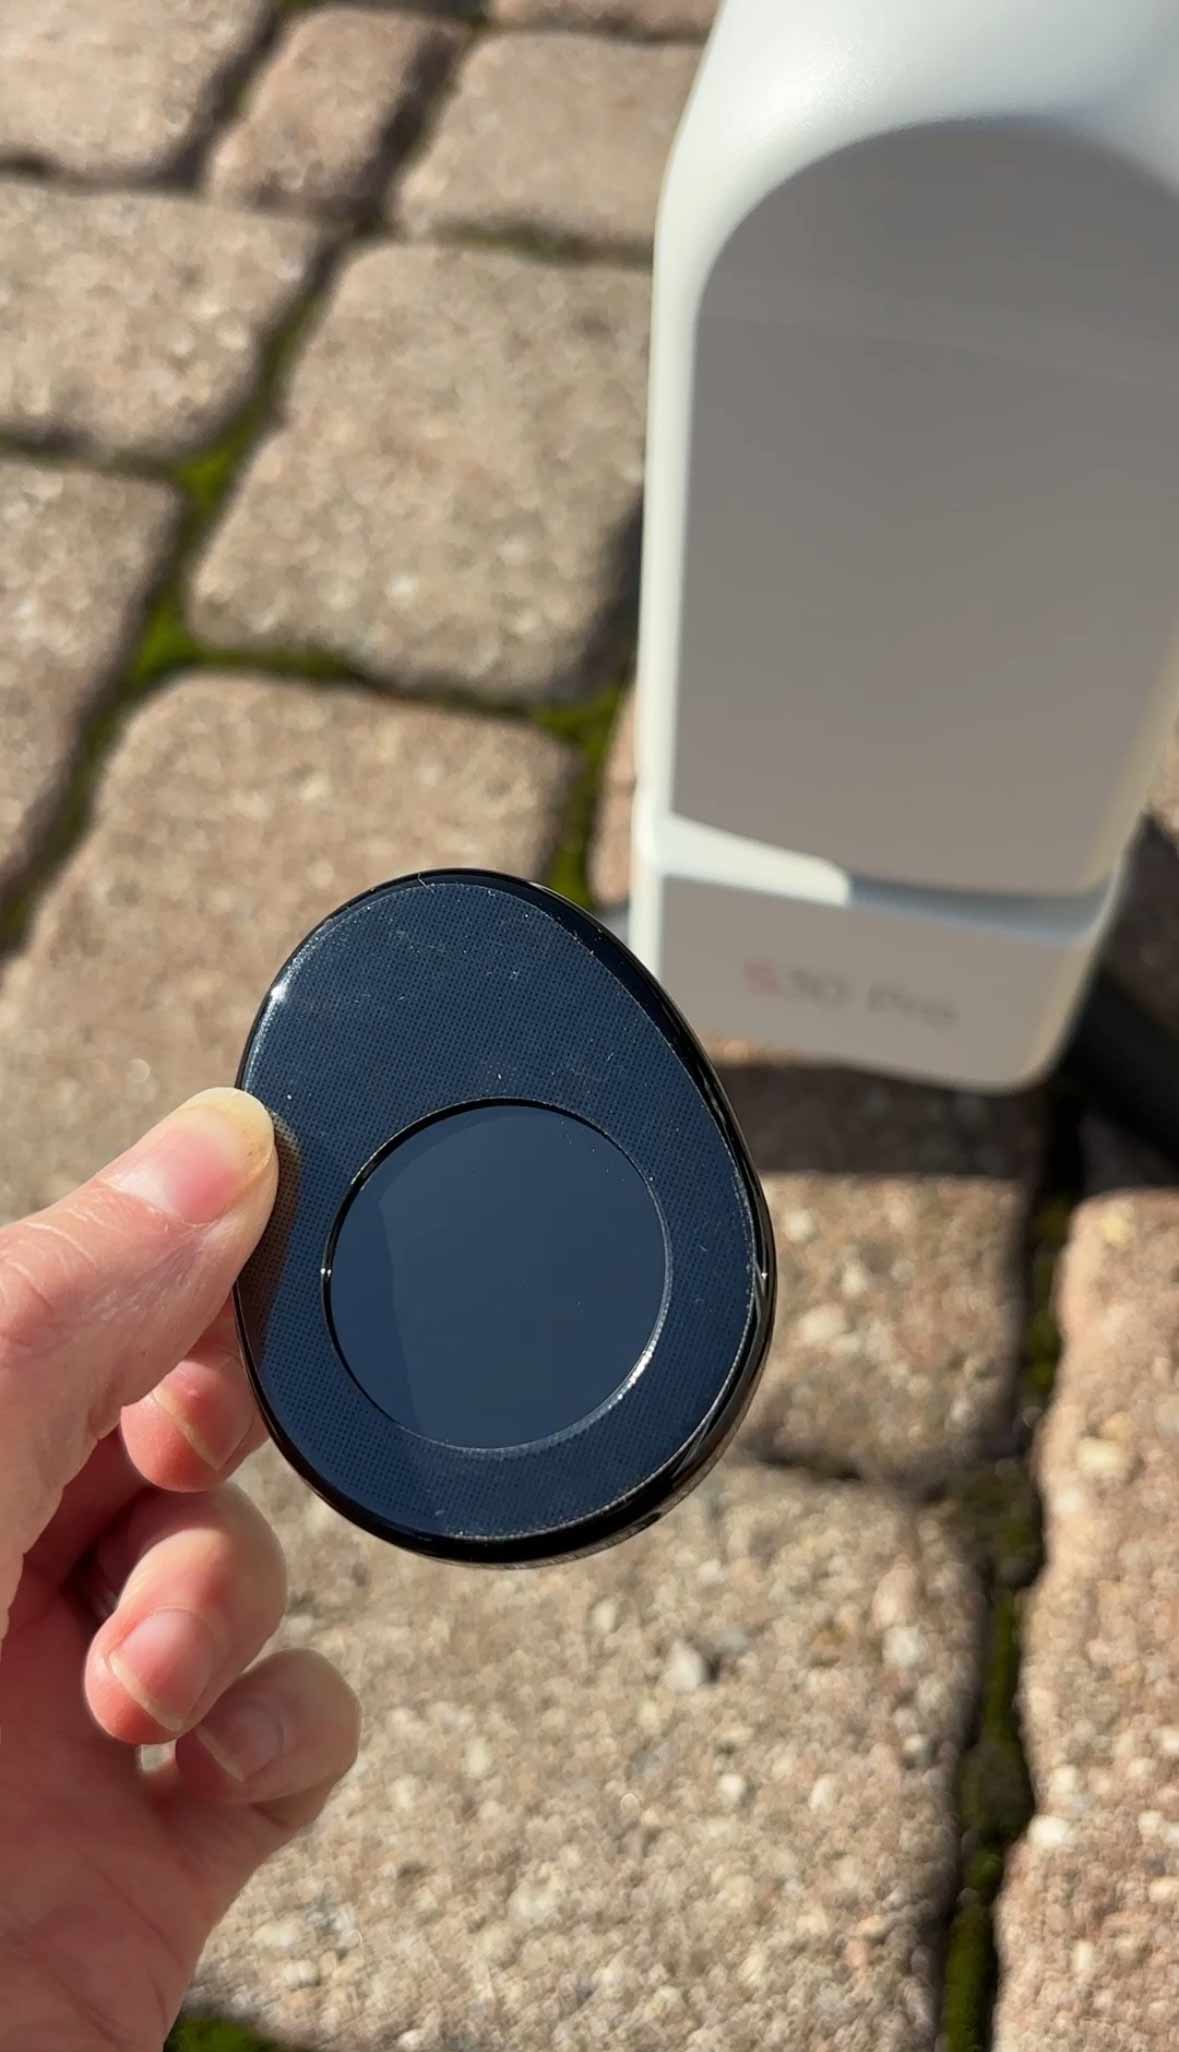
Seestar S30 Pro solar filter
Solar performance is about what you would expect from a short focal length system. At the native focal length, the sun appears relatively small in the frame, which is the trade-off for such a wide, versatile field of view.
If you want more detail, you can zoom in digitally, capture raw video, and process it later. It is a fun extra mode that adds versatility, but deep-sky imaging is still the main focus of the S30 Pro.
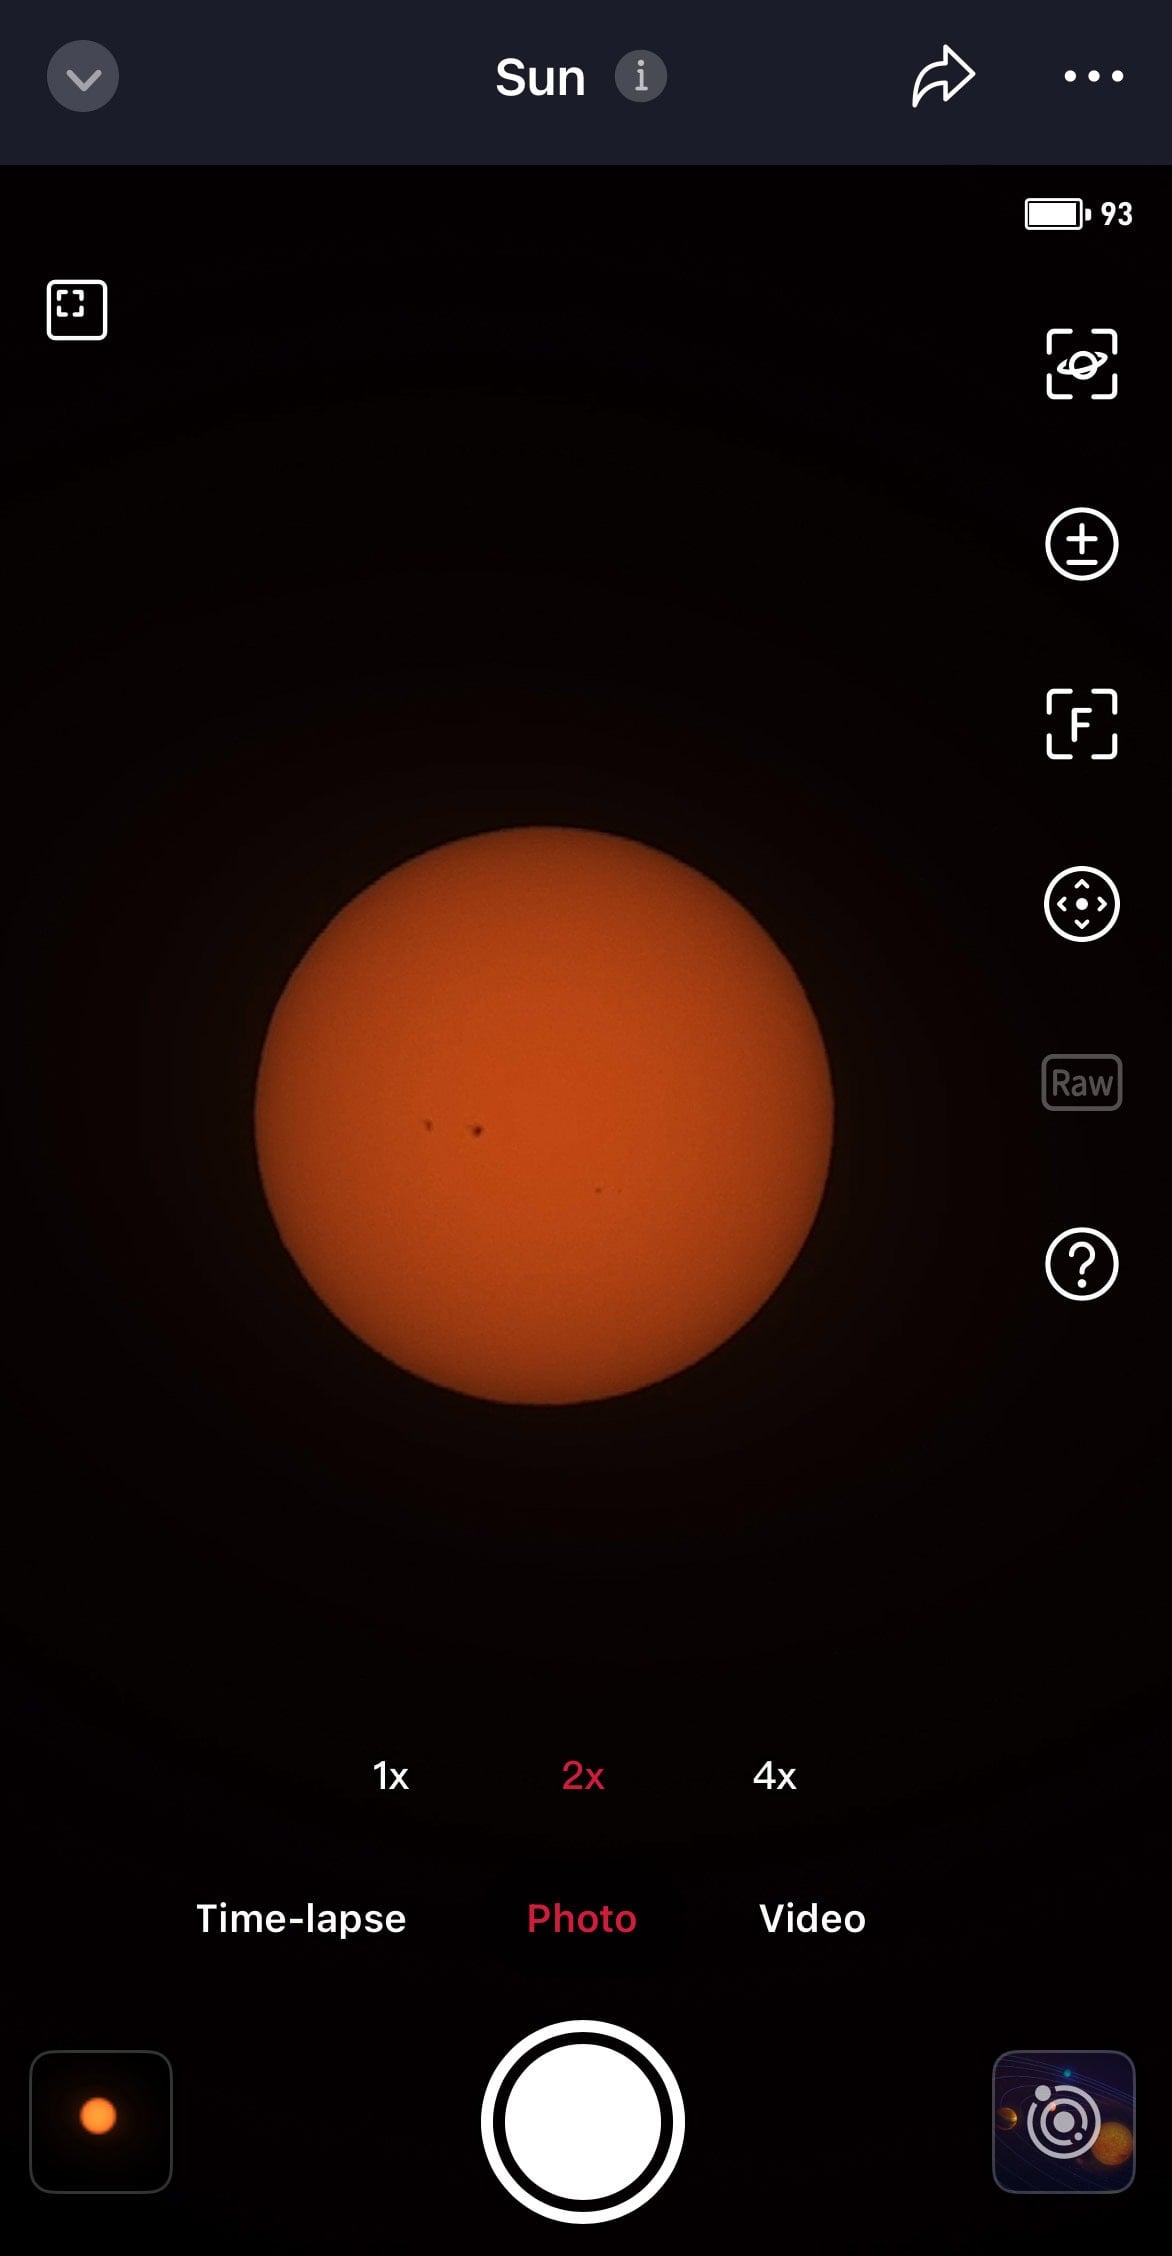
Solar Imaging S30 Pro Interface – Sun at 2X zoom
Real-World Performance under Light-Polluted Skies
I tested the Seestar S30 Pro over several sessions from my light-polluted backyard in the city.
There was heavy sky glow, bright light pollution, and even some moonlight on a few nights. This is exactly the kind of environment where smart telescopes either fall apart quickly or prove their worth.
Many users report strong performance from Bortle 7-9 locations on emission nebulae, and my experience lined up with that quite closely.
If a scope can do something meaningful under these conditions, it is a very good sign. Usually, that also means it will perform even better from darker suburban or rural skies.
Andromeda
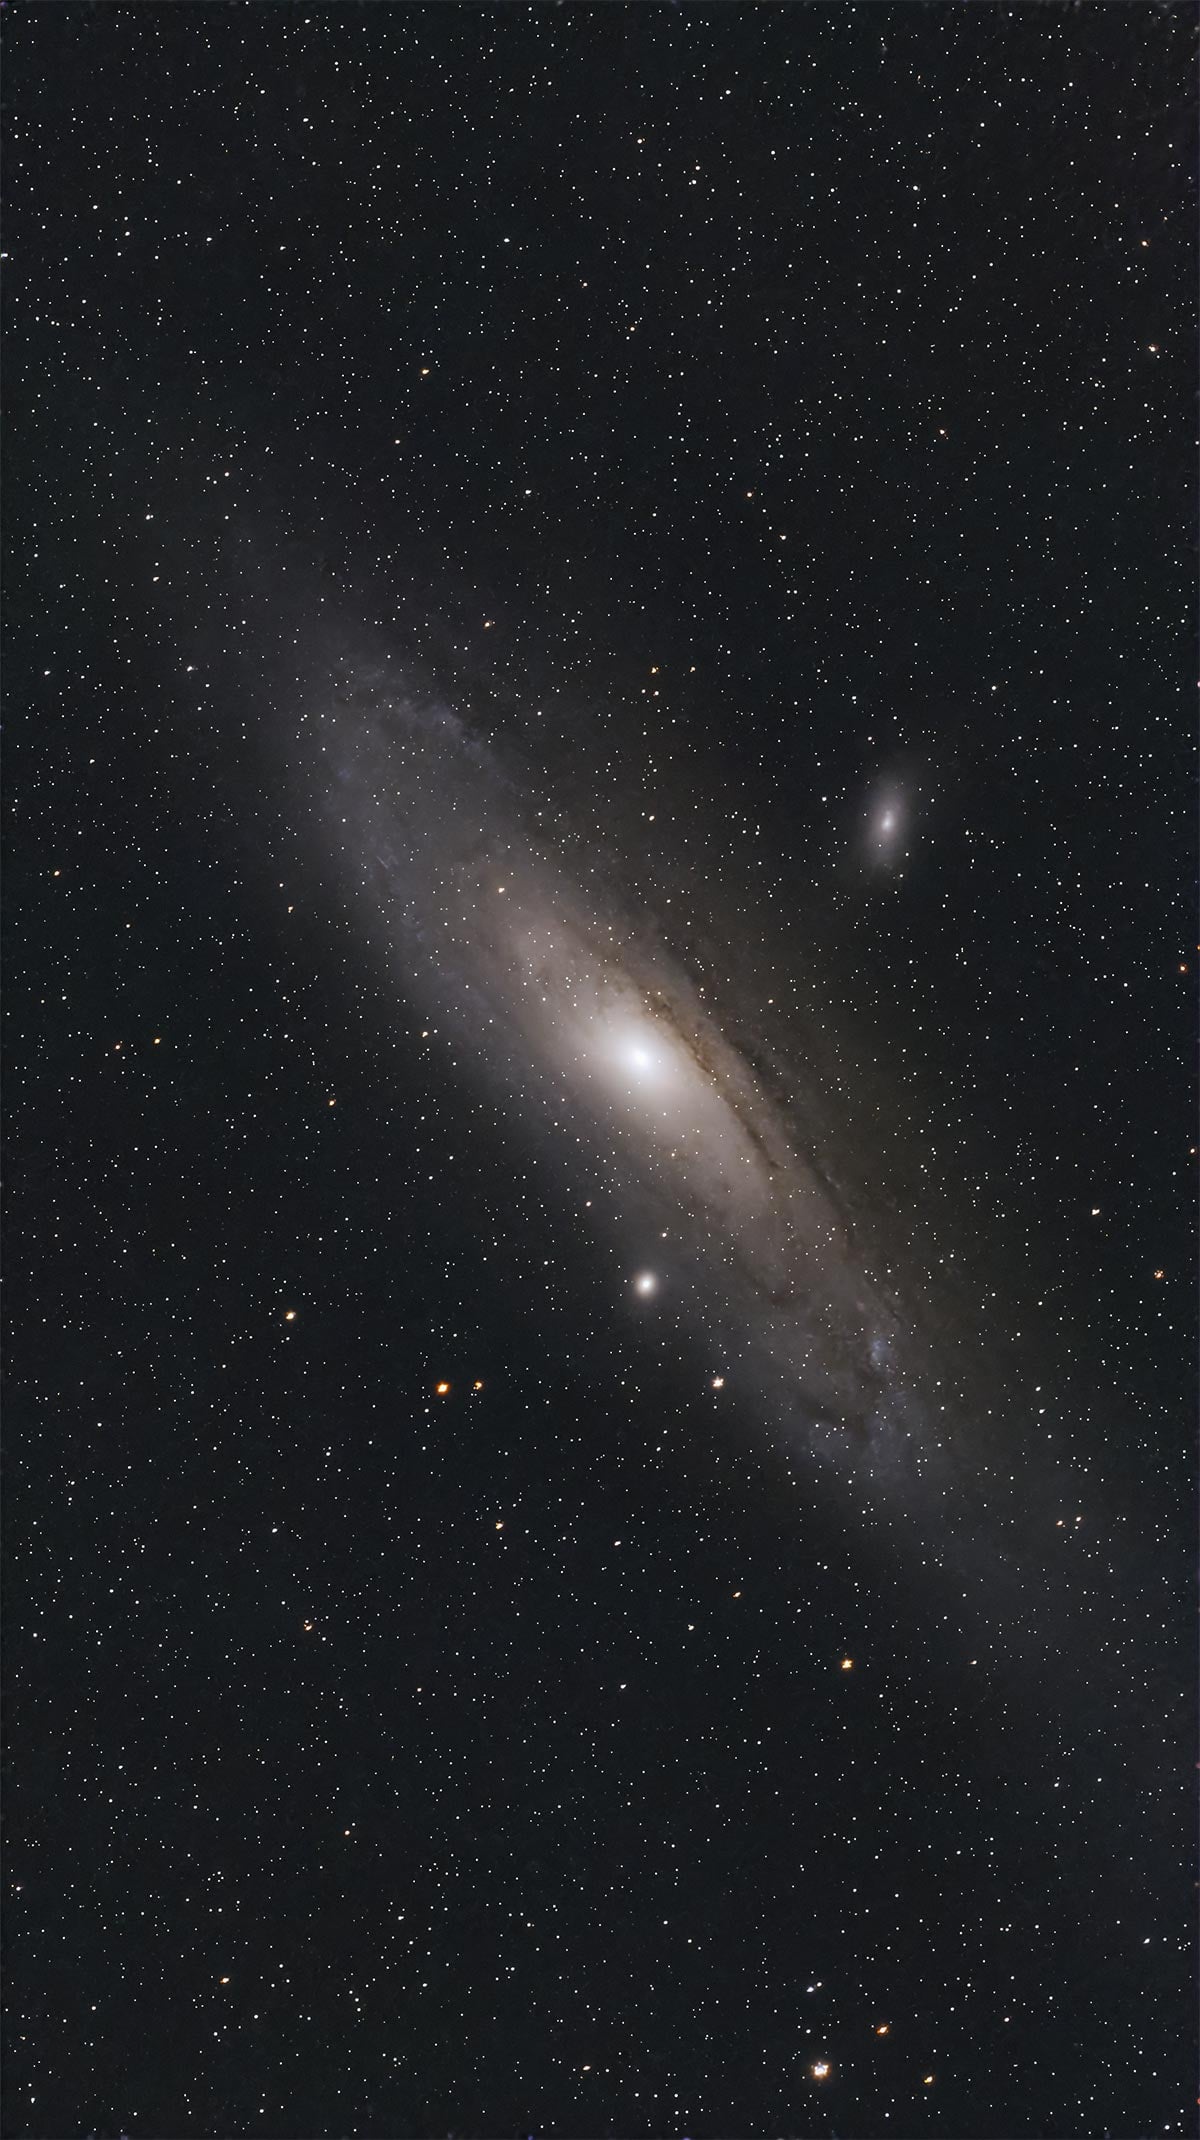
The Andromeda Galaxy using 30-second exposures in EQ mode (44 minutes total).
Orion Nebula
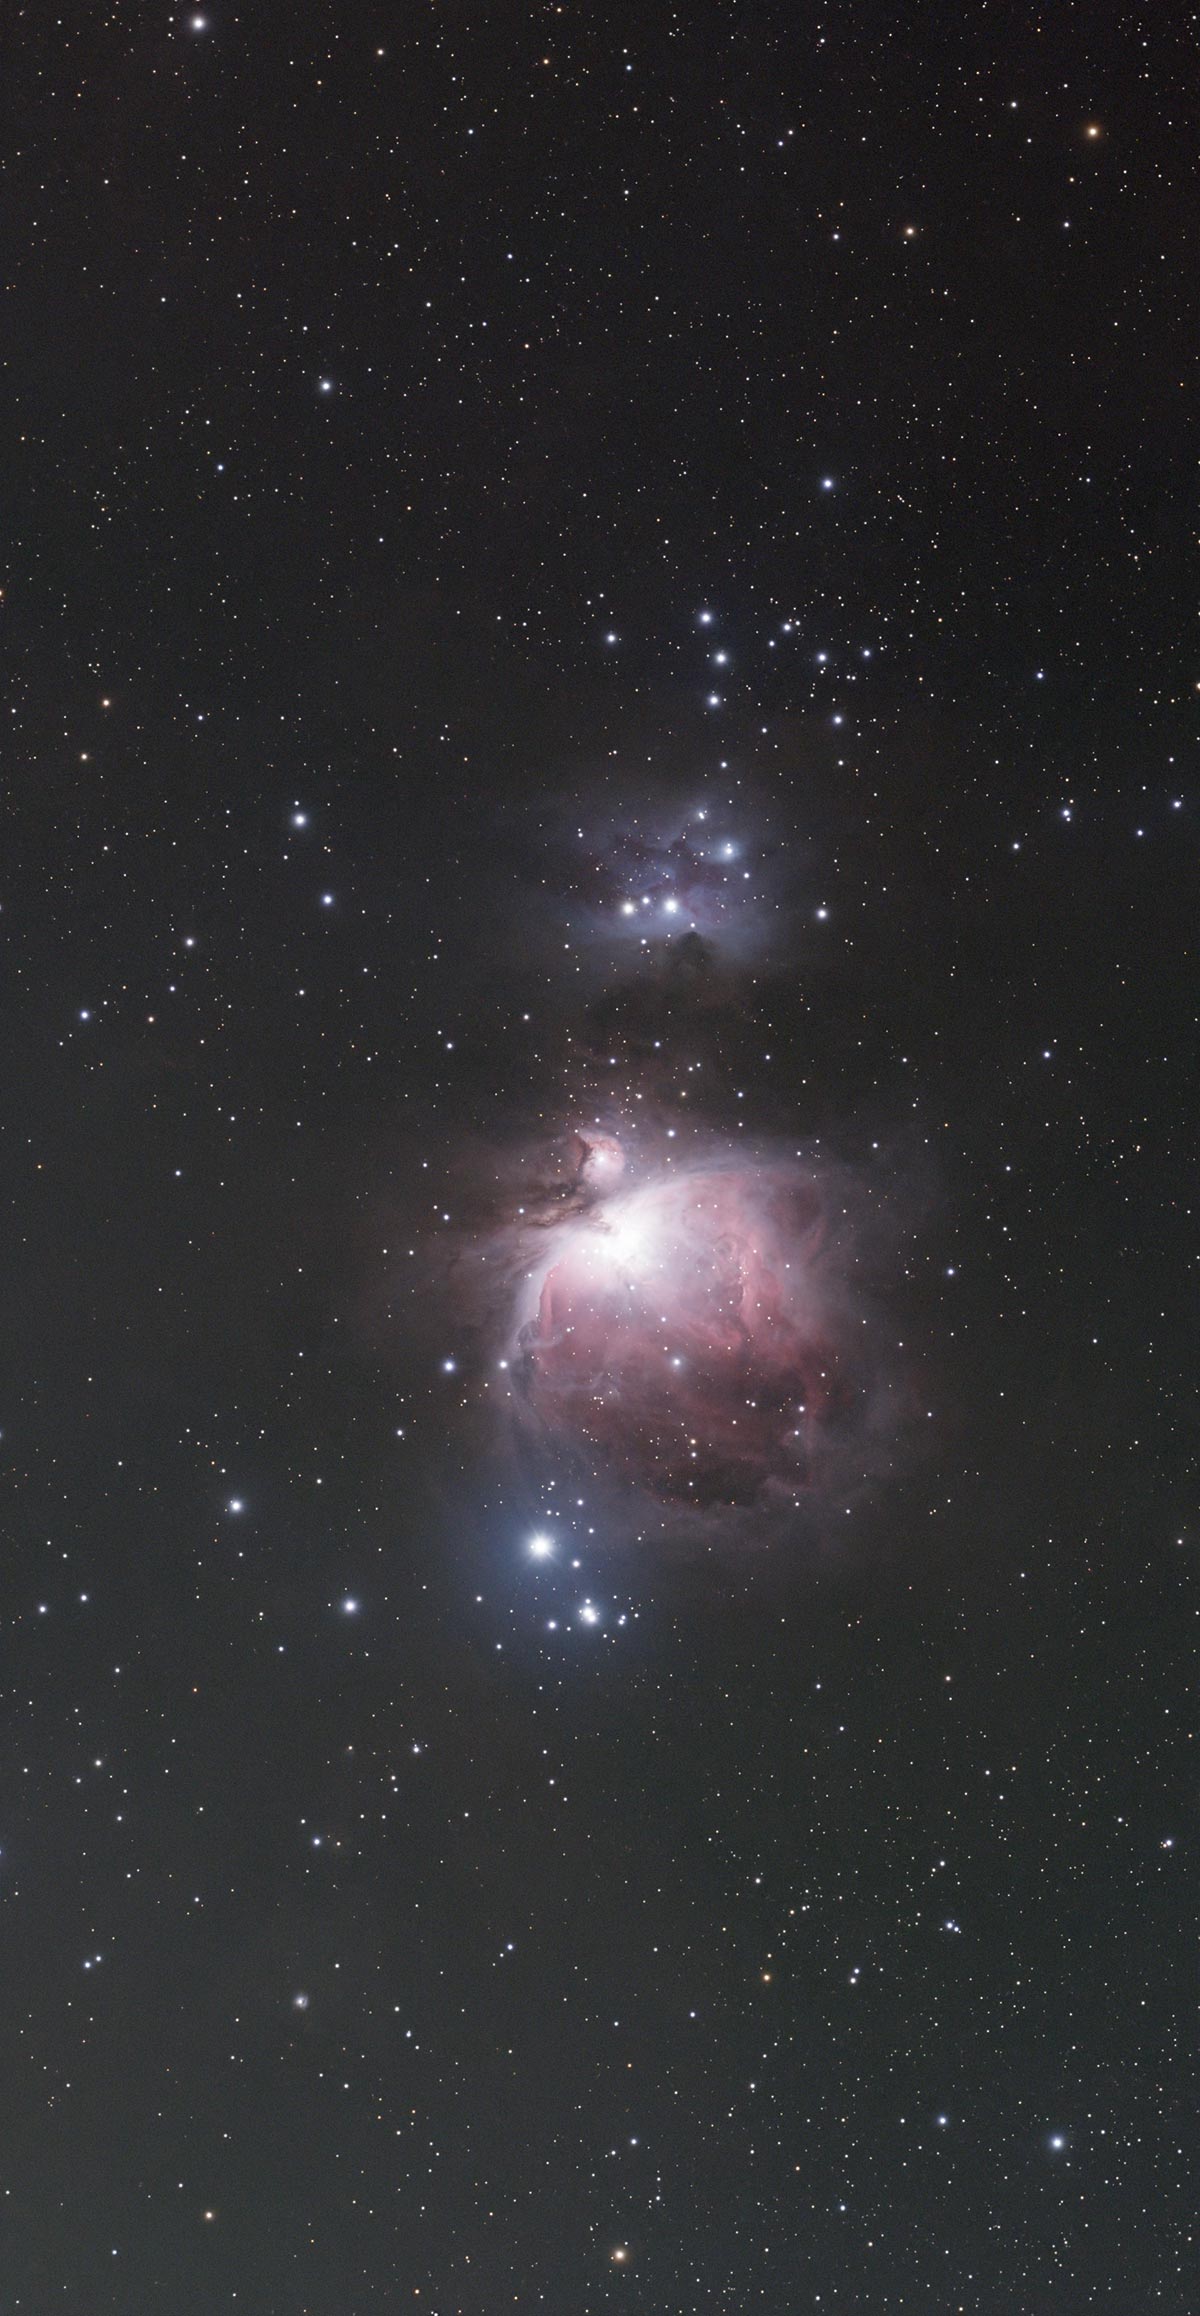
The Orion Nebula using 10-second exposures in Alt-Az (standard tracking) mode. 100 x 10-seconds total.
Seagull Nebula
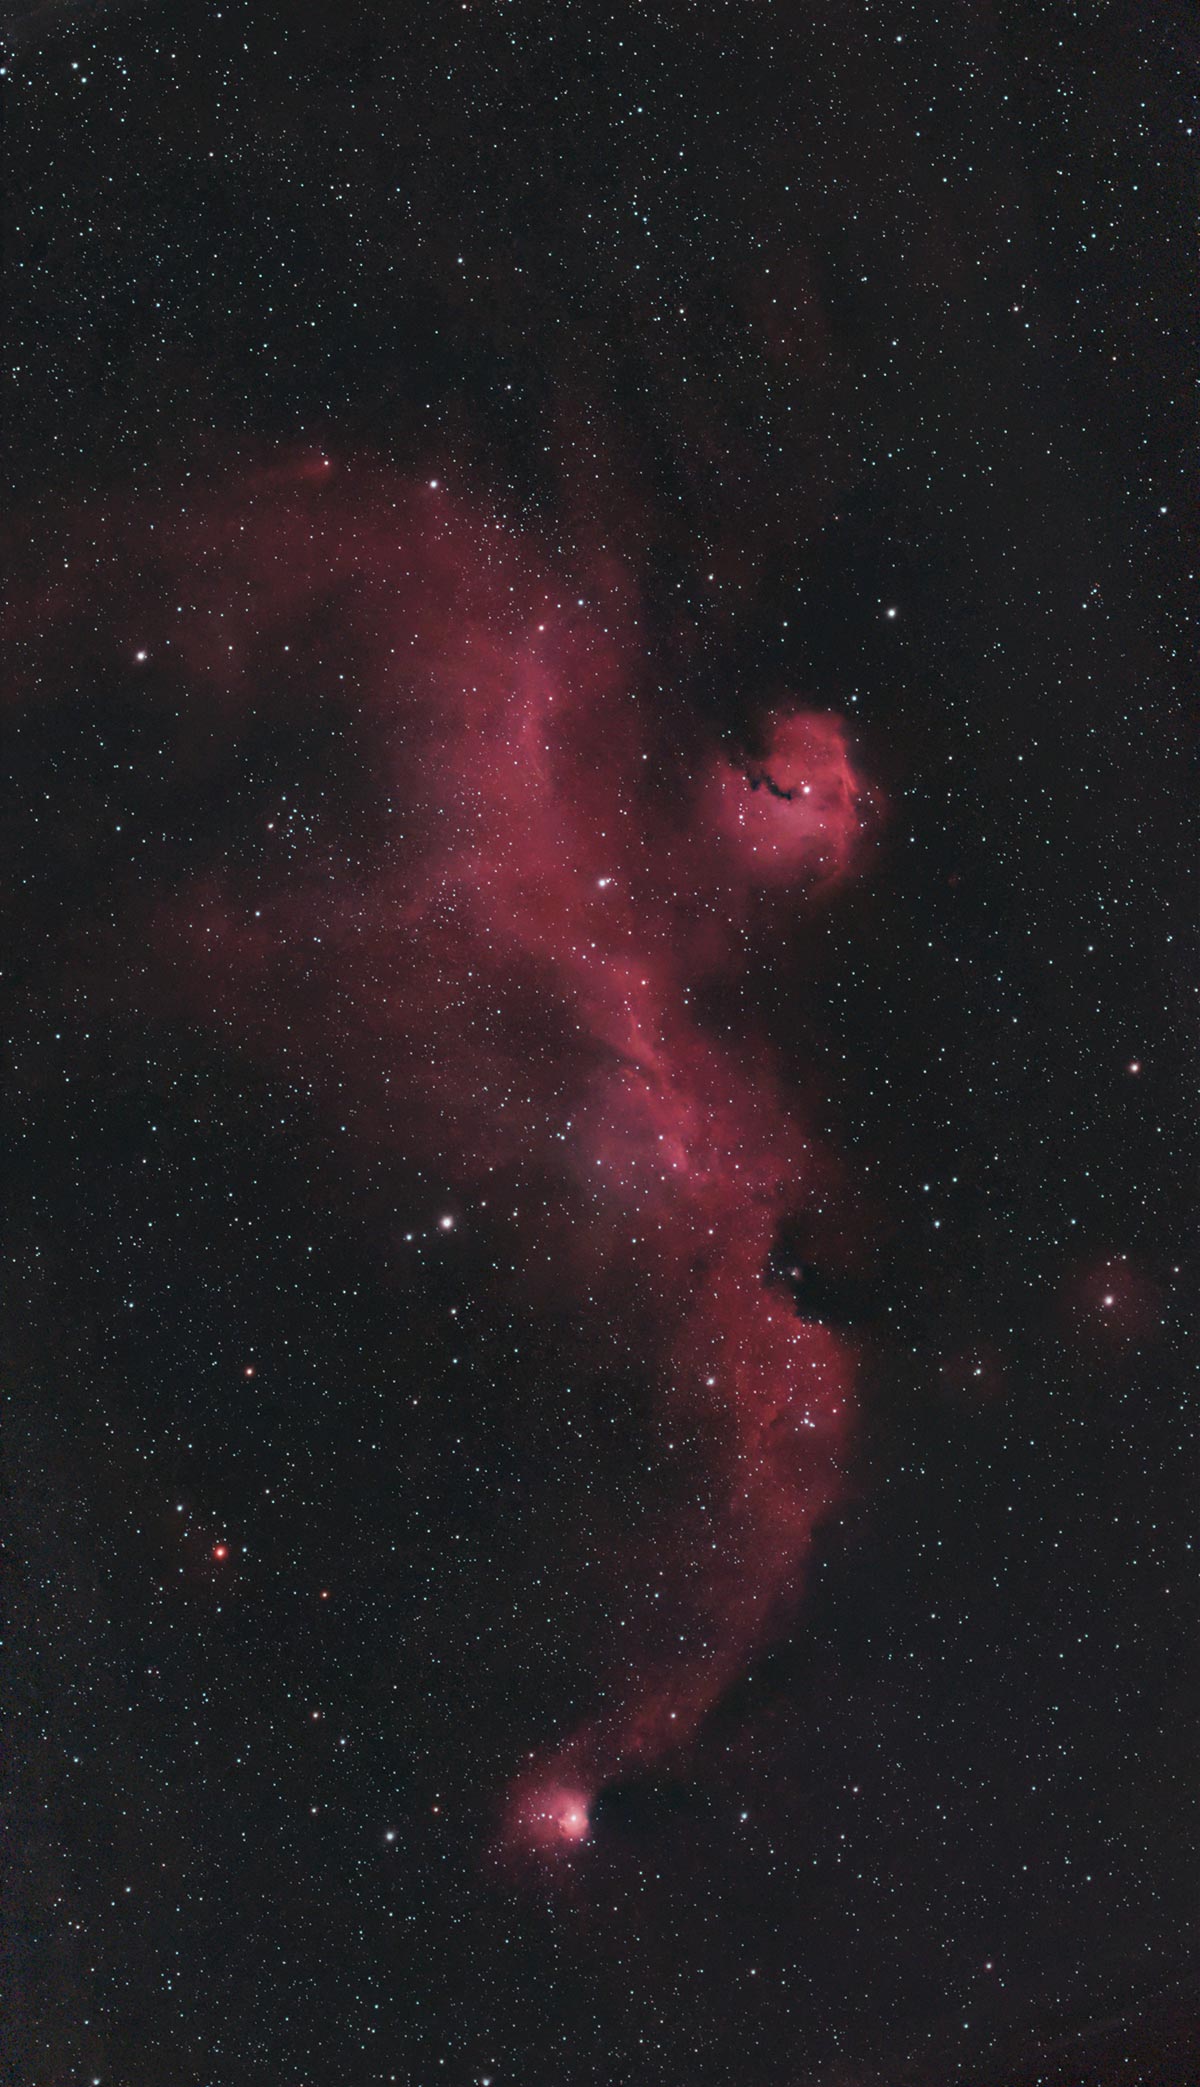
The Seagull Nebula using standard tracking mode and 10-second exposures (1.5 hours total exposure).
Monkey Head Nebula

The Monkey Head Nebula using EQ tracking mode and 30-second exposures (2 hours total exposure).
Alt-Az vs Equatorial Tracking Mode
In standard alt-az mode, the Seestar S30 Pro already does a great job delivering quick, usable results. Short exposures, high frame retention, and rapid stacking mean you can get a presentable image surprisingly fast.
The real upgrade appears when you switch over to equatorial tracking mode using a wedge. The Seestar S30 Pro supports equatorial tracking when paired with a suitable wedge and a stable tripod. Once you are polar aligned, you can expect improved star shape, less field rotation, and longer usable exposures.
With equatorial mode enabled and everything set up correctly, I was able to use 60-second exposures successfully, which is the maximum allowed. The success rate was around 90 percent overall. That is a big deal for a telescope this small and reduces field rotation artifacts significantly, especially on faint deep-sky targets.
Battery Life and Power Management
Battery life is another strong point.
Real-world use tends to average around five to six hours on the internal battery, depending on temperature and imaging mode. That is enough for a typical evening session without worrying too much about power.
If you want to run longer sessions, the Seestar S30 Pro can operate while connected to a USB power bank. This makes it easy to extend your imaging time without a complicated power setup.
Seestar S30 Pro vs DWARF Mini
When comparing the DWARF Mini to the Seestar S30 Pro, you’re looking at two very different takes on the “smart telescope” concept.
The DWARF Mini excels in portability and simplicity – it’s incredibly light, easy to pack for travel, and offers dual-camera monitoring (so you can see the wide-field view while the primary camera stacks), which is a feature not currently available on the S30 Pro.
It’s a great choice if you want something ultra-compact that’s all about wide-field views, skyscape shots, and casual deep-sky imaging without a lot of setup.
The Seestar S30 Pro, on the other hand, packs much more imaging power with its larger IMX585 sensor, larger overall sensor coverage, expanded imaging modes (including Milky Way and timelapse), and longer effective focal length – making it better for higher-resolution deep-sky targets and serious backyard imaging.
In short: pick the DWARF Mini if ease of use and portability matter most, especially for travel and quick sessions; choose the S30 Pro if you want bigger, sharper deep-sky images and more advanced features in a still fairly portable package.
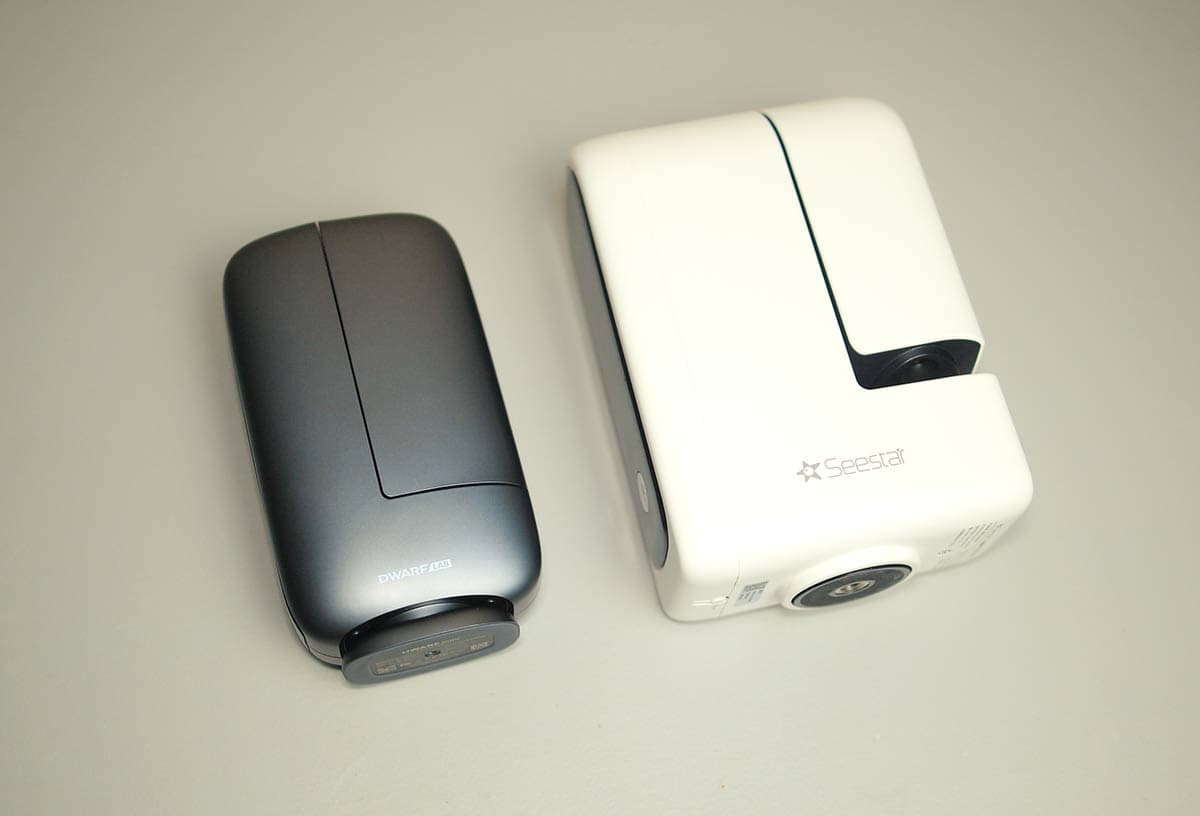
The DWARF mini is substantially smaller and lighter than the S30 Pro.
Limitations and Things I Would Improve
No smart telescope is perfect, and the Seestar S30 Pro has a few areas that could be improved in future updates.
No Option for Simultaneous Dual-Camera View
The Seestar S30 Pro includes a secondary wide-field camera, which is genuinely useful for surveying the sky, watching cloud cover, and getting a broader sense of what’s happening around the telescope. However, once a deep-sky imaging session is running with the main telescope, the app doesn’t allow both camera views to be active at the same time.
If you try to switch from the main imaging view to the wide-angle camera during an active session, the app asks you to confirm that you want to stop imaging. In practice, this means you have to choose one camera or the other, there’s no true dual-view mode.
This isn’t a deal-breaker by any means, but it is something you notice if you’ve used smart telescopes that allow simultaneous camera monitoring.
With dual-camera monitoring, you can:
- Spot clouds rolling in before they ruin a long integration
- See trees, rooftops, or obstructions creeping into the tracking path
- Keep an “all-sky” view while the main camera continues stacking
On models like the DWARF 3 and DWARF Mini, the wide-field camera stays accessible while the telescope is imaging. Once you’ve experienced that setup, it’s surprisingly hard to give up. It lets you catch problems early instead of discovering them after you’ve already invested a lot of time.
With the S30 Pro, you lose that passive awareness of what’s happening in the sky. In variable conditions with thin clouds or nearby obstructions, sessions can feel a bit more “set it and hope” than they need to be.
From a hardware standpoint, both cameras are already built into the system, so there’s at least some hope this could be addressed in a future app update.
Other Minor Limitations Worth Noting
While the dual-camera behavior stood out the most during testing, there are a few other smaller areas where the S30 Pro could improve with future updates.
- Star sharpness and autofocus: the quadruplet optics and IMX585 sensor deliver a clean, well-corrected field overall, but star sharpness can sometimes look a bit soft. This feels like an area where autofocus refinements in future firmware could squeeze out even more performance.
- Plan mode exposure control: being able to set different exposure lengths per target inside a plan would make the automation even more powerful, especially when mixing galaxies and bright nebulae.
- Closed filter system: you cannot add external filters, which is expected for this type of device, but advanced users may still wish for more flexibility.
- Internal storage management: FITS and video files fill the internal storage quickly, so regular data transfers are essential. It works fine in practice, but it is something to keep in mind.
Seestar S30 Pro FAQ
Q: Can you use the Seestar S30 Pro from a light-polluted backyard?
A: Absolutely. The S30 Pro performs very well under light-polluted suburban skies. The built-in dual-band nebula filter helps isolate emission nebulae, and the live stacking approach allows you to build up signal over time. While dark skies will always improve results, this telescope is very capable from a typical backyard location.
Q: Does the Seestar S30 Pro require internet access to work?
A: No. Once the app and firmware are installed, the Seestar S30 Pro does not require an internet connection to image. You can connect directly to the telescope via its built-in Wi-Fi or use Station Mode through your home network. Internet access is only needed for initial setup, firmware updates, and app downloads.
Q: Can you use external filters or accessories with the Seestar S30 Pro?
A: No. The Seestar S30 Pro is a sealed, all-in-one smart telescope, so external filters, reducers, or camera upgrades are not supported. This is expected for this class of device, but it’s worth keeping in mind if you’re coming from a traditional astrophotography setup and enjoy heavy customization.
Q: How long can the Seestar S30 Pro track and image a target?
A: In standard alt-az mode, the S30 Pro works best with short exposures and live stacking, which is ideal for quick and simple imaging sessions. When mounted on a tripod and used in EQ mode, it can take exposures up to 60 seconds, significantly reducing field rotation and improving overall image quality. Battery life typically supports 5–6 hours of imaging per session.
Q: Can you save RAW or FITS files for post-processing?
A: Yes. The Seestar S30 Pro allows you to save individual FITS subframes in addition to the internally stacked image. This is a big advantage for users who want to process their data later in software like PixInsight or Photoshop. Just be sure the option to save individual frames is enabled before starting your session.
Q: Does the Seestar S30 Pro replace a traditional astrophotography setup?
A: Not entirely—but that’s not the goal. The S30 Pro doesn’t replace a large telescope on an equatorial mount with interchangeable optics, but it dramatically lowers the barrier to entry. It excels as a grab-and-go, travel-friendly, or weeknight imaging solution and complements traditional rigs rather than competing directly with them.
Final Thoughts: Is the Seestar S30 Pro Worth It?
The Seestar S30 Pro is a very strong smart telescope option for anyone who wants to capture deep-sky images without the complexity of a traditional astrophotography rig. It’s small, lightweight, highly portable, and genuinely capable from a light-polluted backyard.
For beginners, the S30 Pro offers a low-friction way to start capturing deep-sky objects, while still leaving room to grow into saving individual frames and post-processing. For experienced astrophotographers, it works extremely well as a weeknight or travel-friendly system that can run unattended while you focus on other things, or just relax.
It’s also worth pointing out that we now have several solid smart telescope options on the market, each with its own strengths. Some prioritize extreme portability, others offer dual-camera monitoring, longer focal lengths, or more emphasis on Milky Way and wide-field imaging.
The expanded field of view and large resolution size of the S30 Pro make it the best smart telescope I’ve tested yet.
There’s no single “best” smart telescope – only the one that best fits your needs and observing style. And just because a new model comes out doesn’t suddenly make your current setup obsolete. If it’s still helping you enjoy the night sky, it’s still doing its job.
To sum up this Seestar S30 Pro review, this is a very compelling, all-around smart telescope. It handles deep-sky imaging, solar imaging, wide-field modes, mosaics, and automated imaging plans in a compact, easy-to-use package. Most importantly, it delivers strong results even under bright, light-polluted skies.
If ZWO can keep the price in a reasonable range, the Seestar S30 Pro is likely to be extremely popular. It’s beginner-friendly yet still rewarding for experienced astrophotographers seeking a simpler way to capture deep-sky objects.
If you’re considering a smart telescope and deep-sky imaging is high on your priority list, the Seestar S30 Pro absolutely deserves a serious look.

The Seestar S30 Pro is available for pre-order at High Point Scientific.
 Trevor Jones is an astrophotographer and a valued member of the RASC. His passion is inspiring others to start their astrophotography journey on YouTube so they can appreciate the night sky as much as he does. His images have been featured in astronomy books & online publications, including the NASA Astronomy Picture of the Day (APOD).


HI Trevor
Always good to read your reviews.
I am enjoying the ease of use of a S50 and the features ZWo keep updating. REally nice to be able to control it with full feature program like Sharpcap.
I know you can buy 2″ filter holders for the S50 and std S30 but not sure about the S30 Pro.
Side note: Texas Star party registration is now open. May 10-17, They are offering a range of attendance options this year, first come,first serve. Hope to see you there.
Steve
The S30 Pro review is good information. I have an S50, so how does this appears to be a complete change. There are severe limitations to the S50 images, so, is the S30 Pro a better option? And does the S30 Pro provide any better planetary imaging compared to the non-existent planetary imaging if the S50?
Best wedge for the Seestar S30 pro? and if using the wedge recommended, what is the best tripod to go along with it?
Good review, thanks, just what I was looking for.
Hello, I have never owned or used a smart telescope in my entire life. I am looking fairly seriously at one now however. I am stuck between the S30 Pro and the S50. could I please ask which one you would choose and why?
Hi Geoff – I personally prefer the S30 Pro for the expanded field of view and better image quality. For many deep-sky objects, the framing is much better with the S30 Pro. Clear skies!
Hi Trevor Jones,
Is there also a way with the Seestar S30 Pro to take images that are level (horizontally aligned)? And is the local time of the capture included in the photo’s metadata?
I don’t believe the Seestar S30 Pro has a dedicated feature that automatically straightens or locks the horizon in the final image. The best approach is to make sure the unit is sitting level when you begin, since proper leveling helps with alignment and tracking. For daytime or landscape-style shots, you may still need to rotate the image slightly afterward if you want the horizon perfectly straight.
As for metadata, the captured image includes the date and time of captured. Clear skies!