The Impressive Optolong L-eNhance Filter
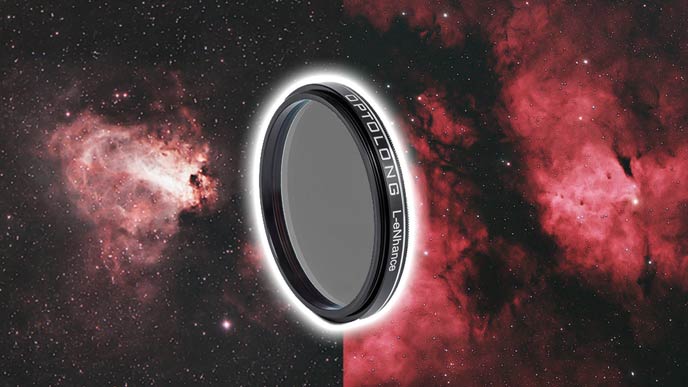
In this post, I’ll share my results using the Optolong L-eNhance filter for deep sky astrophotography in the city. The L-eNhance is a dual band pass filter that ignores artificial light, yet collects a strong signal emitted by certain nebulae.
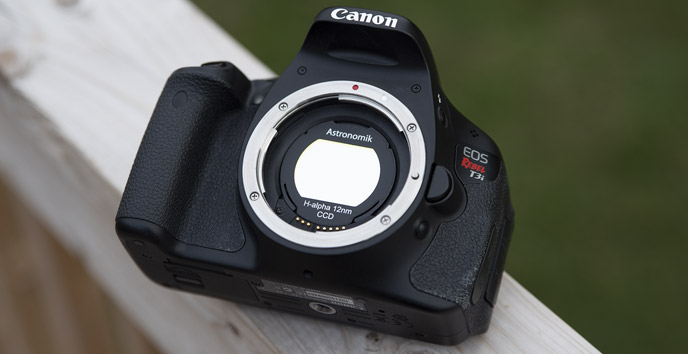
This light pollution filter was designed for color cameras, whether it’s a DSLR (a modified camera is best) or a one-shot-color dedicated astronomy camera like the one used (ASI294MC Pro) for the images in this post.
As many of you know, I mostly shoot from the city. I love to travel to dark sky locations, but imaging from home is a lot more practical, and I can do it more often.
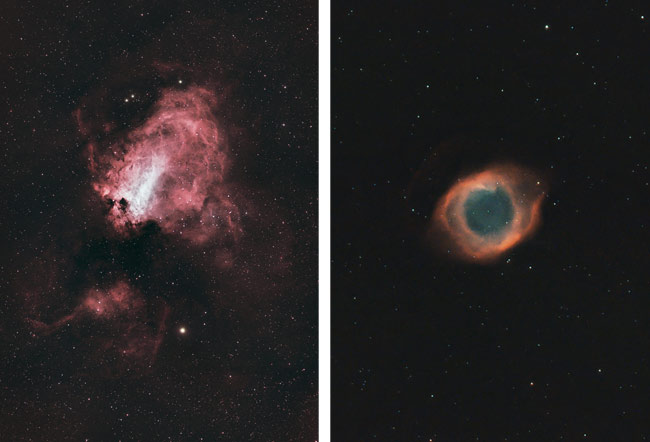
The Omega Nebula & Helix Nebula| ZWO ASI294 MC Pro + Optolong L-eNhance Filter
The problem is, the city I live in is home to over 100 thousand people, and that makes it very bright. Excessive light pollution is a reality for many of us, and I’m not sure we fully understand the long term negative effects of it yet.
The battle between light pollution and amateur astronomy wages on, but thanks to organizations like the IDA, more people are aware of the situation and making small steps in the right direction.
Here’s a look at the light pollution I shoot through in my backyard. As you can see in this animated gif, it looks as though the light pollution increased significantly between 2018 and 2019.

Light pollution data from LightPollutionMap.info. 2018-2019.
For backyard astrophotographers like me, light pollution creates some serious challenges, from horrible gradient patterns to a pathetic signal-to-noise ratio.
It seems like we have to work twice as hard as those under dark skies do to capture a beautiful image.
Fortunately, though, light pollution filters exist – and the companies that make them are getting better and better at isolating the “good” light from the bad. The argument as to whether a light pollution filter for broadband targets (such as galaxies) can actually help you collect better data continues in the forums, but I have found them to make my life a lot easier.
However, nobody can argue the fact that a narrowband filter (often called “line filter”) can be exceptionally useful from the city. The filter I am discussing in this post is a dual-band pass filter, that collects light in two prominent emission lines, H-alpha, and Oxygen III.

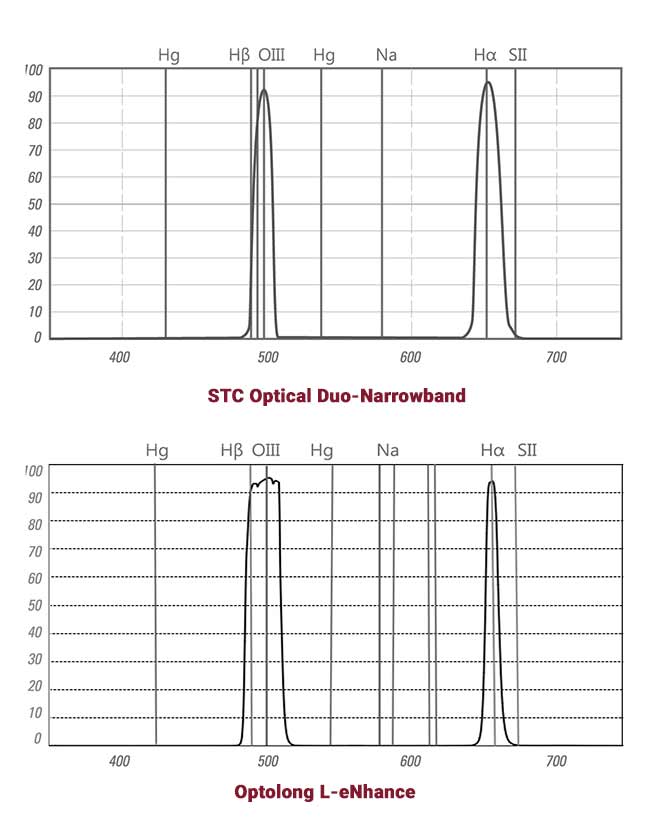
The transmission graph of the Optolong L-eNhance dual-band pass filter.
Looking at the transmission lines of the bandpasses above, you may notice that this filter is only allowing a very selective amount of light to pass through to the camera. The good news is, some of the most incredible deep-sky nebulae in the night sky emit the majority of their signal in these two wavelengths.
Which ones? The Eagle Nebula, Omega Nebula, and North America Nebula, to name a few. Emission nebulae are some of the most widely-photographed deep-sky targets by amateur astrophotographers, and from a filter perspective, they are much more obtainable from the city than a broadband galaxy.
Optolong L-eNhance Filter
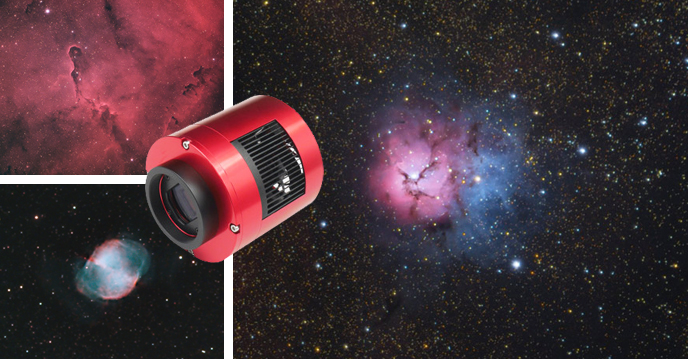
The Optolong L-eNhance filter was designed for color cameras, such as a DSLR camera or a one-shot-color astronomy camera. The camera used for all of the example images in this post is a ZWO ASI294MC Pro, a 10.7 MP 4/3″ sensor camera with cooling.
If you take a good look at the transmission graph, you’ll notice that the first band pass line includes both the OIII, and H-beta wavelengths. Essentially, this means that the filter should collect an even more “natural” looking image than one that isolates Ha and OIII exclusively.
The H-beta (486.1nm) emission line is nowhere near as impactful as the hydrogen-alpha line (656nm) when photographing an emission nebula target, but I like the idea of including this subtle wavelength for a more well-rounded image.
Transmission Lines
- H-beta: 486.1nm
- OIII: 501nm
- H-alpha: 656nm
As you’ll see in the images shared in the post, this transmission combination leads to some surprising “natural” looking images when used with a color camera.
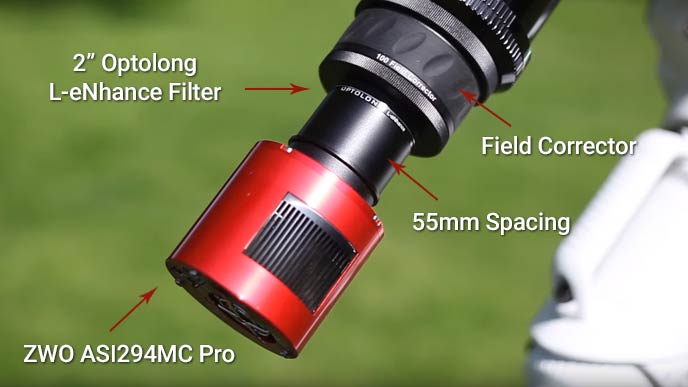
In the video below, you’ll see me use the Optolong L-eNhance filter for deep sky astrophotography in the backyard. Notice the bright white LED streetlamps that line my street. These artificial lights are largely ignored by the L-eNhance filter, as they do not emit light in the spectrum that passes through the filter.
In the video, I’ve threaded the Optolong L-eNhance filter (48mm version) to the field corrector of my Sky-Watcher Esprit 100 refractor telescope. The filter sits between the sensor inside my ASI294MC Pro color camera and this apochromatic refractor telescope.
Threading the filter directly to the field corrector involves carefully removing the internal ring that seals the filter glass into the housing. The reason for this is to access the threads on both sides of the filter. I do not recommend this method, as the filter glass becomes loose, and you could easily drop or damage the filter.
Instead, I would look into a filter drawer system that is compatible with your telescope. This allows you to easily swap filters in and out of the imaging train, and maintain the accurate spacing between your camera sensor and the corrector/field flattener.

The Optolong L-eNhance filter (48mm).
Some telescopes, such as the William Optics Zenithstar 73, or Radian Raptor 61 include a threaded slot for a 2″ filter inside of the field flattener and/or adapter. This is a very convenient location for a 48mm filter, as it is completely sealed from the elements.
Optolong L-eNhance Filter Specifications
Here are the technical specifications of this filter, coming straight from the company. I have to admit, I don’t know what most of these terms mean, but in the spirit of creating the most useful resource possible, I’ve included them for those that do.
- Blocking Range: 300nm – 1000nm
- Blocking Depth: >99% light pollution line
- TPeak: T>90%
- Substrate: B270
- Thickness: 1.85mm
- Surface Quality: 60/40
- Transmitted Wavefront RMS: λ /4
- Parallelism (arcsec): 30s
If you don’t know what the transmitted wavefront RMS reading means in terms of the pictures you can expect to capture with your color camera, keep reading…
Imaging Results from the City
The first object I chose to photograph was the Butterfly Nebula, which is also found within the Sadr region in Cygnus. The reason I chose this target for my testing, was because this area is absolutely loaded with emission nebulae. If you have a filter that specializes in isolating H II regions, this is an area of the night sky you need to photograph.
Having used a dual bandpass filter in the past (STC Optical Du0-Narrowband) from my backyard, I had a feeling that the L-eNhance would meet my expectations. I primarily shoot using a color camera, to maximize the chances of completing an image in a single night. If you are like me, a dual bandpass filter may be the answer you are looking for.
In the past, I have used a number of Optolong branded filters, including narrowband “line” filters for Ha, OIII, and SII. The Optolong L-Pro is one of my favorite broad-spectrum filters, so my experiences with this company have been stellar thus far. (They even sent me an Optolong Flag for my garage as a thank you for my video content!)
Results using a 100mm Refractor Telescope
The first image was captured using a high-end refractor telescope (ED triplet apochromat), with a focal length of 550mm. The image scale of this system is 1.7, which creates a pleasing resolution for wide-field nebulae targets like the one below. To find out the image scale of your camera and telescope, you can check out this online calculator.
With a dual-band pass filter like the L-eNhance, moonlight, and the glow of my city do not interrupt a memorable imaging session in Cygnus. Below, is the image I captured using the L-eNhance filter with my ZWO ASI294MC Pro (one-shot-color) camera. The final image includes 69 x 4-minute exposures for a total integration of 4 hours and 36 minutes.
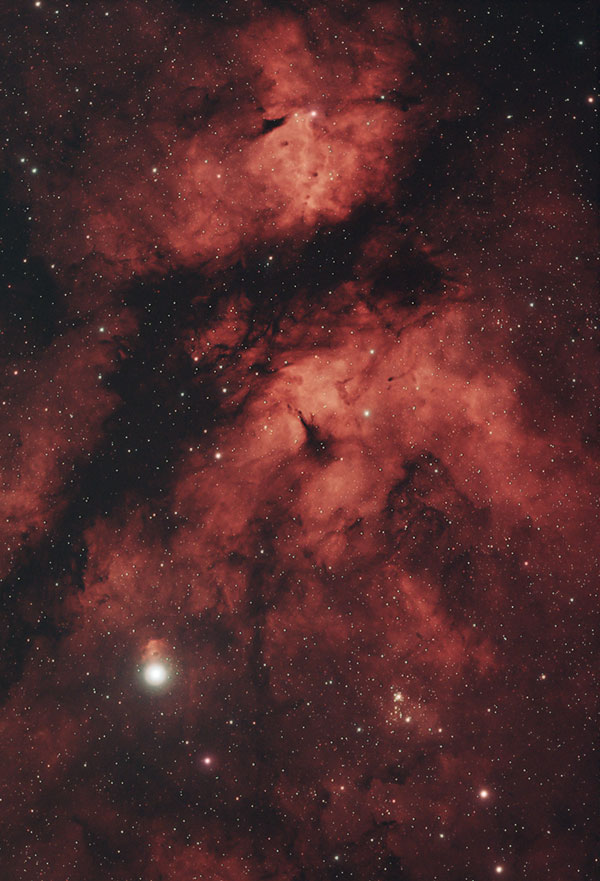
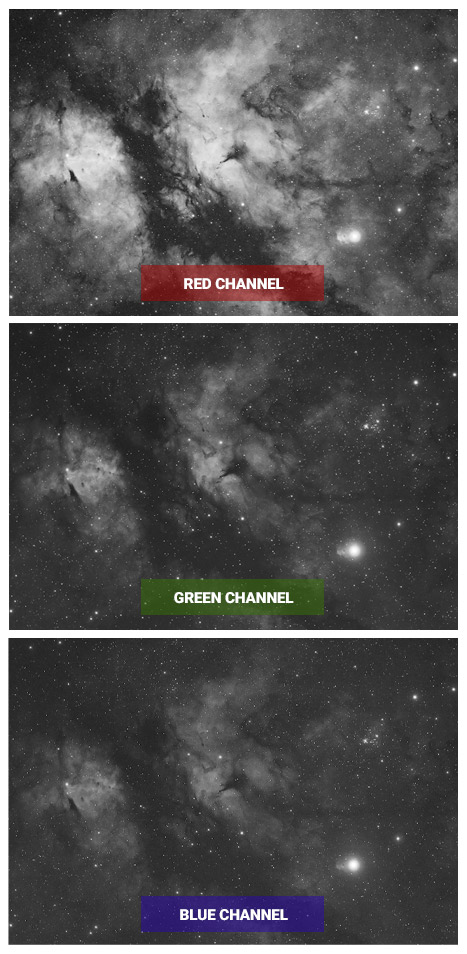
The Butterfly Nebula in Cygnus. 69 x 4-minutes.
If you would like to see all of the equipment used for this shot, I have broken everything down piece-by-piece on this page.
Below, you’ll see a breakdown of what the data looks like in each color channel, after the image has been processed and balanced as the version above. Although these images are non-linear, it should give you a better idea of how much data was collected in each color after neutralizing the background.
The “stretched” image (the one shown above) shows exaggerated levels of data, but it does indicate the general level of sensitivity to color in each channel.
After an extremely successful night using the L-eNhance filter on my 100mm refractor, I thought it would be interesting to see what would happen when I use it on the Celestron 8″ RASA.
Results using the Celestron 8″ RASA
To use this filter with a Rowe-Ackermann Schmidt Astrograph system, it must be placed in front of the camera sensor that sits on the corrector plate of the front of the telescope. To achieve the correct spacing between my camera sensor and the optical window of the RASA, I use this Starizona filter drawer.
I also installed a new Pegasus Astro FocusCube 2 motorized focuser to the RASA, for improved accuracy when focusing on this demanding F/2 optical system. The one I have was designed specifically for Celestron SCT telescopes and the RASA (this is the model I use).

The Celestron RASA 8 F/2 with ASI294MC Pro color camera attached to the corrector plate.
As fast as the F/2 f-ratio of the RASA is, it also means that achieving critical focus manually is very difficult. I believe that relying on camera control software to measure the accuracy of your focus precision is a must.
Which software? Many amateur astrophotographers have had success using Sequence Generator Pro, and I personally use Astro Photography Tool. The FWHM or HFD readings of a star are needed when attempting to find (and maintain) critical focus (More on this in a later post).
Here is a better look at the FocusCube 2 installed on the RASA. The process involves removing the standard focus knob on the telescope and attaching a bracket to the base. I’ll share a new video and review of this focuser for the Celestron RASA soon.

Pegasus Astro FocusCube (motorized focuser) for the Celestron RASA.
To highlight the qualities of this filter on a telescope like the RASA, I decided to hop over to the Omega Nebula in Sagittarius. From my latitude in Canada, I have a very short window of opportunity to photograph this target. It does not reach a high apparent altitude in the sky, which makes it a demanding target for amateur astrophotographers in the Northern US or Canada.
As you’ll see in the image below, the images straight out of the camera will appear green using CMOS camera like the ASI294MC Pro.
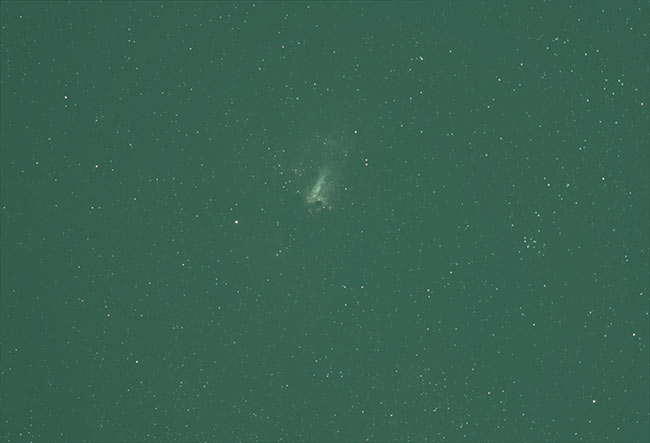
A raw un-stretched image (stack) using the Optolong L-eNhance filter with a color astronomy camera (ASI294MC Pro)
To create the final image, each sub-exposure was 3.5-minutes in length, with the camera set to Unity Gain. For this image, I also used autoguiding with the RASA as well (for the first time). I attached a small 50mm guide scope (Starfield 50mm guide scope) and bracket to the base of the 8″ tube.
The ZWO ASI290mm Mini is a reliable guide camera that always pulls in more than a handful of useful stars for autoguiding purposes.
The biggest advantage of having an autoguiding system in place with the RASA (in my opinion), is the ability to dither between frames. In previous imaging sessions with the RASA, I had no trouble capturing unguided images with round stars on the Celestron CGX-L. However, walking noise was prevalent due to a lack of the simple (yet powerful) act of dithering.
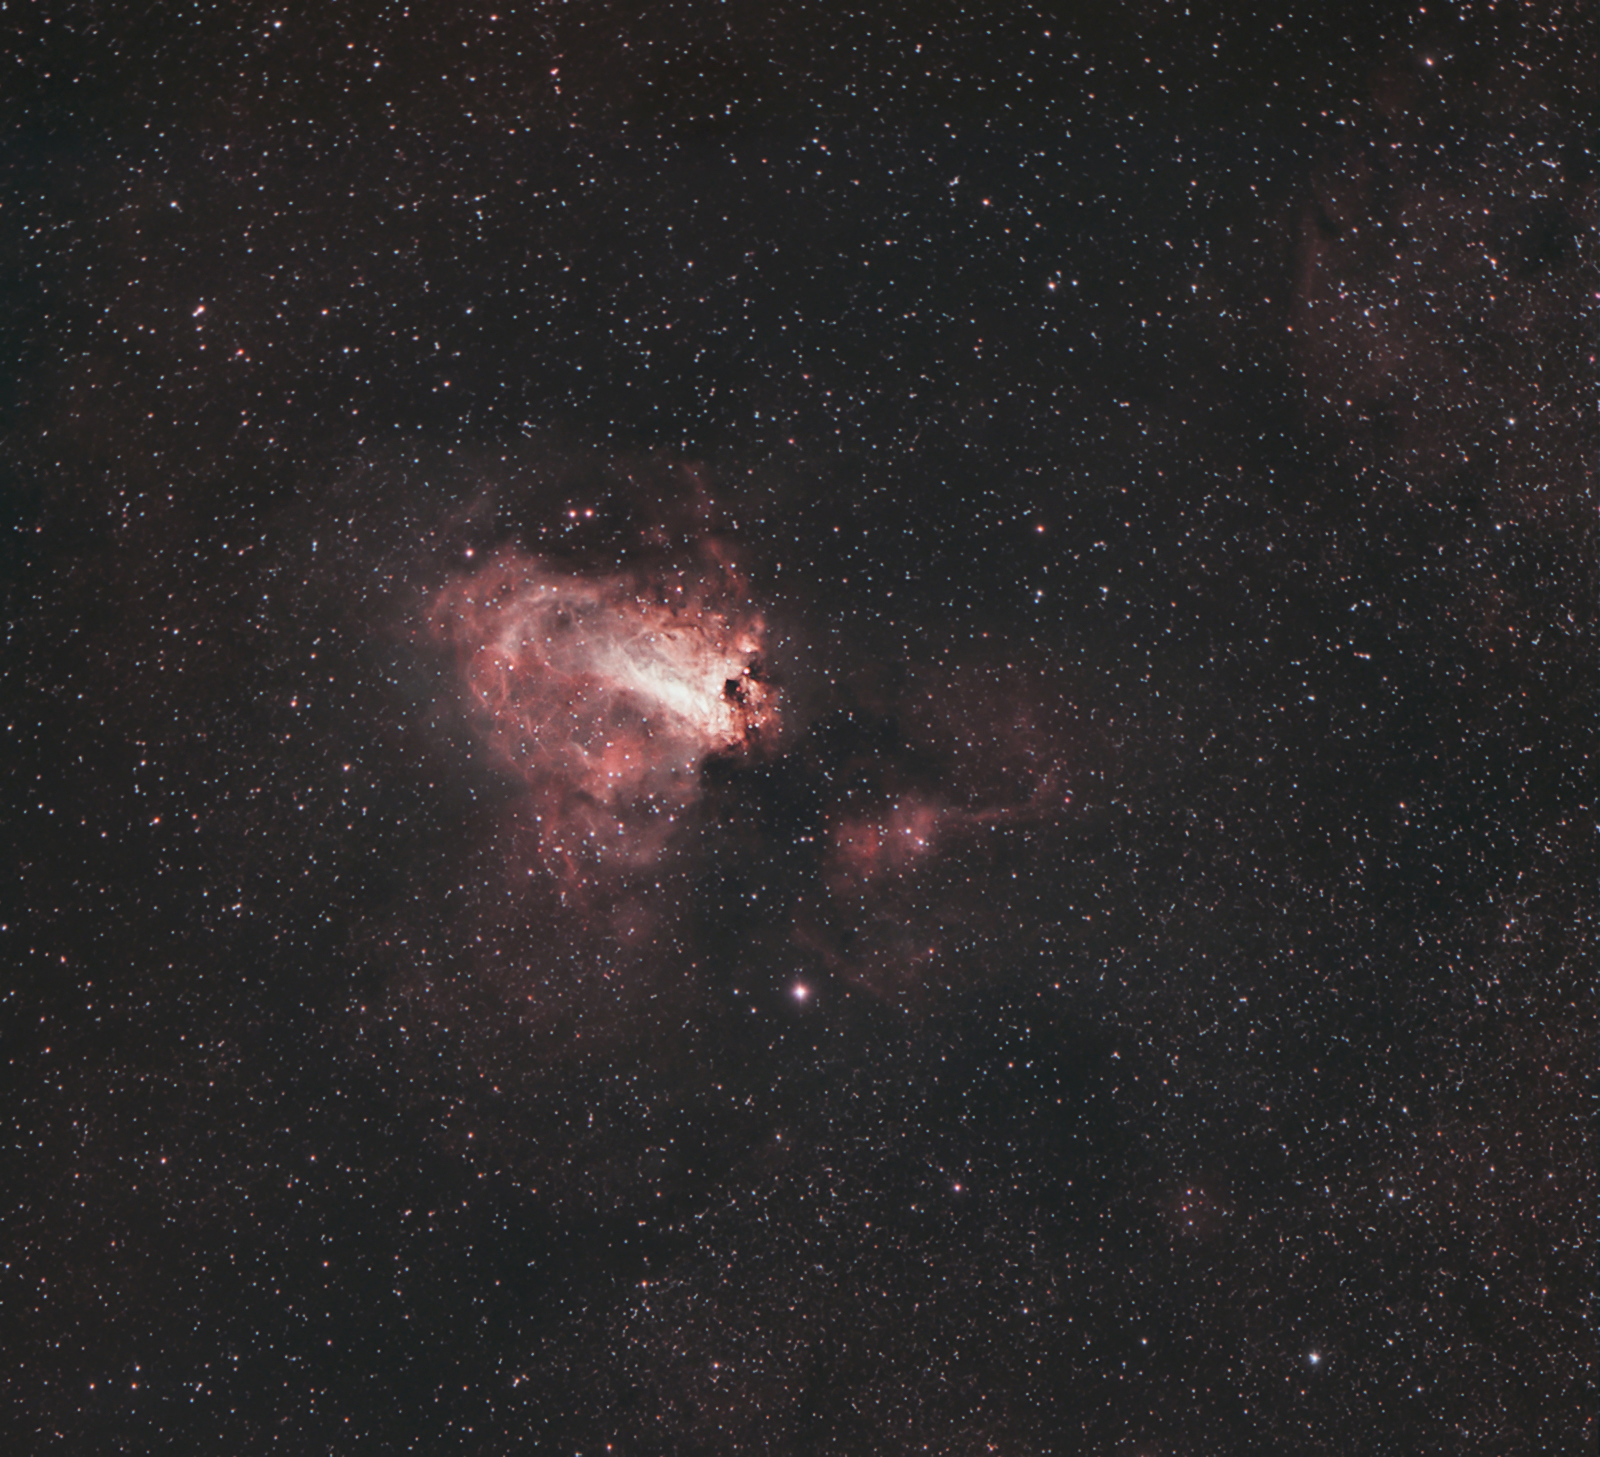
The Omega Nebula. Color CMOS camera with Optolong L-eNhance filter.
When it was all said and done, I ended up with 29 x 210-second exposures on the Omega Nebula through the 8″ RASA. As you can see in the processed image stack above, achieving a “near-natural” looking color balance with this dual band pass filter is possible. I can’t help but think that the additional light collected in H-beta makes a subtle, yet important difference on targets like M17.
I also pointed my telescope towards the Helix Nebula using this filter. This planetary nebula in Aquarius is another deep sky object that does not reach a high apparent altitude in my night sky. The L-eNhance filter did a fantastic job of separating the glowing gases of NGC 7293 from a light-polluted sky.
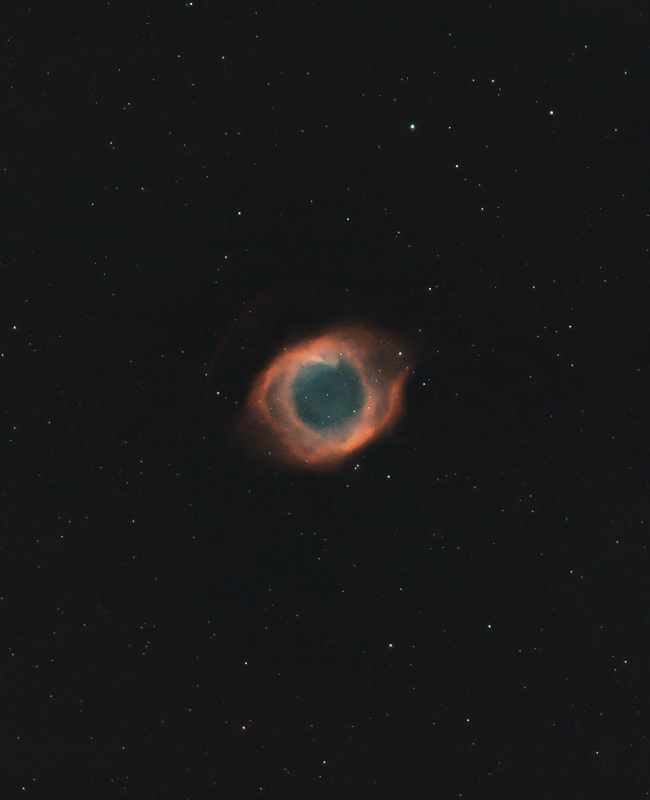
The Helix Nebula. ZWO ASI294MC Pro + Optolong L-eNhance Filter.
L-eNhance vs. STC Optical Duo-Narrowband
Many readers have asked how the Optolong L-eNhance filter compares to the STC Optical Duo-Narrowband filter. In my tests, it produces VERY similar results when used an emission nebula. If you look at the transmission graphs between the two, you’ll see why.
The L-eNhance lets in a subtle amount of light in the H-beta line, which I am yet to illustrate how much of a difference this makes. The transmission peak in the OIII spectrum also appears to be wider, which may help produce a more natural looking image (at the expense of less isolated data).
The bottom line is, these filters act very similar, and I don’t own equipment sophisticated enough to truly show the difference between the transmission qualities of this glass. In reality, I think most folks just want a filter that compliments their color camera when shooting in the city, or under moonlight. If that is what brought you here, I think you’ll be extremely impressed with the Optolong L-eNhance.
What others are Saying…
I’m not the only one seeing great results with this filter. Ron Brecher is one of my favorite astrophotographers, and someone I look up to personally in terms of his work and his career. He uses sophisticated imaging equipment from his observatory in Canada (only 2 hours from me!) to capture stunning deep-sky objects. He shared this image on his website, and on twitter about the Optolong L-eNhance filter:
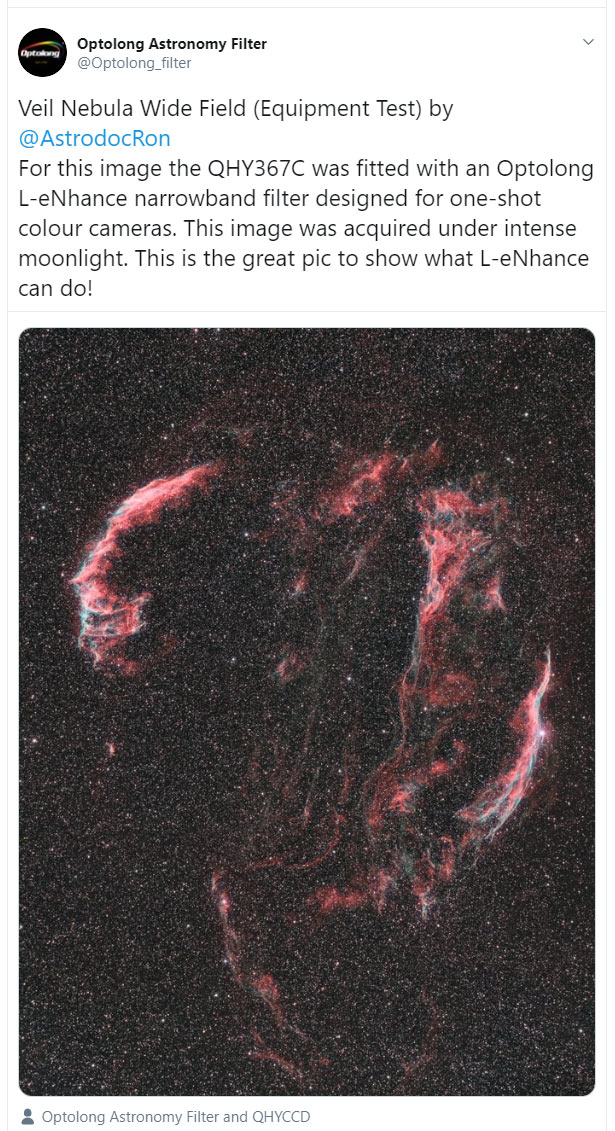
The image was captured using a QHY 367C one-shot-color camera through a Tak FSQ-106. Be sure to visit Ron’s website to see the full-size version of the image, it’s really incredible!
Final Thoughts
Narrowband filters, especially ones that collect light in two band passes at once offer an incredible way for backyard astrophotographers to collect impactful images with a color camera. Whether you shoot with a DSLR or dedicated astronomy camera, a capable light pollution filter can be the difference between setting up twice a week, and twice a season.
There is no substitute for dark skies, but there is hope your light-polluted backyard. The Optolong L-eNhance filter took months to develop, and as you can see first hand from my images, the results are impressive.
If you have used the Optolong L-eNhance filter with your color astrophotography camera, please let me know what you thought in the comments. Feel free to include a link to your personal website or AstroBin profile to share an image captured with it. Seeing others work is a great way to validate the performance of this filter.
Update, August 2020
The Optolong L-eXtreme Filter has launched, and many amateur astrophotographers agree that it is an improvement over the L-eNhance. This version of the filter isolates the OIII bandpass at 7nm, without including H-Beta, and the small bandpass between OIII and Hb.
The resulting images appear to be more dynamic with better contrast. The following image of the Veil Nebula was captured using the Optolong L-eXtreme filter and a QHY268C one-shot-color camera.

The Veil Nebula. Captured using the Optolong L-eXtreme Filter.


Trevor,thanks for sharing your Astrophotography adventures! I enjoy all of your videos. You do a great job.
I included my Astrobin link below.
I used the Optolong L-eHance filter for
M17 The Swan Nebula
M20 The Trifid Nebula
M8 The Lagoon Nebula
The Cocoon Nebula
The Crescent Nebula
I really like the filter. It does a great job blocking out the light pollution in my Bortle 7 skies. ( Phoenix Metro area) 5 million pop.
Clear skies, Mike
Hey Mike, I appreciate the kind words! I don’t see the link yet, but would love to see your examples with the L-eNhance filter from Bortle 7 skies!
https://www.astrobin.com/users/Elmiko/
how does the L-eNhance compare to STC’s Astro Duo-Narrowband?
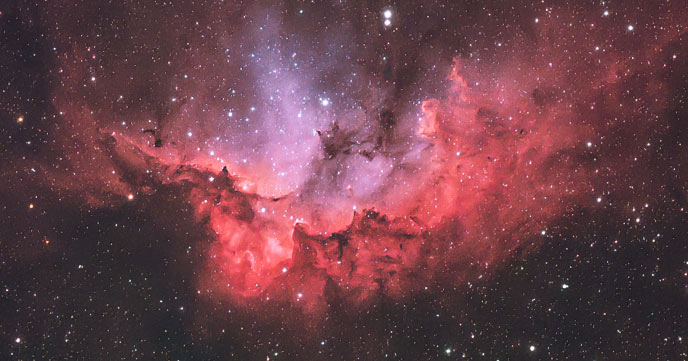
In my testing on Emission Nebula (Omega, Wizard, Butterfly), it creates extremely similar looking results. The subtle differences in transmission to the H-beta line are difficult to identify. I’ll try to capture an object that better showcases this – I think the Eastern Veil would be a good target to compare the two.
I actually purchased the filter based on your videos. I would always hear you say Optolong l-eNhance filter. I had a STC – Duo-Band and the STC – Quad-Band, but either don’t work as well as the Optolong for me.
I have lot’s of light pollution, and a sodium lamp (city street light) just across the way that has failed (Thank goodness). I was having lots of problems getting rid of that in Photoshop, but when I put this filter on, I could not believe it was the same imaging equipment!
I use L-eNhance for all my nebula and getting additional data of Galaxies. It has really helped me a ton.
So Thank you for your work!
Thanks for sharing that, Sonny! I’m really glad the filter is working out for you. Also happy to hear that the sodium street lamp is out – every little bit helps! 😀
Hi Trevor,
I am curious how this filter (which I own too) compares to the Triad filters that OPT sells (tri/Quad band). Is there a noticeable difference in your opinion which would justify the hefty price tag for the OPT filters or are they similar in performance? You have tested the quad-band filter from OPT recently. How do those different filters fare against each other?
https://astrob.in/415866/0/
The Lagoon Nebula
Trevor, I have a new RASA 11 and have been having a hard time with the Celestron Focus Motor and RASA Retrofit Kit. I’ve researched it a lot and found others with the same issue, unresolved. So, I’m looking for another solution and saw your informative post here about the Focus Cube 2 which I was unfamiliar with. I’m concerned about it getting bumped because of its outboard position due to it hanging off the RASA. The exposed belt also makes me think I’ll need to remove it each time I take my RASA apart to store it (which is every time I use it unfortunately, because it’s on a nice, beefy but very heavy CGX-L). I was wondering if you also had the same concerns with the Focus Cube 2. And if you have used other focus motors like the Focus Boss 2, or anything else. In general I think a low profile, high resolution focus motor that ALSO allows me to still manually focus if I had to (a plus), would be perfect. Thoughts?
Hey Calvin – sorry to hear about your issues with the Celestron focus motor. What’s the issue? I haven’t explored that option but I am curious to know what’s happening. I’ve only used the Focus Cube twice (weather) – and you’re right, it’s really hanging off the end of the scope. It’s really not in the way for me, but I’ve got it on the stubby 8″ model. I’ve got the FocusCube hand controller accessory (http://bit.ly/2YlUQVv) for manual operation – which I really like. I still need to get my autofocus going in Sequence Generator Pro – but I’ll share more about that soon. Hope this helps. Cheers.
Thank you for a review. What about cheaper analog – simple Optolong UHC? It has also narrow OIII\H-beta region.
Hi Trevor,
I see more and more people doing false color mapping with one shot color cameras and multi bandpass filters (Have a look into the Facebook ZWO ASI group for instance). While you will not be able to fully isolate each emission line using this combination, the different types of gases come out with higher contrast. I find this a very aesthetic alternative to the usually rather reddish results from a standard processing.
I have given it a very first try:
Here is the standard OSC RGB image https://www.astrobin.com/411211/B/?nc=user
This is the false color mapping result
https://www.astrobin.com/411211/D/?nc=user
I would love to see you do a review / tutorial on this soon.
Anyway, I love following your channel and being inspired, keep up the great work.
Best Regards from Leipzig, Germany
Thank you for sharing that, Marius! I have been experimenting with this over the past few weeks. Great timing. I agree that steering away from the standard processing (the overly red result) is a smart move, and something I’ve been working on a lot lately. Thanks for sharing your images – and I’ll talk about this soon on the channel!
Hi,
I have the l-eNhance filter as well, and I am very happy with it. It has 2 great advantages.
1. You save 50% time when you want to shoot narrowband with an OSC camera compared to separate O3/Halpha Filters.
2. It is great a suppressing light pollution.
I have a few images on astrobin that contain subs shot with that filter.
See here:
https://www.astrobin.com/full/412566/C/
https://www.astrobin.com/full/417123/0/
https://www.astrobin.com/full/418945/0/
Clear skies
Dirk
Hi Trevor,
I noticed that you needed to disassemble the l-eNhance filter in order to thread it into the optical train.
A 10mm thick 2-sided thread (2″) filter is available in case your users might want to use it as you did (I did for my old Slyglow for years).
I’m not sure what your policy is on commercial links but I’ll post it here, please remove if needed:
https://telescopescanada.ca/products/optolong-l-enhance-dual-bandpass-filter-h-alpha-o2-2-inch
The 10mm is currently out of stock with more expected by next week.
Cheers
Stephen
Hey Travor,
Again thanks for sharing your results. Just got a RASA 8 and was so curious about the question if it works with a L-enhance filter (some people claim you do need special fast f/2 filter for the RASA like from Baader). So I remembered your review in YouTube and thought let’s read this Text – and what do i find to my pleasant surprise? You testet the RASA!! Great as always. Your one of my few ‘very frequent’ sources to learn from and I started the hobby in early 2018 using so many recommendations from your channel! A big thank you from Germany and keep on the great work!
Thanks for the great blog !!!
I am new to AP, so I have a basic question.
If you use the L-enhance filter, how do you process it in PixInsight.
Do you use the same steps for OSC?
I just ordered an Optolong L-eNhance filter based on this terrific experience report above for my Atik Horizon Camera (OSC).
I’d expect you do the same PixInsight (PI) steps as with a Color cameras and say an UHC-S Filter:
Debayer, Stacking, DBE, Background Neutralization and Color Calibration and so on. In my case I usually use the live-stacking fits result as input for PI.
The idea behind Narrow Dual Band with color imaging is that you do all the blending with Color Calibration (even simple Photoshop would do).
However, in PI one could theoretically extract pseudo RGB (i.e. Halfa=R and OIII=R+G) and follow the normal combination procedures as described here. http://fallenangels2ndlife.dyndns.org/2019/08/23/atik-horizon-camera-osc/
See appendix links for the detailed combination process with PixelMath.
As soon I get my hands on the Optolong L-eNhance I will add a chapter with Atik Horizon results processed by PI.
Thanks for the great article.
Hi Trevor, love the love for astro imaging, your honest point of view substantiated with the results you produce are a real help in navigating the reward rich but equally booby trap world of this great hobby.
I bought the L-eNhance filter based on your published experience along with the Samyang 135mm (Rokinon in Northern America) and have been very happy with my initial results using the ASIAIR to control my NEQ6 mount. I have attached a link to astrobin of my image of the “Soul Nebula”. Keep up the good work, I look forward to your videos like another episode of GOT! 🙂
Hi you may want to change your ‘Omega’ nebula caption to the Swan nebula 🙂
The Swan Nebula is also known as the Omega Nebula. They are the same object.
I have purchased this filter, and a RASA 8, and the EQR-6 based on your reviews and the suggestions of people at Starizona.
I started out curious about HyperStar for my older than dirt CPC-8, but eventually gave up on the idea.
Why attempt to refurbish old equipment when instead, you can spend huge bucks, right? (Well I did get new eye-piece and dew shield for corrector plate)
Ha, anyway, I know a lot of people enjoy and rely on your reviews, so the dealers know that and should send you cool products.
I’m sure the Dark Sky Ranch in New Mexico is next on the list…and you will need the light twin aircraft to shuttle to Albuquerque for flights to visit Canada. The Sky is the Limit!
Looking forward to your next vids…Dark Skies! (IDA member)
Found this article shortly after having been swindled in a Lumicon UHC filter scam in the Cloudy Nights classifieds; it made me realize that the Optolong might be what I actually should have been looking at in the first place. Made the purchase (through a reputable dealer!) and have been very pleased with the results using my Stellarview 102 and ZWO 294 Pro. Attached my first attempt on IC1805.
Thanks for the advice!
Does using this filter necessitate getting more exposure or taking longer shots?
how good is the L ehance filter works on galixy.
Trevor, thank you for the excellent review!
Just a question. Do you know perhaps if the filter is suitable for modified DSLR without the use of an IR cut filter?
Many thanks
Thanks for your great reviews, Trevor. I have followed your recommendations starting out with HEQ5 and Z73!
I would like to share image of the Western Veil and Pickering’s Triangle taken with LEnhance and ASI2600MC Pro, 10 hr exposure on Edge 8 + Hyperstar. I think LEnhance does a pretty good job!
Here is the link: https://flic.kr/p/2mjMLR7