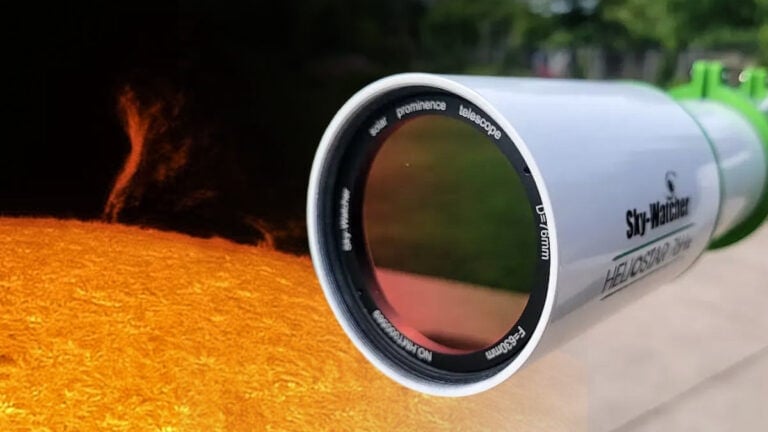
Sky-Watcher Star Adventurer 2i Review

The Sky-Watcher Star Adventurer 2i is an extremely popular portable star tracker designed for astrophotography. It provides a simple way to track the motion of the stars, allowing you to take long-exposure images of the night sky.
It uses AA batteries, making it ultra-portable and travel-friendly. It’s an excellent miniature equatorial tracking mount designed for smaller setups such as DSLRs and camera lens configurations.
In this article, I’ll share my unbiased opinion about the Sky-Watcher Star Adventurer 2i and the images I captured using it. I used the Pro Pack version, which comes with the counterweight kit, latitude EQ base, and fine-tuning mounting assembly.
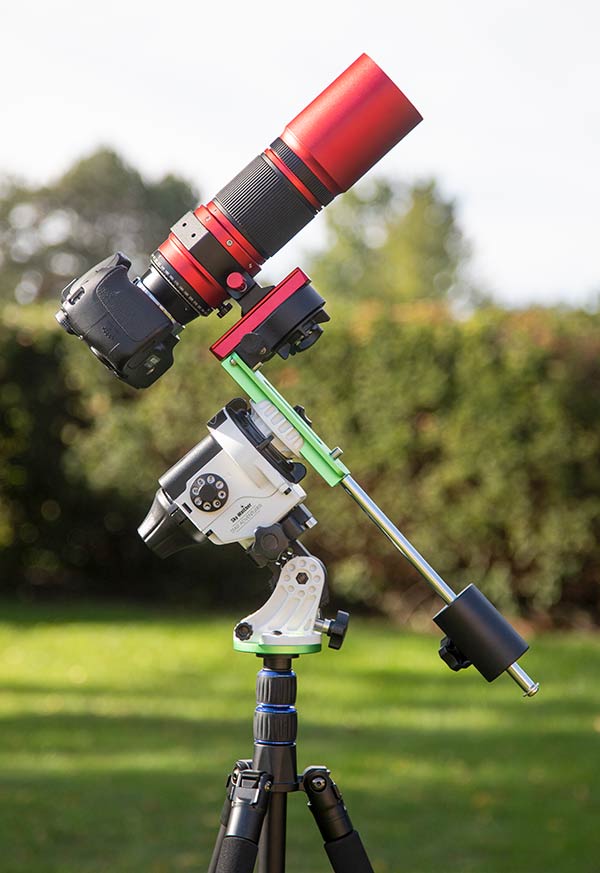
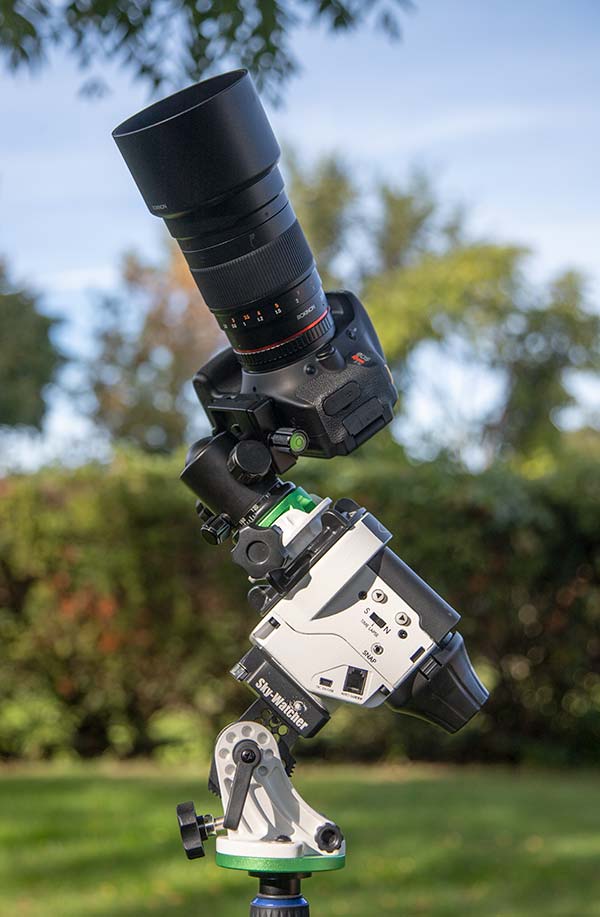
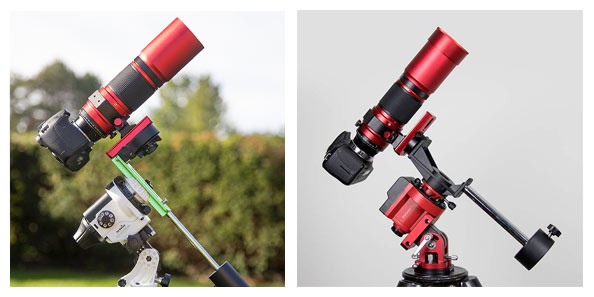
The Sky-Watcher Star Adventurer with a small telescope mounted on top.
The Star Adventurer 2i is still an extremely practical choice in 2024. For those looking for even more capabilities, check out the Sky-Watcher Star Adventurer GTi with GoTo functionality.
Sky-Watcher Star Adventurer Review
If you would like to see the Star Adventurer Pro Pack in action, please enjoy my video review on YouTube. In the video, I share example images taken using a DSLR camera and a small telescope with a focal length of 250mm.
One of the most daunting challenges in the beginner stages of astrophotography is choosing a reliable tracking mount for long-exposure photography at night. Affordable, portable camera tracker mounts are a fantastic way to start because they are not overly complex and can provide promising results in a short period of time.
If you’re new to the world of star trackers for astrophotography, this article should help clear things up. Essentially, a tracking camera mount allows you to shoot sharp, long-exposure images of deep-sky objects in space. For me, this is often a large nebula or galaxy, but it could be anything from a star cluster to a comet.
The star trackers in this category have many names, from “tracking camera mounts” to “multi-function mounts.” Whatever you call them, mounts like the Star Adventurer Pro (and Star Adventurer Mini) were designed to be portable, quick to set up, and take sharp images at varying focal lengths.
This mount can be used in a staggering number of configurations for astrophotography, from dual-camera and telescope setups to a versatile time-lapse photography/video mode. Whichever type of astrophotography/videography you’re into, you’ll be able to enjoy up to 11 lbs of gear in more orientations than you thought were possible. (I never thought of using the mount in horizontal rotation time-lapse mode before!)

The Sky-Watcher Star Adventurer Pro sits in an increasingly crowded space of portable astrophotography mounts. If you’re familiar with my work, you’ll know that I am no stranger to Sky-Watcher products, with my primary imaging rig consisting of an EQ6-R Pro equatorial mount and an Esprit 100 APO refractor.
Does the fact that the Star Adventurer Pro matches my existing Sky-Watcher gear (lime green and white) affect my opinion of the mount? A little. The previous version of this mount was black and red, which would have matched the RedCat a lot better!
The outrage from the audience of my YouTube video (because I did not review the Star Adventurer mount) resulted in Sky-Watcher USA reaching out to me to test the Sky-Watcher Star Adventurer Pro Pro Pack. (Thanks!)
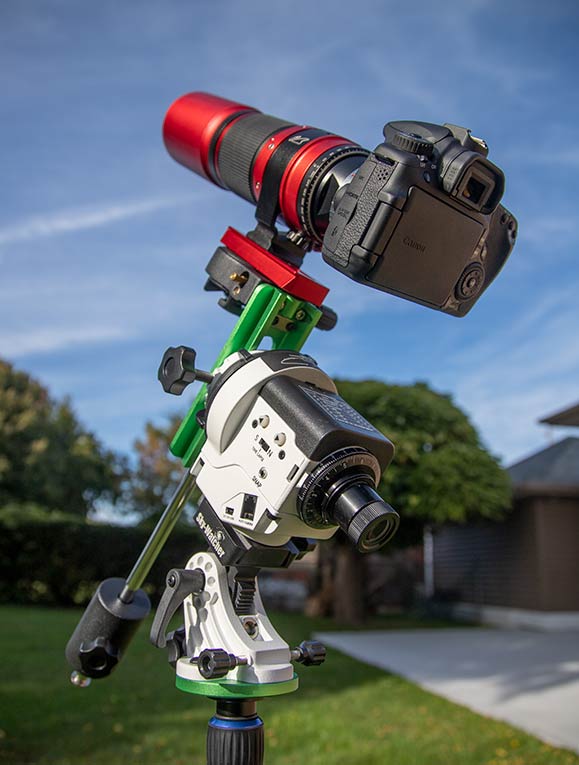
The Star Adventurer Pro with the fine-tuning mounting assembly and counterweight attached.
The Pro Pack
The Sky-Watcher Star Adventurer Pro comes in three packages. If you want to maximize this mount’s full potential and use it with a small telescope (like the William Optics RedCat 51) or heavy telephoto lens, I suggest investing in the Pro Pack.
What’s Included:
- Star Adventurer Pro Mount Head
- Dovetail L-Bracket with DEC Fine Adjustment
- Built-in Polar Scope
- Ball Head adaptor
- Polar Scope Illuminator
- Latitude EQ Wedge
- Counterweight Shaft
- 1kg Counterweight
The Pro Pack includes the multi-function mount, a polar scope with an external switch-on illuminator, a counterweight kit, a ball-head adapter, the latitude (EQ) base, and a declination bracket. The build quality and finish of the mount are impressive. The main body of the mount is metal, and the core components like the mode dial, adjustment knobs, and polar scope are solid and secure.
As I’ll discuss further later on, the fine adjustment declination mount on the L-bracket was a pleasant and much-appreciated surprise.
Another option to consider is the Sky-Watcher Star Adventurer Mini (SAM). This version is the smallest of the bunch and can handle a maximum payload of 6.6 pounds. This miniature tracking platform was designed for landscape astrophotographers looking to capture long-exposure nightscapes using a DSLR or mirrorless camera and lens.
If keeping weight to a minimum and ultra-portability is important to you, perhaps the SAM is worth looking into. I find the full-size Star Adventurer Pro to be extremely compact and portable and can easily handle some of the heavier lenses I use for astrophotography like the Rokinon 135mm F/2.
Thus far, I have enjoyed using the Star Adventurer Pro with my 250mm RedCat 51 refractor most. With my Canon 60Da camera, this provides an advantageous 400mm focal length. The image of the Orion Nebula below was captured using 16 x 90-second exposures @ ISO 3200 on the Star Adventurer Pro mount.
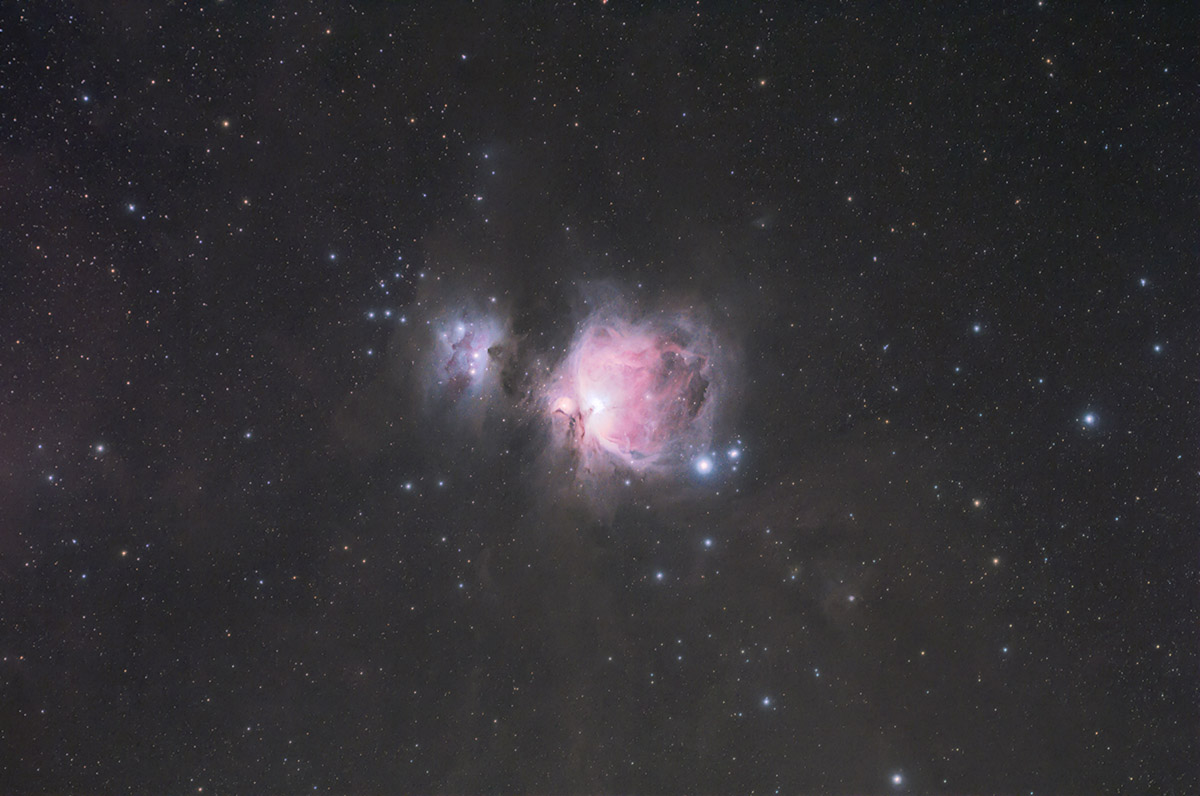
The Orion Nebula. Captured using a Canon 60Da DSLR camera and small telescope on the Star Adventurer Pro.
Complete Specifications (Pro Pack)
The Pro Pack includes absolutely everything you need to fully enjoy this mount, including the latitude EQ base and the counterweight kit. As with all of the gear I review on AstroBackyard, I was not paid to endorse this mount or any other Sky-Watcher product. Here are the core details of this star tracker:
- Mount Type: Equatorial Camera Tracking System
- Mount Weight: 3.63 lbs.
- Built-In Illuminated Polar Scope: Yes
- Autoguide Port: Yes
- Maximum Payload Capacity: 11 lbs.
- Type of Mount Electronics: Motorized (Non-Computerized)
- Built-in Battery: Requires 4 “AA” Batteries
- Motor Type: DC Servo, 144 teeth
- Tracking Rates: Celestial, 1/2 Celestial, Solar, Lunar
- Saddle Type: Vixen
- Hand Controller: None
Here is a look at the body of the mount. This helpful diagram can be found in the Sky-Watcher Star Adventurer Pro manual (PDF). I have listed all of the numbered areas of the mount below.

- Celestial Tracking Mode Dial
- Mode Index
- Polar Scope Cap
- Battery Base Cover
- Polar Scope Cover
- Mini USB Port
- RJ-12 Autoguider Port (6-pins)
- DSLR Shutter Control Port
- 3-Position Slide Switch
- Right Button and LED Indication
- Left Button and LED Indication
- Clutch Knob
- Mounting Platform
- Locking Knob
- Polar Scope Focus Ring
- Polar Scope
- Date Graduation Circle
- Time Meridian Indicator
- 4 X AA Battery Case
- Time Graduation Circle
- Time Meridian Indicator Calibration Screw
- Polar Scope Calibration Screw
- Worm Gear Meshing Adjustment Screw
- Sockey for 3/8″ Thread Screw
- 1/4″ to 3/8″ Convert Screw Adapter
Most users will power the mount using 4 X AA batteries, which will last for up to 72 hours of tracking. You also have the option of powering the mount using DC 5V with a Mini USB cable (Type mini-b) from your computer.
The power of a star tracker lies in the freedom and portability of the mount, so do yourself and power the Star Adventurer using batteries.
The mode dial has 8 positions, giving you 7 possible tracking speeds (position 1 is “off”).
Tracking Speeds:
- Celestial Tracking
- Solar Tracking
- Lunar Tracking
- 0.5X Speed (48-hour Rotation)
- 2X Speed (12-Hour Rotation)
- 6X Speed (4-Hour Rotation)
- 12X Speed (2-Hour Rotation)

The mode dial lets you select the tracking rate of the mount.
How the Star Adventurer Pro Works
If you own a DSLR camera and a sturdy tripod, the Star Adventurer Pro opens up the world of astrophotography to you. That’s because this tracking camera mount will compensate for Earth’s rotation and allow the capture of long exposure images of deep-sky objects without star trailing.
You could actually use the Star Adventurer for visual astronomy, too, if you wanted. The mount can handle up to 11 pounds of gear, which means a small refractor telescope with a diagonal and eyepiece is an option.
If you have never used an equatorial mount for astrophotography before, the first thing you need to know is that polar alignment is critical.
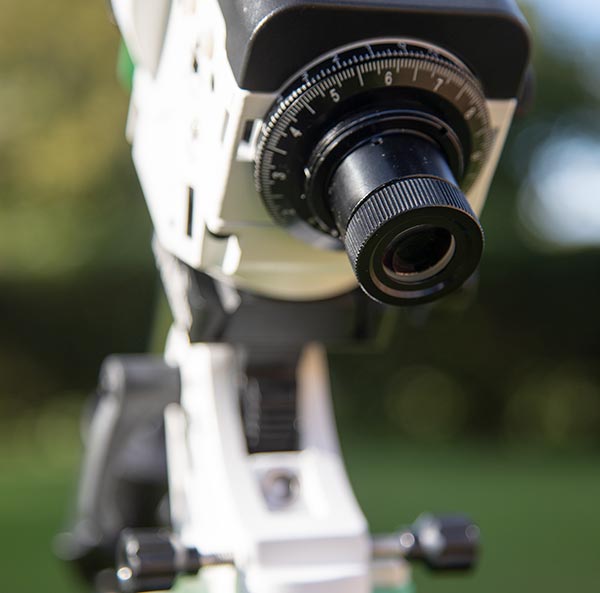
The built-in polar scope on the Sky-Watcher Star Adventurer Pro.
To polar align the Star Adventurer Pro, you need to align the latitude wedge with the north or south celestial pole from your geographic location. For me, that means adjusting the altitude control knob so that 43 degrees north is set.
Then, it’s a matter of moving the azimuth controls from side to side to place the north star in the correct position.
I use a smartphone app called Polar Finder to identify the exact position Polaris must be in from my location and time. Once you get used to it, adjusting the Star Adventurer’s (or any other EQ mounts) Alt/Az controls is quick and easy.
Once you are polar aligned, you can dial the mode dial to 1X celestial tracking rate, which will match the apparent motion of the night sky. Images of 1-minute in length or more will no longer show star trailing, and deep-sky astrophotography is now possible.
Using a Ball Head vs. Fine-Tuning Mount Assembly
If your interests lie in wide-angle nightscapes or Milky Way photography, chances are a ball head is your best option. A DSLR or mirrorless camera and wide-angle lens are relatively lightweight when compared to a telephoto lens or telescope. In this scenario, a ball head will easily support your camera and lens, and you’ll have the freedom to point the camera in whichever direction you like.
To use a ball head (not included with the mount) on the Star Adventurer, you can use the green 3/8″ ball head adapter. This attaches to the mounting platform, and then you can thread the base of your ball head to it.
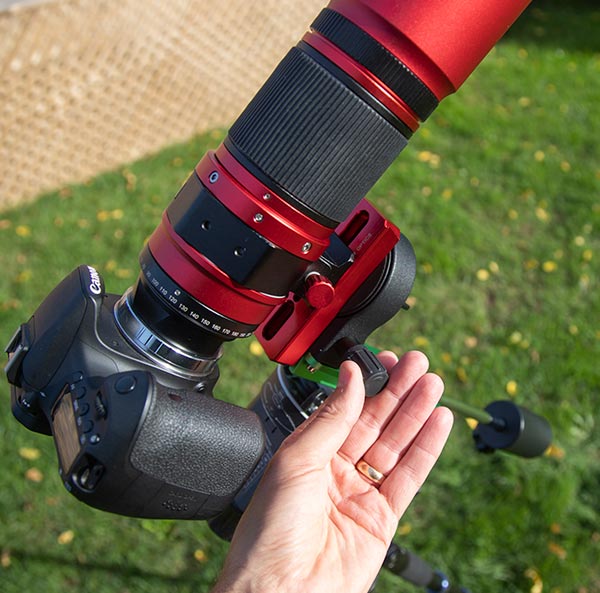
When using the mount with a DSLR camera and lens, the ball head and adapter is a handy configuration.
If you are using a longer lens in the 200-300mm range (or a telescope), you’ll probably want to use the fine-tuning mount assembly. The dovetail bar and declination bracket that comes with the Star Adventurer is probably my favorite feature of the mount overall.
You can mount your camera to the declination bracket of the Star Adventurer using the 1/4″ thread screw on the base of your lens collar or telescope mount. Then, just screw the counterweight bar into the bottom of the fine-tuning mount assembly, and adjust the height of the weight to achieve balance.
Adjusting the height of the dovetail bar on the mounting platform and the counterweight itself should allow you to balance your load evenly.
How to Find and Frame Deep-Sky Objects
The mount does not include a computerized GoTo system, so you’ll need to find and frame objects yourself. A lot of people ask me how to accomplish this, and it’s really not that hard. If you are looking for GoTo functionality, you will want to check out the Sky-Watch Star Adventurer GTi model.
Just use a planetarium app on your phone or desktop computer to get an idea of where the object you wish to photograph lies. That means finding the location of the object and the constellation that it is in, so you have a point of reference when you’re outside.
The brightest objects make this experience much easier. For example, in the northern hemisphere, the Pleiades star cluster is very easy to locate in the night sky, even in a light-polluted area. Once you’ve spotted its location, you simply use the RA and DEC controls of the Star Adventurer to frame up the object using your camera lens or telescope.
If the object is bright enough, you can use the viewfinder on your camera to center it in the frame. You can also focus the image at this time as long as there is at least one bright star in the field.
To focus your camera lens or telescope, you can use the live-view mode on your camera and zoom in 10X. You could also try using a Bahtinov mask, which will create a useful star pattern as a reference.
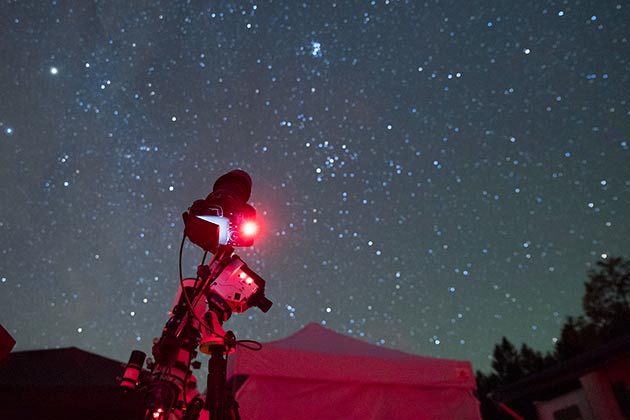
Set up under dark skies for astrophotography with the Star Adventurer Pro.
Helpful Tips and Advice
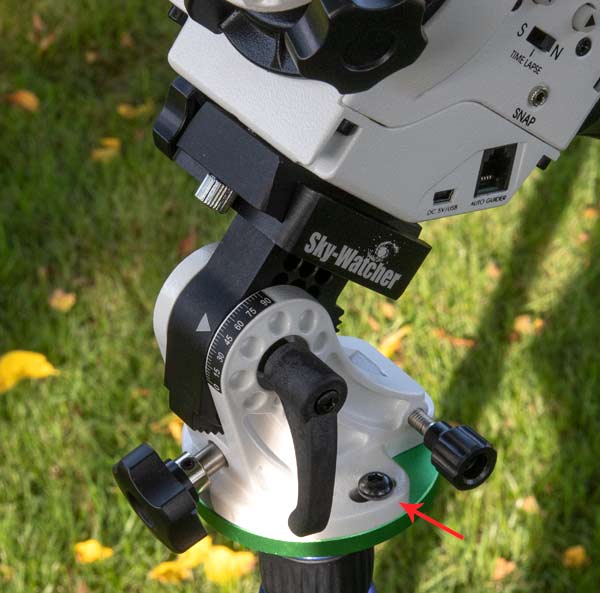
One thing I wanted to mention to new owners of the Star Adventurer Pro Pack is to remember to remove the 1/4″ to ⅜” convert screw adapter on the base of the wedge before installing it on your tripod.
The adapter is inside of the wedge base from the factory, but you’ll need to use a slotted screwdriver to remove it so it will thread onto your tripod.
The included adapter is handy, but I feel that some owners will wonder why the wedge will not fit on their ¼” thread tripod if they haven’t removed it.
The Star Adventurer includes a DSLR shutter control cable to directly control your camera’s shutter release with pre-programmed shutter intervals. I must admit, I have not used this feature because I am rather comfortable with my own intervalometer I’ve been using for years. However, if you don’t already own a remote shutter release cable, this is likely a nice bonus for you.
Which Tripod to Use?
If you already own a sturdy photography tripod, you can thread the altitude base of the Star Adventurer on top. Due to the added weight of your camera equipment (which may include a small telescope) a star tracker needs to be much more secure than a traditional panning tripod head does.
If you find that the configuration, including your original photographic tripod, is unstable, you should look into the Sky-Watcher Star Adventurer Tripod. This adjustable-height tripod is also compatible with the AZ-GT series and AZ5 Sky-Watcher mounts.
This tripod includes a spreader for added stability and a handy eyepiece tray, which is beneficial for amateur astrophotographers.

What I Like
The mount feels very stable,, and adjusting the altitude and azimuth controls of the base are precise. I can polar align the Star Adventurer quickly and accurately without the need for an electronic polar scope like the PoleMaster or iPolar.
My favorite thing about the Sky-Watcher Star Adventurer is the declination bracket and controls. The DEC bracket makes it very easy to attach your camera or telescope to the mount. By releasing the clutch and turning the declination adjustment knob, you can point your camera or lens in any direction in the sky. When you have framed up your target, you can lock the RA clutch and begin tracking the object for an extended period of time.
I really like the smooth, secure declination bracket on the fine-tuning mount assembly.
The included Sky-Watcher Star Adventurer Dec Bracket lets you attach a camera or small telescope, which can then be pointed to different Declination angles as you wish. The Dec bracket includes a motion control knob and a Dec axis locking knob. With the Dec Bracket installed, the Star Adventurer becomes a functional equatorial mount including Dec angle adjustments operating with manual control.
The fine-tuning mounting assembly with the ¼” screw is absolutely fantastic. I love the locking mechanism underneath, the precision declination angle control, and the overall secure and balanced nature of the design. If you plan on using the Star Adventurer with a small telescope, this will likely be your favorite aspect of the mount too.
I was a little surprised to learn that the mount is powered using AA batteries rather than a rechargeable lithium-ion-style battery. However, I honestly don’t think this is a negative aspect of the design because it’s actually quite a practical and handy feature. You can buy AA batteries almost anywhere, which means there is no excuse for being without power in the field.
If you are looking for a second opinion, my friend Nick over at Astro Exploring has also put together a great video review of the Star Adventurer Star Tracker. Nick goes into detail about the equatorial wedge, dial, autoguiding port, and ball-head adapter.
Tracking Accuracy
As amateur deep-sky astrophotographers will tell you, tracking accuracy becomes extremely important when shooting through a long lens or telescope. I tested the Star Adventurer Pro with an equivalent focal length of 400mm (Crop Sensor DSLR + 250mm telescope), and the Star Adventurer held up exceptionally well.
Here is a single 1.5-minute exposure @ ISO 3200 using my Canon DSLR and RedCat 51 refractor on the Orion Nebula. I’d say those stars look pretty round, wouldn’t you?
![]()
This means that anyone shooting with focal lengths of 400mm or less can expect similar results when the mount is accurately polar aligned and balanced. These results are very impressive for a portable star tracker.
What Could Be Improved
As mentioned in Peter Zelinka’s detailed review of the mount, the mode dial can be easily switched on in your camera bag by mistake. Although I always bring a spare set of AA batteries with me when traveling with the mount, it would be a shame to run the batteries dry by accidentally turning the mount on. Perhaps a way to lock the position of the dial with a simple switch could be introduced for the next design.
The polar scope illumination is accomplished by clipping in a small red LED light on the front of the polar axis. The simple device runs on a small battery and can be switched on and off. I would have preferred the light to be inside of the mount at all times because it would be very easy to misplace such a small item when traveling.
The azimuth screws on either side of the wedge base are simple and easy to adjust. However, to “lock” the azimuth position down, you’ll need to use an Allen key to tighten the bolts down all the way. In reality, you could probably get away with tightening these screws by hand.
Astrophotography Results
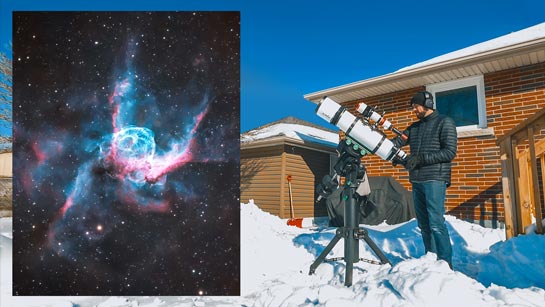
I have used the Star Adventurer Pro for several deep-sky imaging sessions from my backyard and a dark sky site. Many people use this portable mount with a DSLR camera and lens, but the real test of its tracking capabilities is realized when a telescope is used.
Here are some of the images I’ve managed to collect using the Sky-Watcher Star Adventurer Pro using a telescope with a demanding equivalent focal length of 400mm.
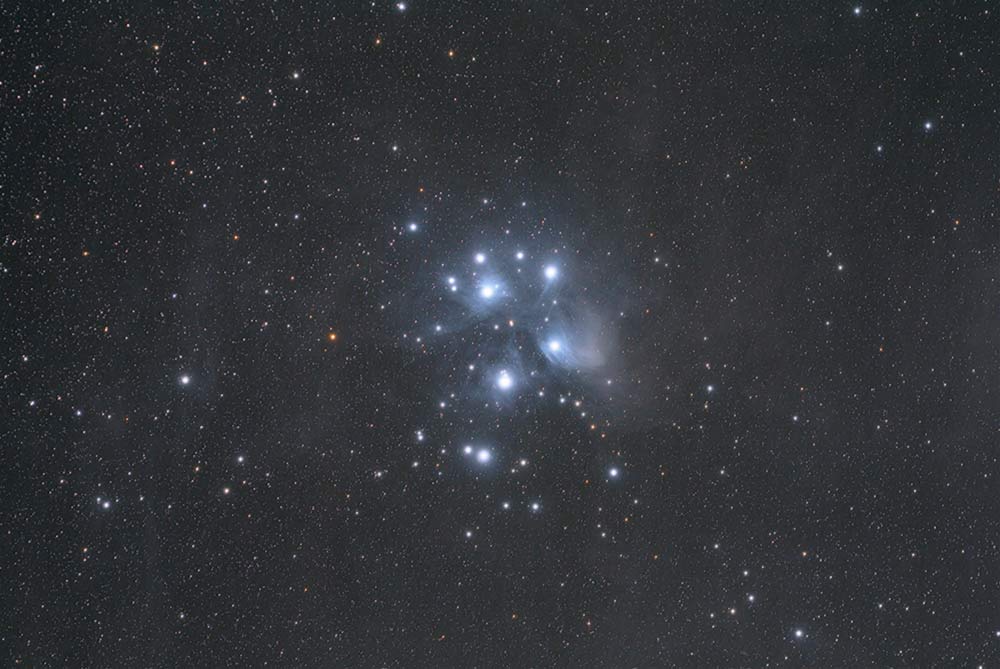
The Pleiades Star Cluster. Star Adventurer Pro + William Optics RedCat 51.
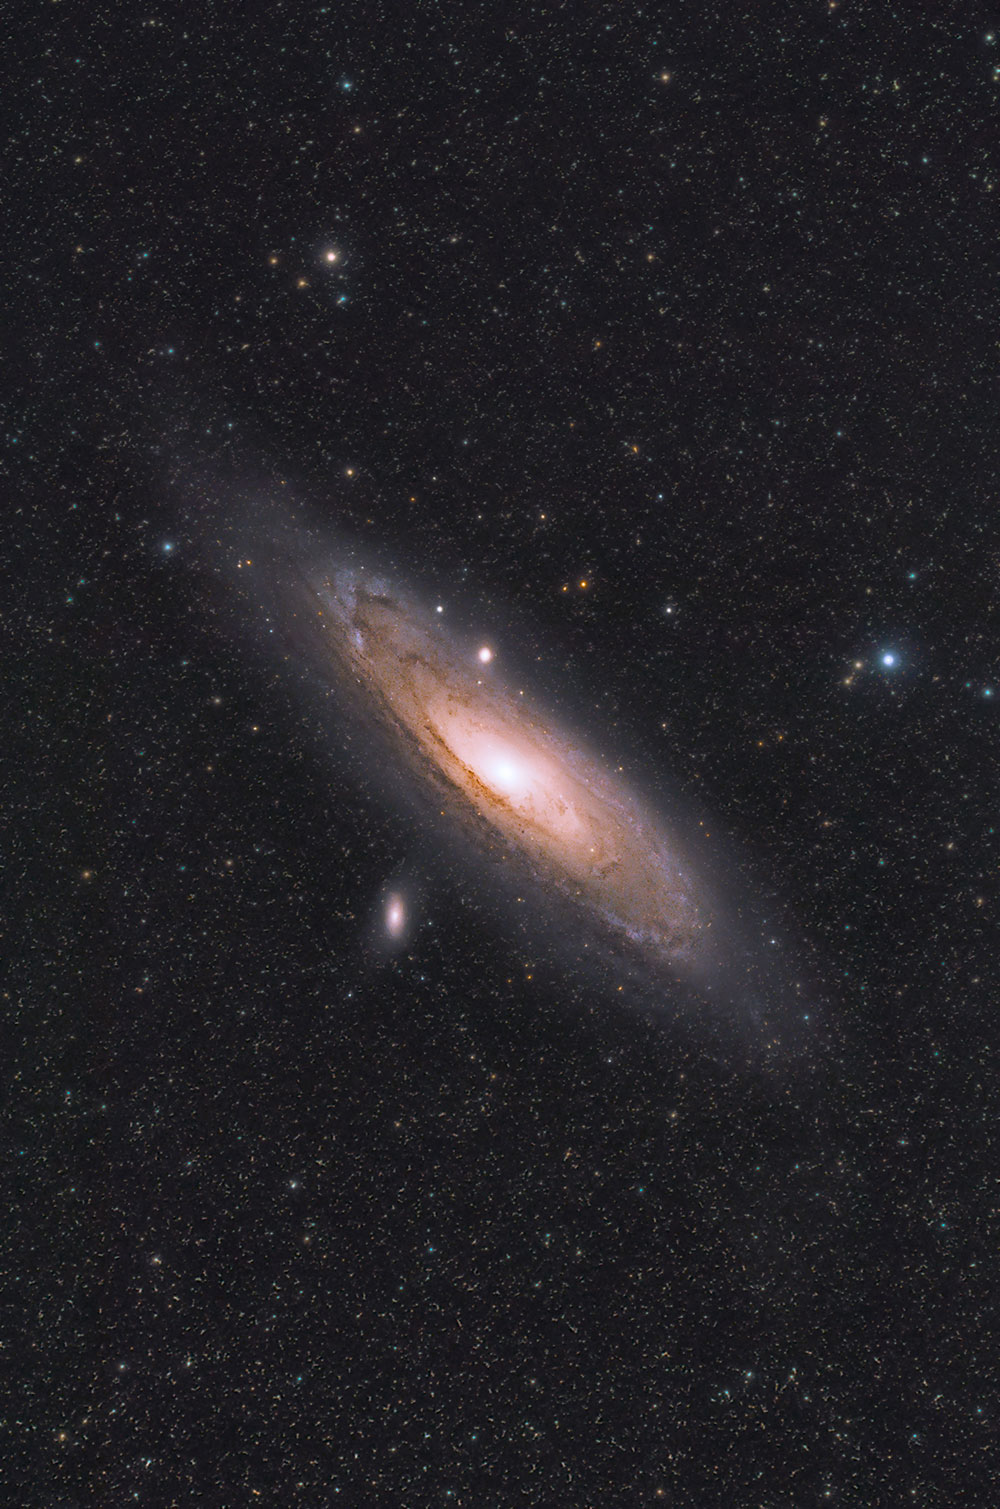
The Andromeda Galaxy. Star Adventurer Pro + William Optics RedCat 51.
Sky-Watcher Star Adventurer Pro vs. iOptron SkyGuider Pro
If you’ve followed this blog for some time, you’ll know that I’ve been using my beloved iOptron SkyGuider Pro for a long time, and loving every minute of it. So how does the Star Adventurer Pro compare the SkyGuider?
First off, I’ll say that I found it easy to collect impressive images using both mounts. They share many positive similarities including the handy polar alignment scope and reliable celestial tracking performance.
The differences between the two mounts lie in the hardware, fit and finish, and overall user experience in the dark.
For example, I found the latitude EQ base on the Star Adventurer Pro to be slightly better than the stock version on the iOptron. If you remember, I upgraded to the William Optics wedge base for the SkyGuider, and that evened the playing field. But you shouldn’t have to upgrade the base for reliable results.
I know that iOptron received a lot of valuable feedback about the included base, and I expect that they will improve upon the design in the future. It works fine; it’s just a bit finicky to get right. As you know, when it comes to astrophotography, your tripod and mount must be extremely secure and solid for successful results.
The iOptron SkyGuider Pro wins in the polar scope department. The Star Adventurer Pro has a beautiful little scope in it, and it works great, but you need to attach an external clip to illuminate it. Don’t get me wrong, it’s a great design and it works fine. The problem is, it would be very easy to misplace and/or lose the tiny illumination device for the polar scope. The SkyGuider Pro’s light is built inside of the mount and you’ll never forget to pack it or leave it on.
The declination bracket on the SkyGuider is notoriously unimpressive and users often upgrade this element. Again, William Optics came to the rescue and manufactured a gorgeous declination bracket design that feels like it should have been there from the start. In comparison, the smooth control knob and stable base on the Star Adventurer is my absolute favorite feature of the mount.
I love that I can slide the dovetail bar up or down on the mounting platform on the Star Adventurer. This ensures that I achieve the perfect balance when mounting a small refractor and DSLR camera on top.
![]()
Final Thoughts
I must say, I now realize why everyone was so upset that I did not mention the Sky-Watcher Star Adventurer Pro when I discussed the topic of star trackers as a whole. Not only did the Star Adventurer Pro meet my demanding expectations of a portable tracking mount, but exceeded them in terms of enjoyment of the setup process.
You may have noticed that I did not test the autoguiding performance of this mount despite the fact that it includes a built-in autoguide port. Adding this element to the acquisition process can generate worthwhile results, but I tend to avoid this type of imaging when using a star tracker and save autoguiding for my advanced setups.
Although the Star Adventurer has some quirks like a dial that’s easy to turn on by mistake and an “add-on” polar scope illuminator, I think it’s an exceptional value and a great product.
The fine-tuning mounting assembly and secure declination bracket is the most impressive design aspect of the Star Adventurer, and anyone who’s previously used an iOptron SkyGuider Pro will know why. If you’ve already invested in a competing model like the iOptron SkyGuider Pro, I see no reason to switch to the Star Adventurer Pro Pack.
However, if you’re in the market for your first star tracker, I think you’ll be absolutely thrilled with the Sky-Watcher Star Adventurer Pro – just make sure you get the complete package (Pro Pack!)

Related Posts:
- Choosing a Telescope for Astrophotography (Top Choices)
- How I Photographed the Southern Hemisphere Milky Way Using the Star Adventurer 2i
- Best Telescope Mounts for Astrophotography (At All Skill Levels)


I think some people over react in the comments section. I viewed your using the iOptron trackers as, you used what you had AND you were getting great results.
I am not sure why people get upset at you promoting stuff you get to demo etc. I personally am jealous I don’t have an awesome youtube channel and get to try out all this cools stuff!
Good on you! You put in a ton of hours and are boon to this hobby.
That said, it is great for you to try out the Star Adventurer. I got mine a few months back and it rocks! Pricing is sub $500 for the pro pack and I think it is a great deal.
I am shooting with a Canon 7D Mk ii with 300mm F4 and I am managing 2 minute subs no problem. I am looking forward to trying out the guiding feature later on.
From a portability perspective, I took mine on a motorcycle trip this past august, so easy to pack along with my other gear.
Keep up the good work and best wishes.
Cheers
Hey thanks Mick! I really appreciate that. Very cool to hear that you are using the Star Adventurer on motorcycle trips when packing light is a must! Clear skies, man. Thank you
Got my StarAdventurer Pack just a day before and had only one night during which I did not manage exposures over 15 seconds without trails using a 360mm APO and a DSLR. Needs practice. Your article is motivating me and so far I share your impressions. Thanks a ton, man 🙂
Dear Trevor,
I am a absolute beginner in astrophotography, but amateur photographer since thenths of years.
My equipment consists of : a Nikon 300mm ED lens, a stock sony A7Rii, a Canon T4i semi filtered (only 1 IR sensor filter removed)and a skywatcher star adventurer mini).
May I add to your mentionning of the SAM a manual well hidden feature : the payload of the SAM is raised to 4kilos when the mount is balanced, which is only 20% less than the adventurer pro. But the mechanism is probably lighter.
With my setting, I have achieved exposure times of « only » 30-45 sec without star trailling (full format camera) with a polar alignement that coud probably be slightly improved, as well as the stability of the tripod. Thus I would say 1’ could be the ultimate exposure limit for that mount.
My aim is to get the best images possible of nebulae with that equipment (maybe later on upgrading the tracker to a skyguider/skywatcher adventurer and the lens for a small refractor such as the WO Z61 that you highly recommend)
After readings your papers on the use of Ha filter, I have a question relative to which filter to use with the newly aquired Canon : a Ha or an Astronomik CLS (cutting pollution wavelengths, with good transmition of O and H bands). I am wondering if the CLS could not directly give a result similar to a Ha file used as a luminance layer blended with sparate RGB layers.
Does that reasoning sound correct to you? I would appreciate your advice on the choice of filter.
Thank you for the numerous papers and videos which are unvaluable for astronovice people like me.
Francis
Hey Trevor I just wanted to let you know that Skywatcher is providing an alternate Firmware for the Staradventurer that let’s you control the shutter speed (and much more) of the built-in shutter release.
Although I have to admit that the “user interface” is far from being easy in this case.
Thanks for your very thorough and detailed review of the Star Adventurer Pro (SAP) Trevor.
I’ve recently downsized from an 8” SCT and gone with two portable rigs. The SAP for astrophotography and the Skywatcher AZ-GTI + 127mm Mak for visual. Both mounted on old but sturdy Manfrotto tripods. Extremely portable, quick to set up/tear down and definitely much kinder to my ageing joints!
I agree 100% with you on the illuminator. It’s one of the few drawbacks of an otherwise extremely impressive package. I’d also add that it’s just a matter of time before I lose both the battery and polar scope covers in the darkness one night. Black plastic and secured by a combination of friction and optimism is not a good combination!
Clear skies!
Hi Trevor,
I got my star Adventurer Pro Pack about 9 months ago and I’ve gotta say it rocks. The first time I used it I took 20 x 30sec images of the Orion Nebula @ f5.6 iso 3200 using my Canon 5D Mk4 and Canon 100-400 L Mk2 lens (a pretty heavy setup). These shots were taken from my back garden in a heavily light polluted area in England and I ended up with a very acceptable result after stacking in Sequator. The mount tracked perfectly and gave very nice round stars. The only problem I had was with focus and slight over-exposure so the core ended up burnt out which was my fault. I’ve now got a bahtinov mask so that should sort my focus problem and I intend to to underexpose a few shots next time to get some detail in the core. Really enjoyed your review and yes, my only complaint with the mount is the afterthought polar scope illuminator which I’ve knocked off the mount on numerous occasions (not funny in the pitch black).
Cheers
Derek
Hi Trevor,
I use the iOptron Sky Guider Pro and find that using a red dot finder in my camera’s flash hot-shoe is a great aid for locating targets with a longer lens. In my case Olympus has an EE-1 red-dot sight but I have seen brackets that allow a standard red dot finder to fit the hot-shoe bracket. Keep up the good work!
Thanks for the review. I agree that the polar scope is the weakest part of the package. Mine came with the north south alignment indicator turned about 15 degrees from the alignment of the declination bracket and I can’t figure out how to adjust it. The description in the manual is unreadable. Otherwise, it is solidly built.
I’m super glad you were able to provide a complimentary review and comparison to the iOptron equivalent. I think you nailed the pros and cons of both, and I’m sure to end up with one or the other at some point to use with my WO RedCat 51. Having someone like you who is familiar with so many products do a sensible review is really fantastic for the astrophotography amateurs like me.
THANKS!
Hello again, Good review. I have to say though I’m shocked that you were able to image M31 with the Redcat and that skinny mount! Wow!
I need to borrow your bag of magic tricks!
Jack P.
AKA TicTac Jac (youtube ID)
Trevor, Hi from Chile. I think I was one of the first to share my “gripe” about the lack of any mention of the Vixen Polarie or the SW Star Adventurer in your overview of several star trackers a few weeks ago. I fear there may have been some misunderstanding and for that I apologize. I don’t believe for an instant that I or anyone had the intention of being “upset”, rude or angry, etc. I believe we all admire, respect and appreciate you and your amazing skills way too much to even consider that. I think the feeling being expressed was just that any overview of current star trackers without at least a mention of this gem would be sadly incomplete, leaving newbies uninformed about some very worthwhile options. The beautiful thing is, you didn’t see this as a problem, but an opportunity, and as a result, produced what is in my estimation the best, most thorough review yet of the Star Adventurer to be found anywhere (BTW, much better than the one done by your buddy down under). I agree with you completely about the many strengths and few weaknesses of this unit. The clip-on polar scope iluminator is a joke – mine is lost somewhere in some weeds in southern Patagonia, Argentina. Also, the AA battery compartment is very tight and swapping batteries with just your fingertips can be a pain. But other than that, this is the mount I waited a long time to see. Back in the late 90s, when hauling around my old wedge-mounted C-8, I kept thinking “why can’t someone miniaturize all this into a well-made portable system? Then the Vixen Polarie showed up, and I thought – “great, but it is too small, with two few of the features I want”. But the Star Adventurer hit the Goldilocks point – a great feature set and build quality in a very, very affordable and portable package. I agree that the DEC bracket is superb. I use the center 3/8” thread to hold a second ball head and an autoguider, which gives me even longer exposures. It is indeed, wonderfully versatile. I can only imagine what this portable tracker world may look like in five years time. We are indeed riding the crest of a wave of amazing developments in this hobby. Thanks again for all you do to keep us informed and motivated. Greetings to Ashley and Rudy.
Hey Trevor, i have been a fan of your channel for a while and watched almost all of your video’s.
They have inspired me to take the plunge and buy the adventurer pro package this summer. I have to get a cls filter though because the light polution here in the netherlands is just aweful.
I want to thank you for your clear explanations on various subjects on your channel and for usually going the hard way. It teaches me a lot.
Please keep on doing things your way.
Clear skies 👊🏻
Hi Trevor,
Great review on the Star Adventurer Pro. I bought this pack almost a year ago and find it a great setup for my T3i and 100-400mm L lens.
I borrowed Peter Zelinka’s tip regarding polar alignment and downloaded the free Star Adventurer Mini console app. This has the exact polar scope setup and gives you the correct position based on your location. And it’s free!👍🏻
Iv’e managed to stack 50 x 90 sec exposures of M51 (Whirlpool galaxy) and came out with a great result from a city location. Going to try the Veil Nebula with it and the Orion Nebula when it climbs up the sky during winter.
Keep up the great work you do. I find your you tube channel a great source of info and motivation to attempt new things. My local Astronomy society are running kids courses and I have a slot on Astrophotography. I will be recommending they take a look at your videos and website as it’s great for beginners!
What software do you edit your videos in?
Kind Regards
Darren
Great post about the Black Forest star party on your YouTube channel. What were the reflective safety ‘rings’ (I think they were called) on the tripods and extension cords? I’ve been looking everywhere and I don’t see that you have included them in your equipment lists.
Also, I’m a few hours almost directly west of you. Looks like clear skies tonight.
Hi,
Thanks for the review. What is you drop/keep ratio when exposing 1.5 minutes subs with the SWSA at 400mm equivalent? I have one and paired with a tairs 3s 300mm on a full frame and still I got the drop rate at about 80% when exposing at 90 secs or more.
Hmm. Having to drop 80% of the frames isn’t very practical. The right answer here really depends on your personal screening process for an acceptable sub to stack. I like to use the “score” feature in DeepSkyStacker and lean on its opinion. Also, I think there is something at play if you are getting some trailing in a 90-second image at 300mm. For my images of Andromeda, Pleiades, and Orion on this page – I used the best 90% of the shots I took. However, I am sure some people would reject a higher number of subs to achieve a sharper final image. To each their own!
Great review. I agree with your comments and would add that on mine the plastic battery cover has a tendency to slide off.
I see a new lightweight tracker MSM has an option to use a laser pointer for polar alignment. This would be a useful addition on the SW. Because of its shape it’s difficult to retro fit but I am working on it.
I love your videos and your reviews and wish you continued success.
I’ve just seen your video on the star adventurer, I can tell you I have the older version which I’ve been using for about four maybe five years, I’m a nature photographer first (44 years) with an interest in the night sky and this was the first mount I could justify buying with its price point for a piece of kit with limited use, i had looked over the years at the early mounts such as the Vixen Polarie and the Astrotrac but couldn’t justify spending the money for limited use, I was quite interested in your comment that you may lose the pop on illuminated polar scope finder in a couple of years, checking my amazon account I’ve bought 16 in four and a half years I’ve also replaced the battery cover 7 times although I’ve given up with the cover now and just use a length of electrical tape and I’ve also had 8 covers for the finder scope probably more important for keeping the worst of the crap off the scope, I do keep rechargeable batteries in it and it has rattled around in bags and boxes in the boot of the car on the back seat and slid around on the floor of the car and never once has the switch moved from the off position could be luck or maybe the older version is stiffer than the new but if it was a big deal to you just remove the batteries and stick them in when you’re setting up a faff but like everything else if you do it often enough it becomes second nature.
Great review !
I´ve using the Star Adventure for some years now, but i dislike the polarscope because it could be focused at all.
Its only possible to focus the engraved plate which shows the markings for the polar adjustment but not the the polarscope on the sky.
I wonder that nobody has this problem as I study the remarks here.
To make the alignment of the mount more “user friendly”, I have designed and 3D-printed adapters
– one to allow the use of the polar illuminator with the L-bracket in place,
– one to attach a right-angle-viewer on the polarscope (save your knees and back),
– to attach a Polarscope.
Watch them on my website : http://www.astrokraken.fr
I recently bought one of Phillippe’s polar scope adaptors and have to say it’s a 3D printed miracle. Merci mon ami.
De rien mon ami.
3D-printing is a miracle for DIY addicts.
My knees and neck fell much better since I applied 3D printing to asrophoto materials.
Clear skies !
I just bought the a Star Adventurer and it comes bundled with an adaptor now for the polar light….
I greatly appreciated your honest and concise review! I’ve just begun the hobby and refer back to your videos and site often. Keep ‘me coming! Thanks!
My native language is Russian, it happened so) I have been using this tracker since 2015, now I can say that just out of the box it will work with restrictions. Today my tracker makes confident three-minute exposures with an equipment weight of 3.8 kg. This was not easy to achieve. Now I make him a belt drive and I have already ordered all the necessary parts. Just in case, I’ll leave the address of my playlist, maybe someone also speaks Russian)) https://goo-gl.su/6Hfnx
Thanks for the useful review.
One quibble: i think your references to a 400mm “equivalent” focal length are misleading. Sounds like the focal length of your optics is 250mm — and that alone sets the plate scale on your detector. If you used a full-frame sensor instead of a ‘crop sensor’ you’d have a bigger field of view, but that’s all. Your focal length is 250mm either way.
The point here is that you’ve tested the tracking accuracy at 250mm f.l., not the considerably more stringent 400mm that’s implied — unless i’ve misunderstoo d 🙂
Thank you for all the detailed information posted in your article!
Do you know if any Sky Tracker is capable of the holding the weight from a Nikon 200-400mm F/4 lens (7.4 lbs) along with the Nikon D500 (2 lbs)
Thanks in advance for any advice.
Mike
Hi!
Great article!
I am curious can I use this mount with Zenitstar 73 or Esprit 80, and small Apc-S mirrorless camera, or it will be too much heavy?
Regards!
You’re wrong. If he was cropped, he had real field of view of 400mm lens with all it takes.
Hi Trevor,
I have the SA2i version. One issue you didn’t explain here is how to physically attach a scope/dovetail to the DEC bracket head when that head only has the one screw. I bought a vixen dovetail clamp (having had First Light Optics suggest it as a solution) but the clamp centre hole, while threaded correctly, doesn’t allow for the clamp to sit tightly on the DEC head and it still turns while mounted as tightly as I can get it. So what I have done is added a metal spacer on top of the screw on the DEC head then twisted the clamp on. This does then allow the clamp to fit much tighter on the screw (but still not perfect at all) and then I add my 70ED with its dovetail to the clamp. However, with a brand new scope and DSLR camera hanging off the end of it (plus the fact the scope/camera is heavier than the counterweight so I have balance issues), makes me very nervous. Any suggestions?
I don’t understand this mount. I just bought one.
Your camera and lens (“small scope”) are perpetually pointed at Polaris. What if that’s not the direction you want to take pictures in?
I’m trying to figure out how this thing is going to help me take pictures of the eclipse, particularly if I’m using a small (but not insubstantial) telescope.
You can adjust the declination of your lens or telescope by turning the little rubber knob where your telescope is attached. Just give it a few turns with your optics attached and you’ll see what I mean. For RA – you just unlock the clutch, swing it around and lock it again. You can also try a robust ball-head for total freedom of movement, but you’ll need to make sure your camera/lens aren’t too heavy for it.
Hi Trevor. I’ve got a question. I’m currently using the sky watcher star adventurer with modded canon t3i with sky tech cls ccd filter and Tamron 70-300mm lens. For some reason, I can only do 30 second exposures before I see star trails. Why is that? And how can I minimise the noise in post processing as my images are quite grainy.