Narrowband Imaging Beginners Guide

Narrowband imaging involves isolating and capturing specific wavelengths of light using filters. Deep-sky astrophotography enthusiasts can produce dynamic images of objects in space through their telescope with the help of narrowband filters.
The following video provides an overview of the topic of narrowband imaging and how you can create a Hubble Palette image using narrowband filters.
To better understand narrowband imaging, let’s first discuss normal (broadband) color imaging. For regular color imaging, there are three filters used to separate the primary colors within the visible spectrum.
These filters are red, green, and blue, also known as RGB filters. Each filter covers a part of the visual spectrum. These RGB filters can produce a wide range of full visual colors within your images, depending on the settings you use.
This type of astrophotography is often called broadband “true-color” imaging, as you are collecting the natural colors of objects and stars in the night sky. Narrowband imaging, on the other hand, involves capturing very specific wavelengths of light at a time.
The photo below was created by capturing images with a monochrome camera and narrowband filters (Ha, OIII, and SII).
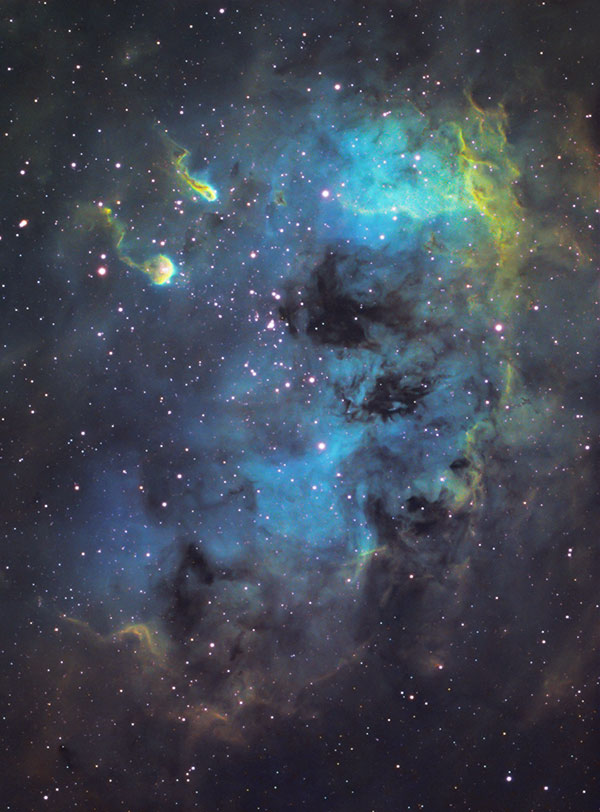
The Tadpoles Nebula using 6nm narrowband filters.
If you’re shooting your astrophotography images with a traditional DSLR or mirrorless camera, you are collecting light across nearly the entire visible spectrum at once.
The image below of the Cocoon Nebula was captured using a one-shot color astronomy camera and a broadband filter. This type of photography has the advantage of collecting “complete” color images in a single shot, with natural-looking colors in the image.
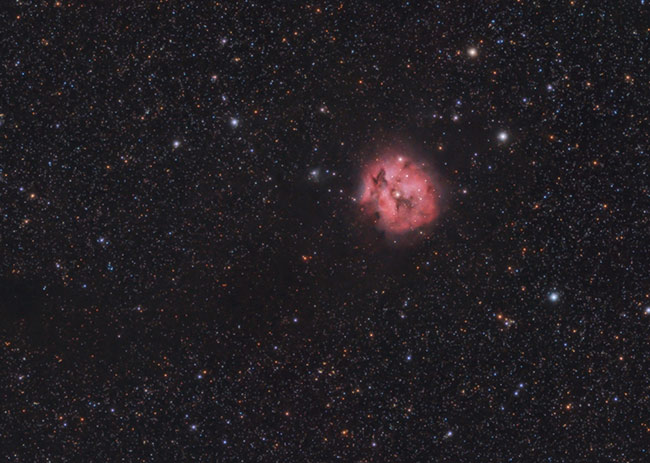
A broadband color image captured using a one-shot color camera.
While broadband “true color” imaging offers the advantages of convenience and natural star colors, it also presents numerous challenges in astrophotography. Light pollution (light pollution filters are designed to reduce this effect), gradients, poor signal, noise, and many other factors come into play, and these are the primary reasons professional astrophotographers typically shoot with a monochrome camera.
Here are a few popular monochrome astronomy cameras available today. The narrowband images shared in this article were captured using the Starlight Xpress Trius 694 and a ZWO ASI2600MM Pro. Although capturing narrowband images with a color camera is possible, a monochrome camera will benefit from a much stronger signal.

Monochrome CMOS and CCD cameras for astrophotography.
Narrowband Imaging
Narrowband filters capture a small part of the visual spectrum. Narrowband filters are designed to pass a very restricted band of wavelengths around specific emission lines of Ha, SII, and OIII.
- Ha (Hα) 656nm = Hydrogen-Alpha
- S-II 672nm = Sulfur-II
- O-III 496nm = Oxygen III
As their name suggests, narrowband filters have a “narrow” bandpass. The bandpass determines how much of the spectrum the filter permits to pass. This amount is measured in nanometers.

The transmission graph for ZWO’s narrowband filters (ZWO ASI Astronomy Cameras).
The whole visual spectrum runs from a wavelength of 400nm (blue) to 700nm (red). For example, an RGB filter may have a bandpass of 100nm. Whereas a narrowband filter may have a bandpass of as little as 3-5nm.
The advantage of narrowband imaging is that it allows for the detection of more detail in your image and enables imaging from light-polluted areas.
This is because the filters help to restrict the light emitted from street lights and other sources of city light pollution.
Narrowband images isolate the light produced by specific types of gas within your target in the sky, and they reveal a lot of information about the image that is captured. For example, scientists are able to learn a lot about the compounds of a nebula using these types of images.
Another advantage of narrowband imaging is that it minimizes the size and impact of the bright stars in the field. Stars captured through narrow bandpass filters are much smaller and not overpowering as they can be when collected in broadband.
This helps when processing the image, and helps to add impact to the image by drawing your eye to the structure of the nebula rather than the stars. Anyone who has taken an image of a bright emission nebula using a hydrogen-alpha filter will understand the benefits of this firsthand.
What is the Hubble Palette?
You may have heard the term “Hubble Palette” come up in conversation with fellow astrophotography enthusiasts. This is referring to the color palette made famous by the Hubble Space Telescope (HST), which photographs objects in very narrow wavelengths of light using various filters.
Visible light spectra are measured in nanometers. Here are the values as they relate to the colors in the visible spectrum:
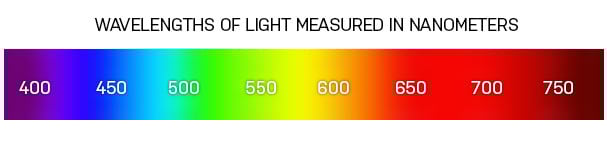
The colors of a nebula in the night sky are a result of the various gases that glow or reflect light, and narrowband filters can isolate the colors of these gases.
When a monochrome camera is used (like the one on the HST), the light collected from each gas in the nebula can be mapped to any color you want.
When astrophotographers process their images in the Hubble Pallete, they are typically using the following color associations for each filter:
SII – Red
Ha – Green
OIII – Blue
Have a look at what experienced and talented astrophotographer Sara Wager can do when processing her images in the Hubble Palette: Sara Wager Astrophotography.
It may seem odd to arbitrarily map specific gases captured in black and white to colors. The question, “Is that what it really looks like?” comes up often when explaining the process to beginners.
The key to the HST palette’s beauty and function is that it reveals more details of the object than you could ever see with the naked eye. For example, any light collected in the 373nm wavelength is close to the ultraviolet, which our eyes can not detect.
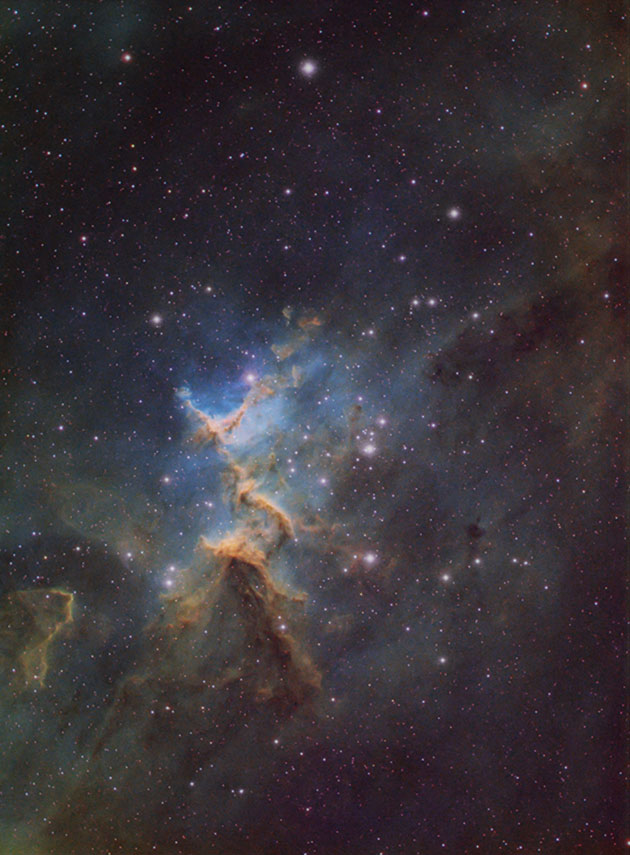
Melotte 15 in the Hubble Palette
There are numerous narrowband color palettes. Most narrowband palettes use images of three emission lines, in a variety of orders. The HST palette is the most commonly used.
Another is the Canada-France-Hawaii Telescope (CFHT) palette, in which the Ha emission is more naturally displayed in red and OIII in green. Still, SII is downgraded to an uncharacteristic blue representation.
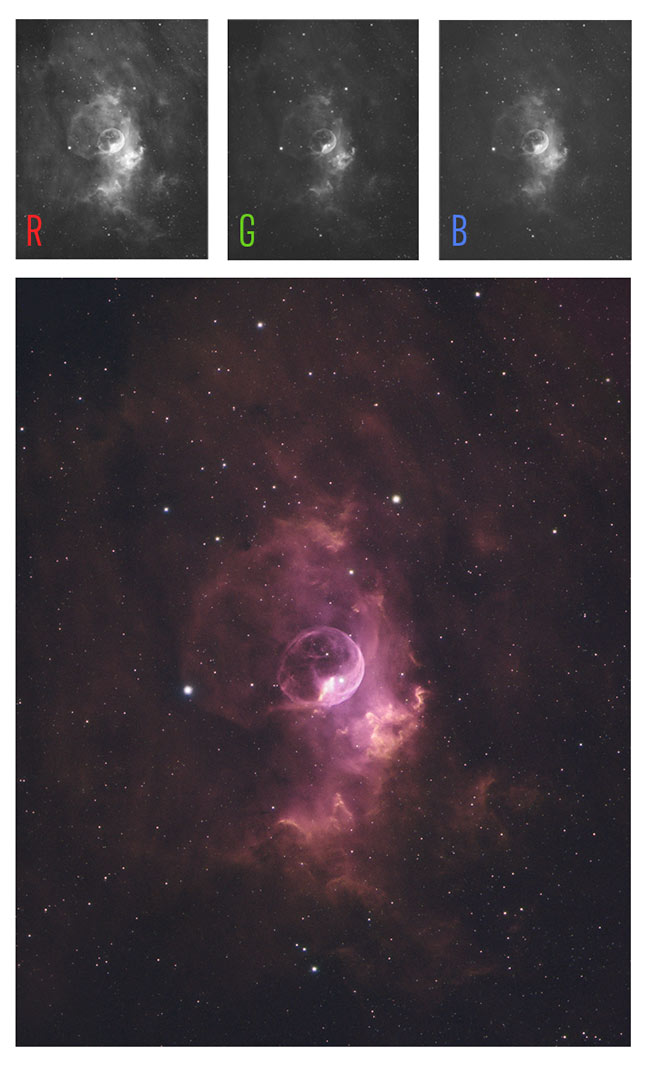
The image below features the Bubble Nebula captured using H-alpha and OIII filters. In this case, the image was processed more like an RGB image, mapping the Ha to the red channel, and OIII to the green and blue channels.
What Types of Targets Can You Shoot?
Narrowband filters are designed to capture precise wavelengths of light. There is a large class of celestial objects known as emission nebulae.
This name arises from the fact that the emission nebulae actually emit their own light as opposed to reflection nebulae, which shine due to the reflected starlight surrounding them.
The Orion Nebula, Lagoon Nebula, and Swan Nebula (or Omega Nebula) are three common examples of emission nebulae. Up to this point, I have only captured images of these objects in broadband RGB (shown below).
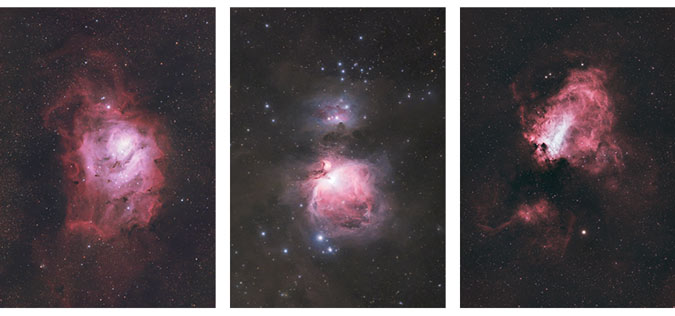
Popular nebulae targets for deep-sky astrophotography.
Planetary nebulae are typically considered a separate class of objects rather than emission nebulae. However, for CCD imaging purposes, planetary nebulae are considered emission nebulae because they also emit their own light. Supernova remnants are also considered to be a part of the emission nebulae class.
Objects like the Ring Nebula, Dumbbell Nebula, Veil Nebula, and the Crab Nebula are therefore prospective targets for narrowband imaging.
These types of emission nebulae have common characteristics; they are composed of gases, and these gases are emitting light.
The atoms within the gases become excited by the energy that is released from nearby stars. The energy impacts the starlight, causing the electrons within the gas atoms to jump up to a higher atomic orbit.
The electrons will then re-emit their excess energy and drop back down to a lower orbit. In this process, the electrons give off extra energy in the form of a photon.
An electron going from a high orbit to a lower orbit always gives off the same amount of energy and therefore the same wavelength of light. Therefore, each atom has a distinct emission line or color of light that is associated with it.
Have a look at this interesting spectrum of the Ring Nebula created by Y. Norimoto (Jim Kaler, University of Illinois).
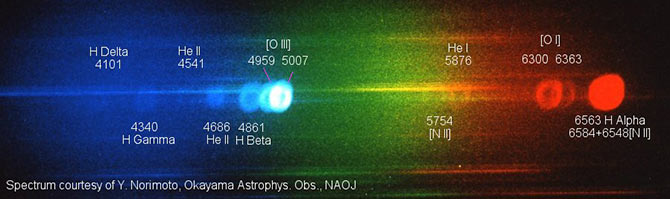
The spectrum of light emitted by the Ring Nebula in Lyra.
Taking Narrowband Images
The major difference between taking narrowband images and taking regular RGB images is that the exposure times are much longer for narrowband images.
In practice, exposure times can increase by as much as 10 times over the standard RGB exposures. For example, an imaging session with a color camera such as a DSLR would typically involve exposures of 2-5 minutes. Whereas an exposure length of 20-minutes per photo is typical in the narrowband imaging realm.
The amount of detail that can be achieved is well worth the extra time invested. The methods for achieving these images are essentially the same as normal RGB imaging, with a few modifications.
For example, many amateur astrophotographers will use more aggressive gain settings when shooting in narrowband than they would to collect luminance data (broad-spectrum).
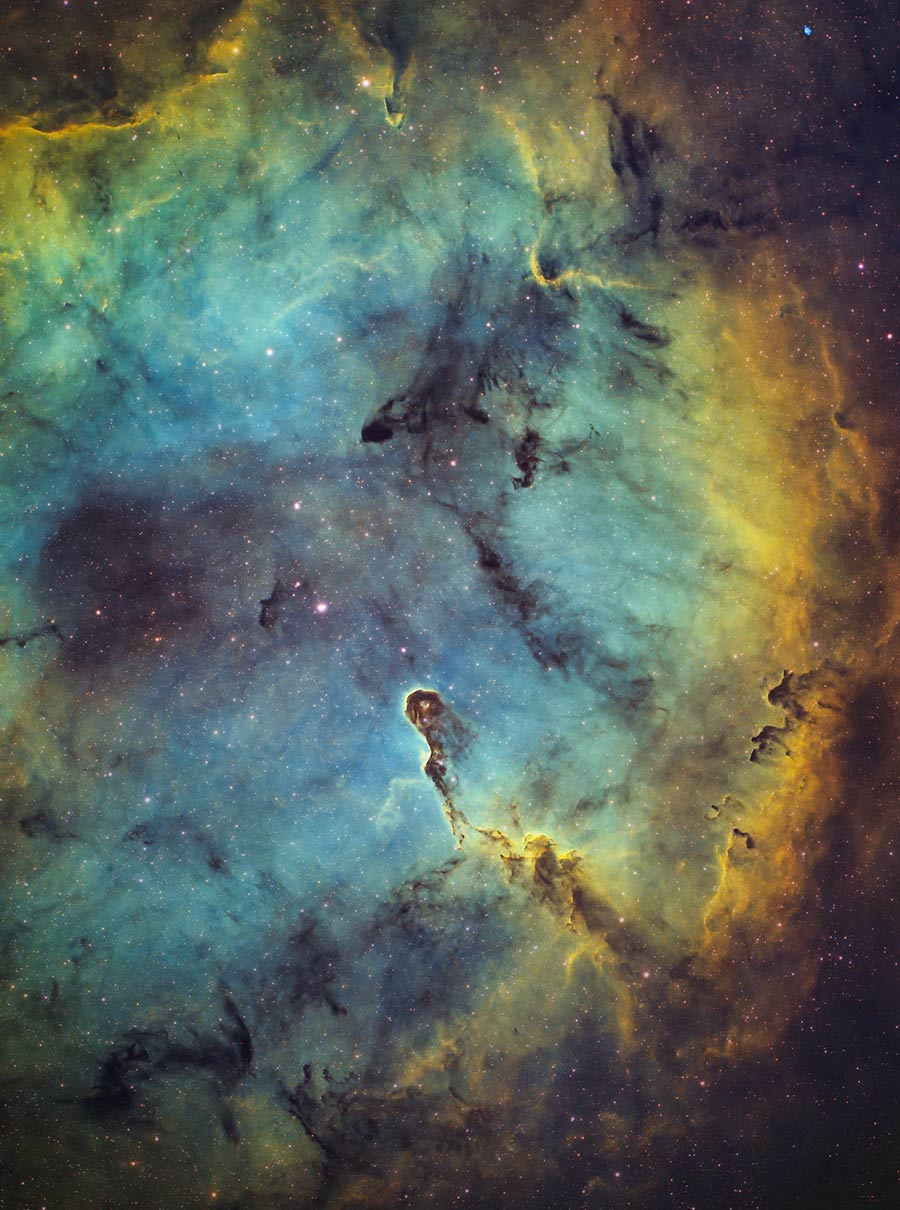
The Elephant’s Trunk Nebula captured using narrowband filters in the Hubble Palette.
Narrowband Filters
Narrowband filters are designed to capture very specific bandpasses of light at a time.
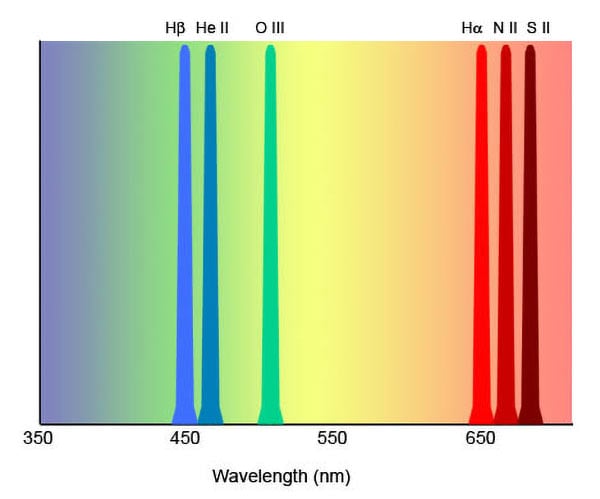
Here is a handy reference to help you understand the bandpasses amateur astronomy enthusiasts are interested in for astrophotography. It includes the light wavelengths given off by excited atoms within a typical nebula.
- H-alpha
- H-beta
- Oxygen (OIII)
- Sulfur (SII)
- Helium (HeII)
- Nitrogen (NII)
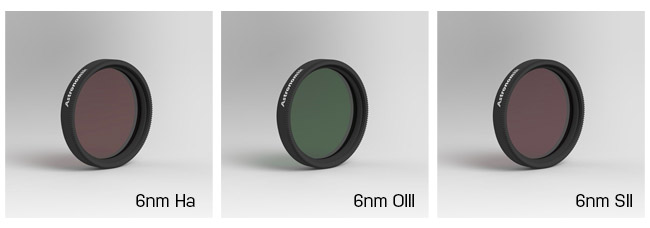
Popular narrowband filters are made by Astronomik, Chroma, and Custom Scientific. Older Custom Scientific narrowband filters had a bandpass of 3nm. Current filters typically have a bandpass of 6nm, while the popular Astrodon filters have a 3nm bandpass.
The bandpass was expanded to allow the use of the popular faster-focal-ratio scopes, such as the Takahashi and TeleVue refractors, etc. At fast focal ratios, narrowband filters shift off band, meaning they shift away from the wavelength they are designed to capture.
The effect is a significant decrease in sensitivity. A wider bandpass allows the required emission line to remain within the filter’s highest transmission zone even if it has shifted slightly.
I use Astronomik brand narrowband filters with my monochrome CCD camera and filter wheel. These 6nm filters are known for their quality and durability in the hobby.
Narrowband filters vary widely in price, with some filters (such as the Astrodon 3nm H-Alpha) listed at nearly $600 each. There are plenty of amateur astrophotographers willing to pay this steep price tag for a piece of glass because they can see a difference in image quality.
I believe there is value in using narrowband filters with a color camera, despite the obvious loss in signal in each shot. This is especially true when capturing images with a strong H-alpha signal.
It is possible to tap into the power of narrowband filters with a DSLR camera and lens. For example, the Astronomik 12nm H-Alpha filter below (clip-in) has been one of the most practical filters I have ever owned.
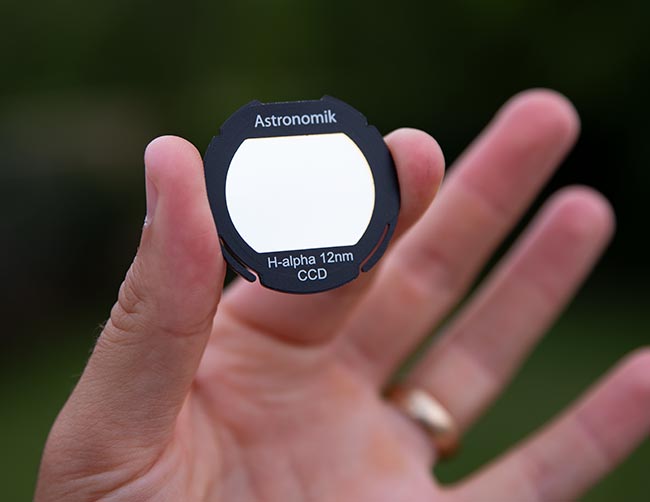
A popular DSLR Ha Filter – the Astronomik 12nm Clip-in for Canon cameras.
Exposure Times
You can expect your exposure times to run long when using narrowband filters. It is common to spend several hours imaging each through each narrowband filter.
For example, individual exposures can range from 10 to 20 minutes, resulting in 5 to 6 exposures within that duration, taken in each filter. It is common to spend multiple nights imaging one object.
This increases the demand for accurate tracking on your equatorial telescope mount, and the use of autoguiding is recommended. A quality astrophotography mount should have no problem taking sharp, 10-minute+ images with autoguiding enabled.
A motorized filter wheel is recommended when shooting with narrowband filters. Without it, you are forced to manually swap filters throughout the night (if necessary), which is time-consuming and impractical.
For my latest narrowband astrophotography images, I have been using a ZWO 7-position filter wheel with 36mm filter slots. You can see the entire astrophotography setup including the camera and filter wheel in the image below.

Focusing
There is no difference in focusing your narrowband images from regular images (see my focusing tips for astrophotography). The only distinction is that narrowband imaging will often require longer exposures.
To obtain an accurate focus on your subject, ensure that the exposure is long enough to reveal a suitable star (or several stars). You can use an electronic focuser to measure the size of the star (the smaller, the better), or use a focusing aid such as a Bahtinov mask.
Keep in mind that there are differences in the thickness of astronomical filters. Standard clear, UV/IR, LRGB, and narrowband filters can have varying thicknesses. This means that if the telescope is focused with the clear filter, it may be out of focus when replaced by a narrowband filter.
Differences in filter thickness are evident when focusing between each narrowband filter. If a particular filter set claims to be “parfocal“, it means that they should all focus at the same point. You can confirm this by using a Bahtinov mask or an electronic focusing tool.
This results in refocusing for each filter. When the difference between filters is determined, you can note the difference in focus position and apply the change as needed. For this reason, a motorized focuser for your telescope is practical to have.
Image Processing Tips
I have included a full-length tutorial video on narrowband image processing in my premium image processing guide for those interested.
The standard astrophotography image processing methods, such as stretching, filtering, etc., still apply to narrowband images in the same way as they do to broadband images.
The primary factor in processing narrowband images is deciding which color channels to assign to each filter and properly weighting the channels to achieve a pleasing color.
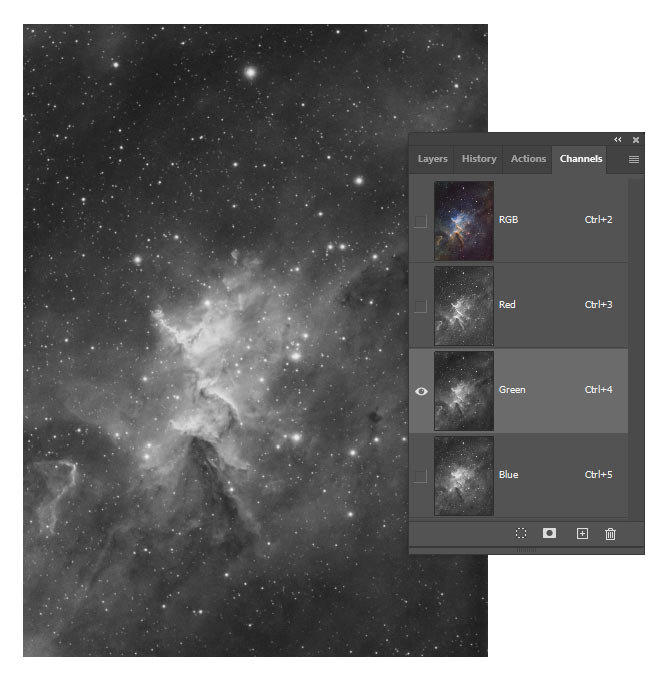
To integrate and calibrate the data collected using a monochrome camera, I use DeepSkyStacker as I do with my traditional broadband images. I then bring the stacked and calibrated (dark frames applied) images into Photoshop and process them separately.
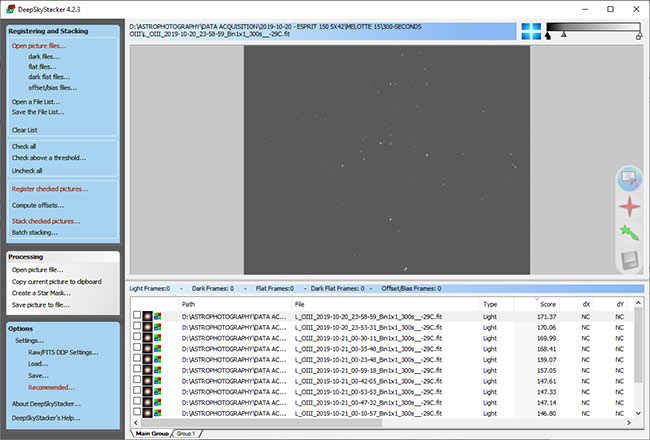
Don’t be alarmed when looking at your linear .FIT images captured in narrowband they will typically show very little information before stacking and stretching the data (shown above).
Many of the same techniques used when processing a broadband color image shot using a DSLR or dedicated astronomy camera apply to monochrome narrowband data. This includes levels and curves adjustments, star minimizing, noise reduction, and sharpening.
It is helpful to keep an ongoing color image open and pull out each channel for processing along the way. That way, you can steer the overall color of the image in the right direction by monitoring the RGB output as the channels are adjusted.
The Hubble Palette, as previously discussed, is a popular technique to apply in processing. It has a way of revealing the faint structures and the hidden beauty of the nebula.
Fixing Purple Stars
A common problem with processing images in the HST palette, however, is the possibility of introducing unnatural-looking purple stars to the image. There are several methods to address this issue, including using the lens correction tool in Adobe Camera Raw (ACR) and blending in stars from an RGB image.
I have personally found success by adjusting the purple saturation levels on the image in the HSL Adjustments tab of ACR (see below). You must be careful not to alter the delicate colors of your subject in the process. Carefully creating masks to protect the areas of your image you do not want to alter will help.

Using the HSL Adjustments (Saturation tab) to fix purple stars and halos in Photoshop.
Another technique I was introduced to recently, was to invert the RGB image in Photoshop (CTRL+I on a PC), and then decrease the saturation of the green colors in the image. You can easily make this adjustment in the HSL sliders found in the Camera Raw Filter.
As usual, masking certain areas of the image will help avoid changing colors where you don’t want to (the Select and Mask tool is a lifesaver).
Bi-color processing usually involves using only H-alpha and O III data and can produce pleasing results for many deep-sky objects. The image of the Crab Nebula below is one such example.
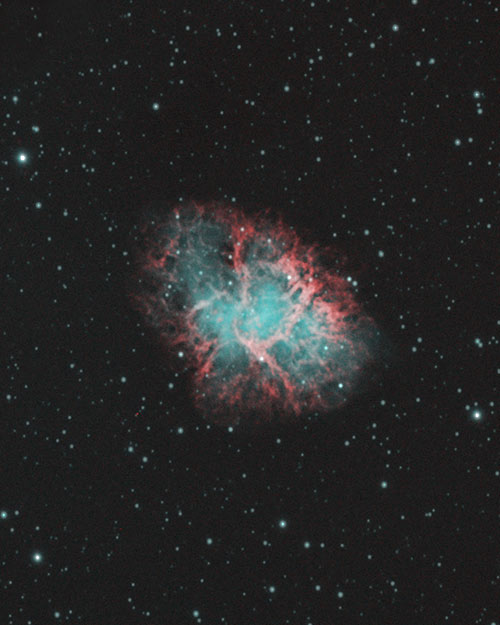
The Crab Nebula using narrowband filters (Ha and OIII).
Helpful Resources:
- Beginner’s Guide to Narrowband Imaging (Atik Cameras)
- Narrowband to RGB Star Combination (The Easy Way)
- ZWO ASI585MM Pro Camera Review: A Narrowband Imaging Powerhouse