Celestron StarSense Explorer Dob Review
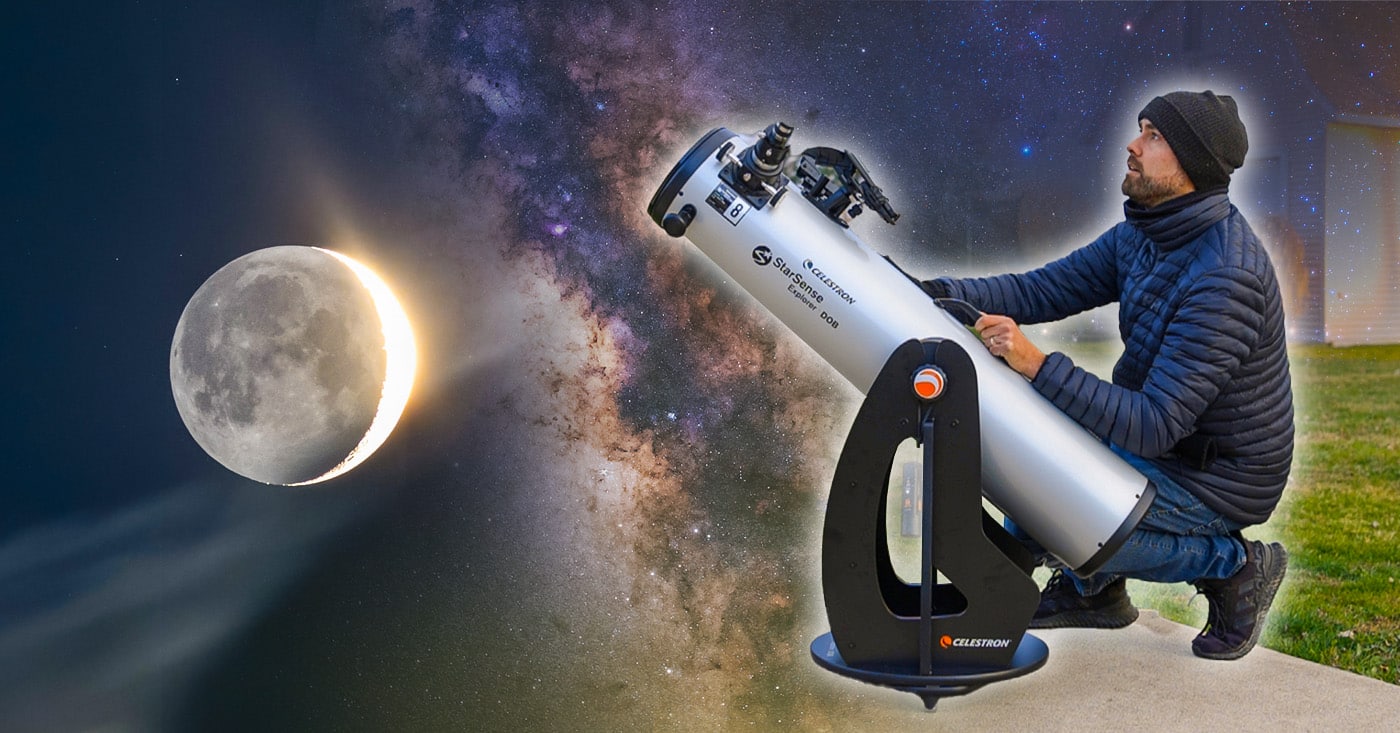
The Celestron StarSense Explorer Dob is a clever upgrade to a traditional 8″ Dobsonian telescope, thanks to its integrated smartphone app that helps you find objects in the night sky. It’s a visual telescope (not designed for astrophotography), but photos of bright objects like the Moon and planets are possible through the eyepiece.
With 8 inches of aperture, this telescope has enough power to see, not only the moon and planets but also deep-sky objects like distant galaxies and nebulae. The StarSense Explorer technology found in the dedicated mobile app contains a wealth of fascinating astronomical observing information.
Celestron has several telescopes that include the StarSense Explorer system (such as the popular Celestron StarSense Explorer LT 114AZ), but the Dobsonian telescopes are their largest optical instruments with the integrated technology yet.
The smaller tripod-mounted models are an affordable option, but I consider an 8-inch Dobsonian telescope to be the best telescope for beginners. By combining the proven StarSense technology with a large-aperture Dob, visual astronomers can have the best of both worlds.
In this post, I’ll show you how to use the Celestron StarSense Explorer Dob, and explain why I think this is a great telescope for beginners that could use some help finding objects in the night sky.
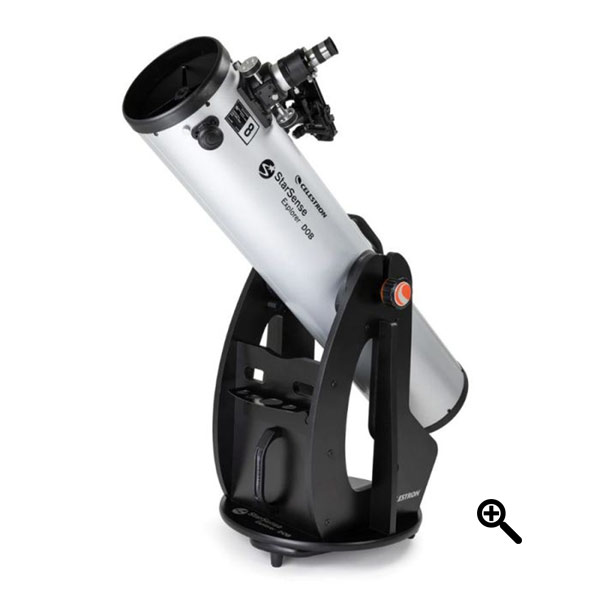
The version I will be reviewing is the 8″ model, but the telescope also comes in a huge 10-inch diameter size for those looking for even deeper views. Keep in mind that this model is quite heavy.
Celestron StarSense Explorer Dob Review
In the following video shared on my YouTube channel, I cover the main features of the telescope and share my experiences using it in the backyard.
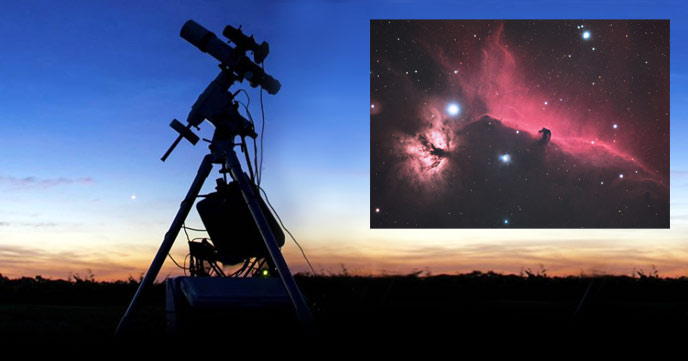
The supportive folks over at Celestron sent me a demo version of their 8-inch model for review. I had a chance to test the StarSense Explorer Dob over the course of about 3 weeks, and thankfully the weather cooperated.
Unlike a lot of the astrophotography telescopes I typically talk about on this website, where I sit at a computer screen – a visual Dobsonian telescope like this is meant to be enjoyed outside at the eyepiece. It’s all about the visual experience and seeing new deep-sky objects for the first time.
As I have discussed at length in the past, an 8-inch Dobsonian telescope is arguably the best possible first telescope for a beginner. I started with a 4.5″ aperture Dobsonian myself back in 2010 (Orion SkyQuest 4.5″ Dob), and the rest is history.
An 8 Inch Dobsonian Telescope
Unlike the humble Dob I started my astronomy journey on, this one has a large 8-inch mirror. An aperture of this size is capable of providing impressive views at the eyepiece.
The simple design of a Dobsonian makes them easy to use, and affordable considering their light-gathering power. They do not require polar alignment, counterweights, or any electronics (other than your phone).
The heavy Dobsonian base (rocker box), allows you to smoothly pan across the sky without vibration. It is a very hands-on ‘point-and-view’ experience that helps you connect with the night sky in a tactile way.
An 8-inch model is widely considered to be the ‘sweet spot’, balancing optical performance with a practical size. This is probably the best fit for most people, as it’s more manageable than the heavy 10-inch version.
For comparison, an 8-inch mirror provides 78% more light than a 6-inch model, which means being able to find more deep-sky objects in the sky like galaxies and nebulae.

Comparing the most popular size of Dobsonian Telescopes.
The telescope and base are about 50 pounds as a whole, so for most people, it is best to transport the scope in two pieces. The big handles on the optical tube, and the rocker box base make this process much easier.
The telescope itself is nothing too special, a well-made Newtonian reflector telescope with a sturdy Dobsonian base. The eyepiece rack is a nice touch (I actually use these a lot), and the tension knobs secure nicely when the tube sits in the rocker box.
This model has an 8-inch mirror, providing a native focal length of 1200mm at F/5.9. This is enough reach to get a good look at Saturn’s rings or Jupiter’s moons, with a high-powered eyepiece.
Speaking of eyepieces, this telescope package comes with a useful 1.25″ Celestron Omni 25mm Plossl. This is a perfect mid-range, all-purpose eyepiece. You can also use any of your existing 1.25″ or 2” eyepieces on this telescope thanks to the included adapter.
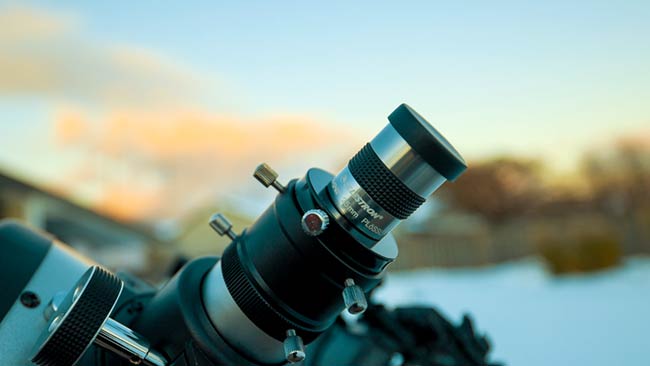
The included Celestron Omni 25mm Plossl is a great all-purpose eyepiece.
I’m told the 10-inch model has some balancing issues, which can be ‘magnified’ when a heavy eyepiece is in place. I did not experience any issues in balance on the 8-inch model, even with some of my heavier eyepieces in the telescope.
Near the objective end of the optical tube, you will also install the included red dot finder. This simple device serves its purpose, and nothing more. Just don’t forget to turn it off when you are done.
This model is considered to be a “Push-To” telescope because everything is done manually by the user. It does not include a motorized ‘GoTo’ mount to move the telescope on its own, you have to do all of the pointing.
However, with the innovative StarSense Explorer system, you have some help. The system uses plate solving technology to give you a big advantage over the traditional star-hoppers.
Putting the Telescope Together
The optical tube assembly (OTA), including the 2″ Crayford-style focuser and smartphone dock, comes completely assembled in its own box. However, you have to put together the Dobsonian base yourself.
Constructing the rocker box took me about 30 minutes to complete using the provided tools that come with the telescope package. This is probably the least fun part of the entire experience, but once it’s done, you are on your way.
While you are putting the base together, you should download the StarSense Explorer app on your smartphone, and enter the unique code Celestron gives you with the scope. It’s a big download too (nearly 500 MB), so get it started before you put everything together.
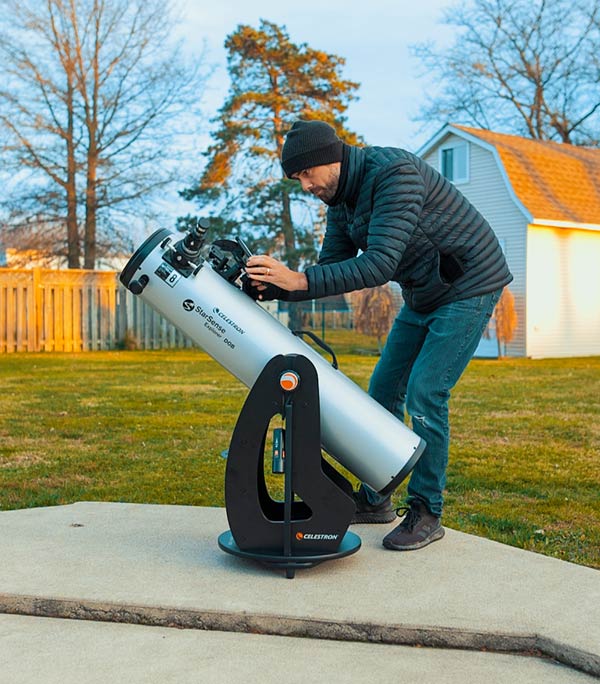
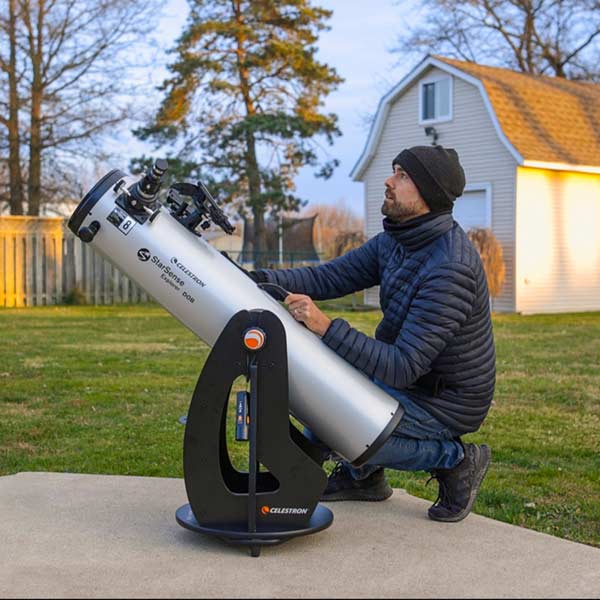
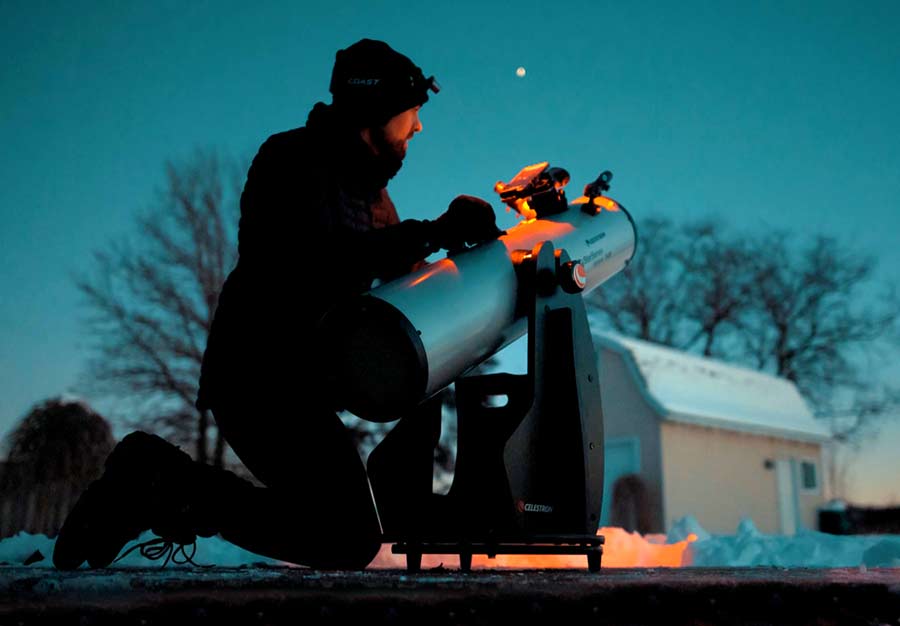
Setting up the Celestron StarSense Explorer Dob in my backyard.
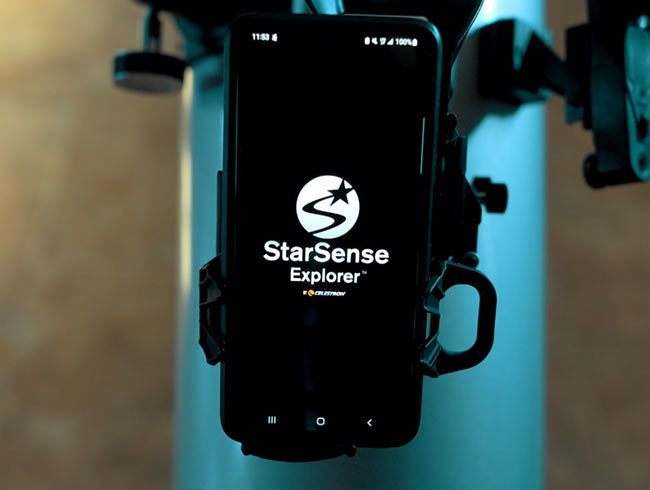
The StarSense Explorer Dock
The StarSense system involves this odd-looking bracket and angled mirror where you would normally see a finder scope. The kit includes a big plastic cover to keep on the dock when not in use, which is probably a good idea to keep that mirror clean.
As I have seen others mention, a tether for this cover would have been a nice feature, as it would be easy to lose this item after setting up in the dark. It’s a little too big to fit comfortably in your pocket.
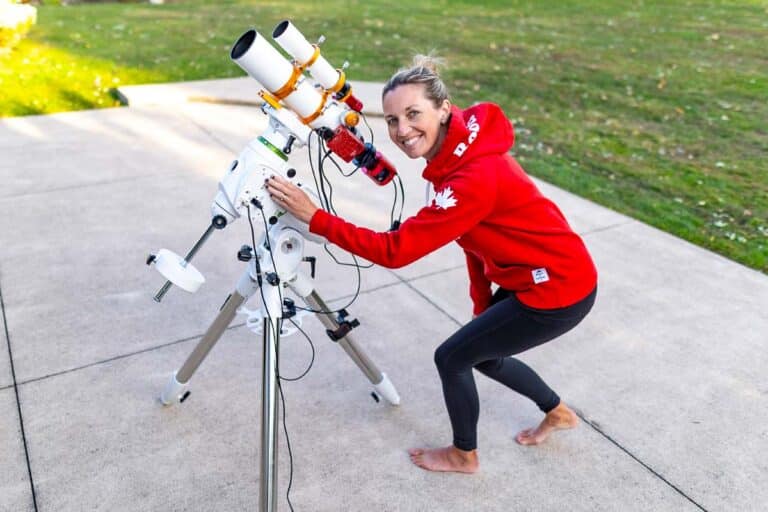
The phone I use is a massive Samsung Galaxy S21 Ultra, so large smartphones are not a problem on this dock. The dual-axis adjustment knobs make it easy to line up the camera lens on your phone with the mirror.
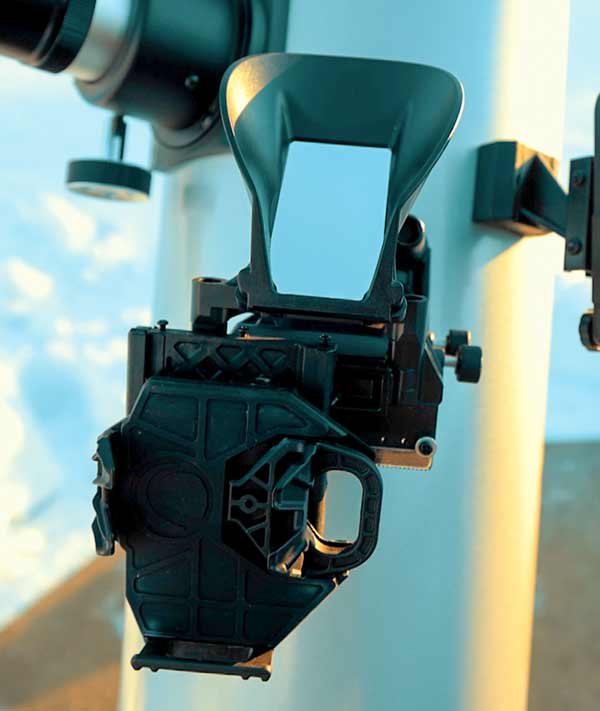
The StarSense Explorer Dock comes installed on the telescope out of the box.
At first, I didn’t know what I was looking at, but this is actually where you will use your phone camera to take short images of the night sky. If you’ve used smartphone adapters to take pictures with your phone through a scope before like I have, this setup may look confusing.
Yes, there is a smartphone holder here, but it is not attached to the eyepiece like a traditional smartphone adapter. Your phone camera is pointing at the angled mirror, which reflects a wide field of view of the sky in front of your telescope.
You need to place your phone into the StarSense docking station and use the controls on the adapter to line up the camera lens with the mirror. There is a setup wizard in the app that makes this process simple and straightforward to follow. It includes helpful videos along the way.
Remember, there is a delay in the ‘live-view’ image, so make sure you wait until you can see an image displayed on your screen. The mirror in the bracket reflects what your telescope is pointed at into the camera lens on your phone.
It’s not looking through the telescope at all, just out there in the open. It’s a big wide wide-open view of your yard, so make sure you adjust the light levels and camera settings for a clear view.
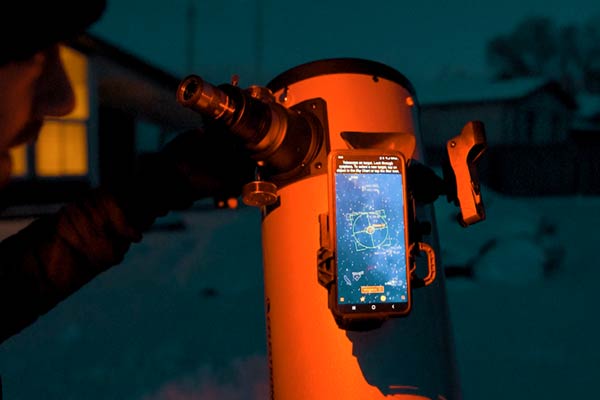
Running the StarSense alignment process at dusk to confirm pointing accuracy.
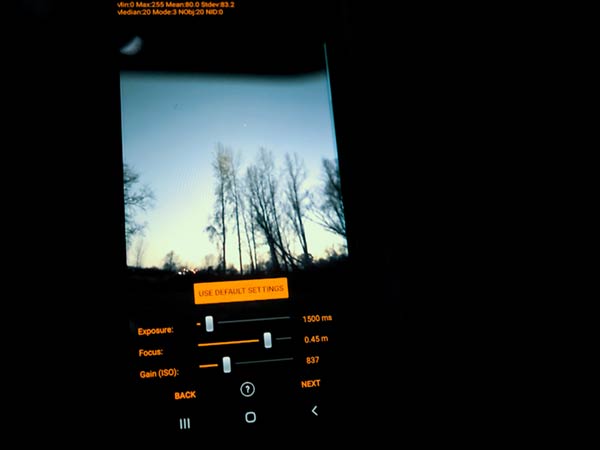
There is a simple setup routine that you need to do during the day, or better yet, at dusk. The process of aligning your camera with the StarSense tool is similar to aligning a finder scope, except this time you aren’t moving the phone’s position at all.
You need to point the telescope at a distant object, like a streetlight or tall tree, and then use the crosshairs in the app so that it’s centered on the same object in your eyepiece. You just pinch and zoom to get the crosshair aligned on the camera, with the same object you see through the eyepiece.
This felt strange to me because on a traditional finder scope, you need to physically move the scope, but not this time. The software knows!

You need to pinch and zoom the crosshairs to align the camera with your eyepiece.
Once it gets dark out, It will use this pointing information to plate-solve the star patterns in the sky and determine your telescope’s exact position.
Some of you will find this process pretty cool and exciting as I did, but others will deal with some substantial trial and error. But you’ll get it eventually, I promise.
The biggest adjustment I had to make to my typical observing session was that I now need to leave my phone in the docked position for the entire observing session, or risk losing my initial alignment.
However, I found that I could actually use my phone while docked, or even take it out, place it back in, and retain the alignment. This is not recommended, however, so leave your phone in the docking station to be safe.
The StarSense Explorer app can drain your phone battery in a hurry, so having a portable battery pack to keep your phone charged is ideal. Celestron sent me their little flashlight/battery charger with this demo (Celestron PowerTank Glow 500), which is a handy accessory for a setup like this.
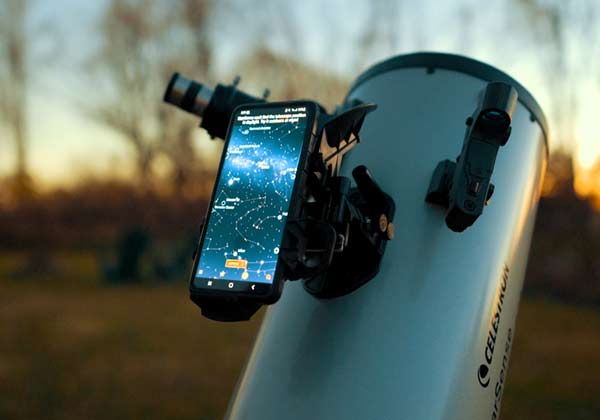
My large phone sat securely in the docking station.
Once the telescope and StarSense Explorer system are aligned and ready to go, we can start enjoying the guided experience it provides. The on-screen star map is really slick, and moving the telescope toward your object in the night sky is actually a lot of fun.
The arrows tell you which way you need to move the scope, and eventually, the crosshair will turn from red to green when you have found the target. I was pretty impressed with how well the system works, and that the object I wanted to see was actually there in the eyepiece, the first try.
There is a reason Celestron expanded the StarSense system into their Dobsonian line-up. It’s been proven to work and it’s fun. Beginners can now bang off dozens of objects in a single night, with the help of this simple system that uses a device they already own.
The star map and guidance system work well and are fun to use.
The StarSense Explorer App
There are two main components to the StarSense Explorer Dob package: the 8-inch Dobsonian telescope tube and rocker box, and the onboard StarSense docking station and dedicated smartphone app.
You likely have a number of stargazing apps installed on your smartphone already, but this one is a bit different. It leverages the computing power of your smartphone to analyze pictures of the night sky, so you can find objects with your telescope.
Of course, you can use the telescope on its own like a traditional Dob, but the real power of this package is realized when you utilize the StarSense explorer smartphone app and the new abilities your telescope has.
Anyone can download the StarSense Explorer app on their iPhone or Android device, but you will need to enter the unique code that is included with the telescope package to fully utilize it.
The Celestron StarSense Explorer mobile app.
The app is compatible with Android devices 7.1.2 and higher and iPhone devices 6 and newer.
Tip: use night mode on your Android or use the accessibility function on your iPhone to switch your screen to red to protect your night vision while using the app. Turning down the screen brightness will help with this too.
The Celestron StarSense Explorer mobile app has an incredible amount of information in it. Not only is it an interactive star map that understands where your telescope is pointed, but it also contains fascinating information about the most popular star clusters, nebulae, galaxies, and more.
When you tap on an object, you can see a photo, read the description, and even get some observing tips for your telescope. The app also includes an audio tour for those with a vision impairment or anyone that prefers to listen rather than read.
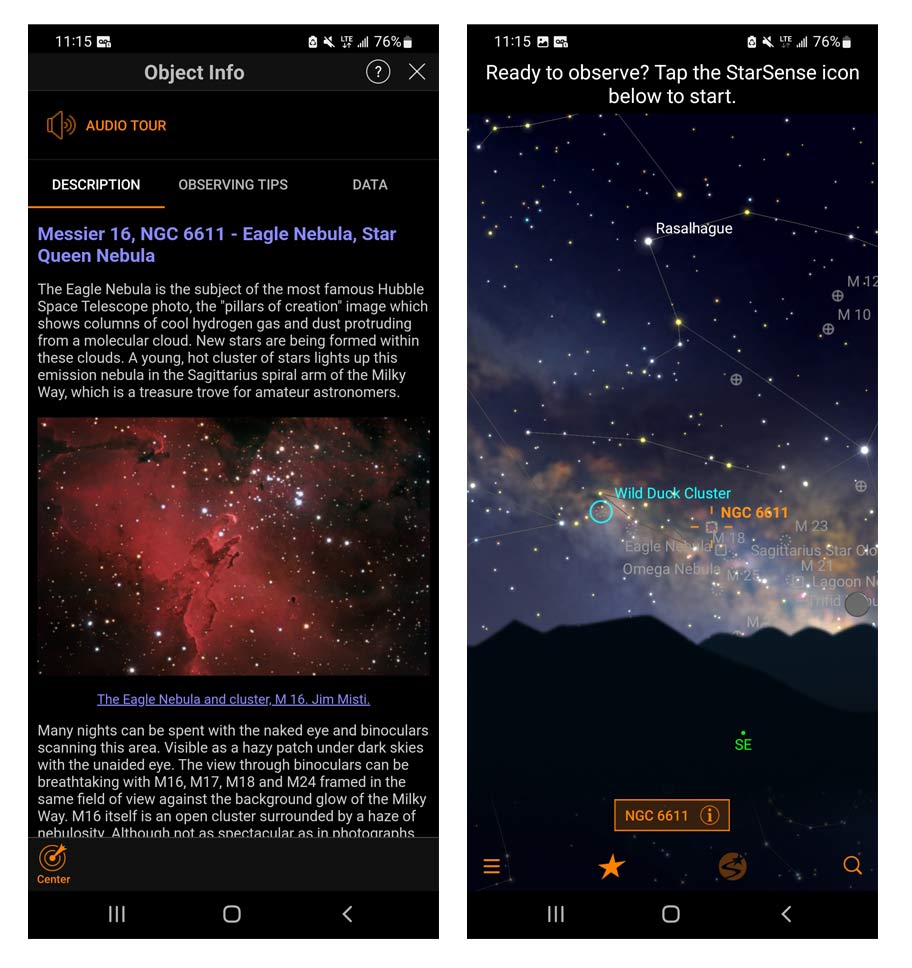
The Celestron StarSense Explorer mobile app is a detailed planetarium with an immense amount of information.
How it Works
- It uses a bracket, your smartphone, and the telescope to locate objects in the night sky using the StarSense sky recognition technology.
- Once the bullseye turns green on your phone, it is ready to view through the telescope eyepiece
- The mirror within the bracket will reflect what your telescope is pointed at into the camera of your phone
- The system uses plate-solving technology to analyze star patterns in real-time to determine the telescope’s position in the night sky.
- It will let you know which way to redirect the telescope after the object has shifted out of the field of view due to the Earth’s rotation.
- When the bullseye is red, use the arrows on your screen to know which direction you should push the telescope. Once it shows green, you have reached the position of your target
- Use the StarSense Explorer app to access a list of available night-sky objects (i.e. planets, nebulae, galaxies, star clusters, etc.)
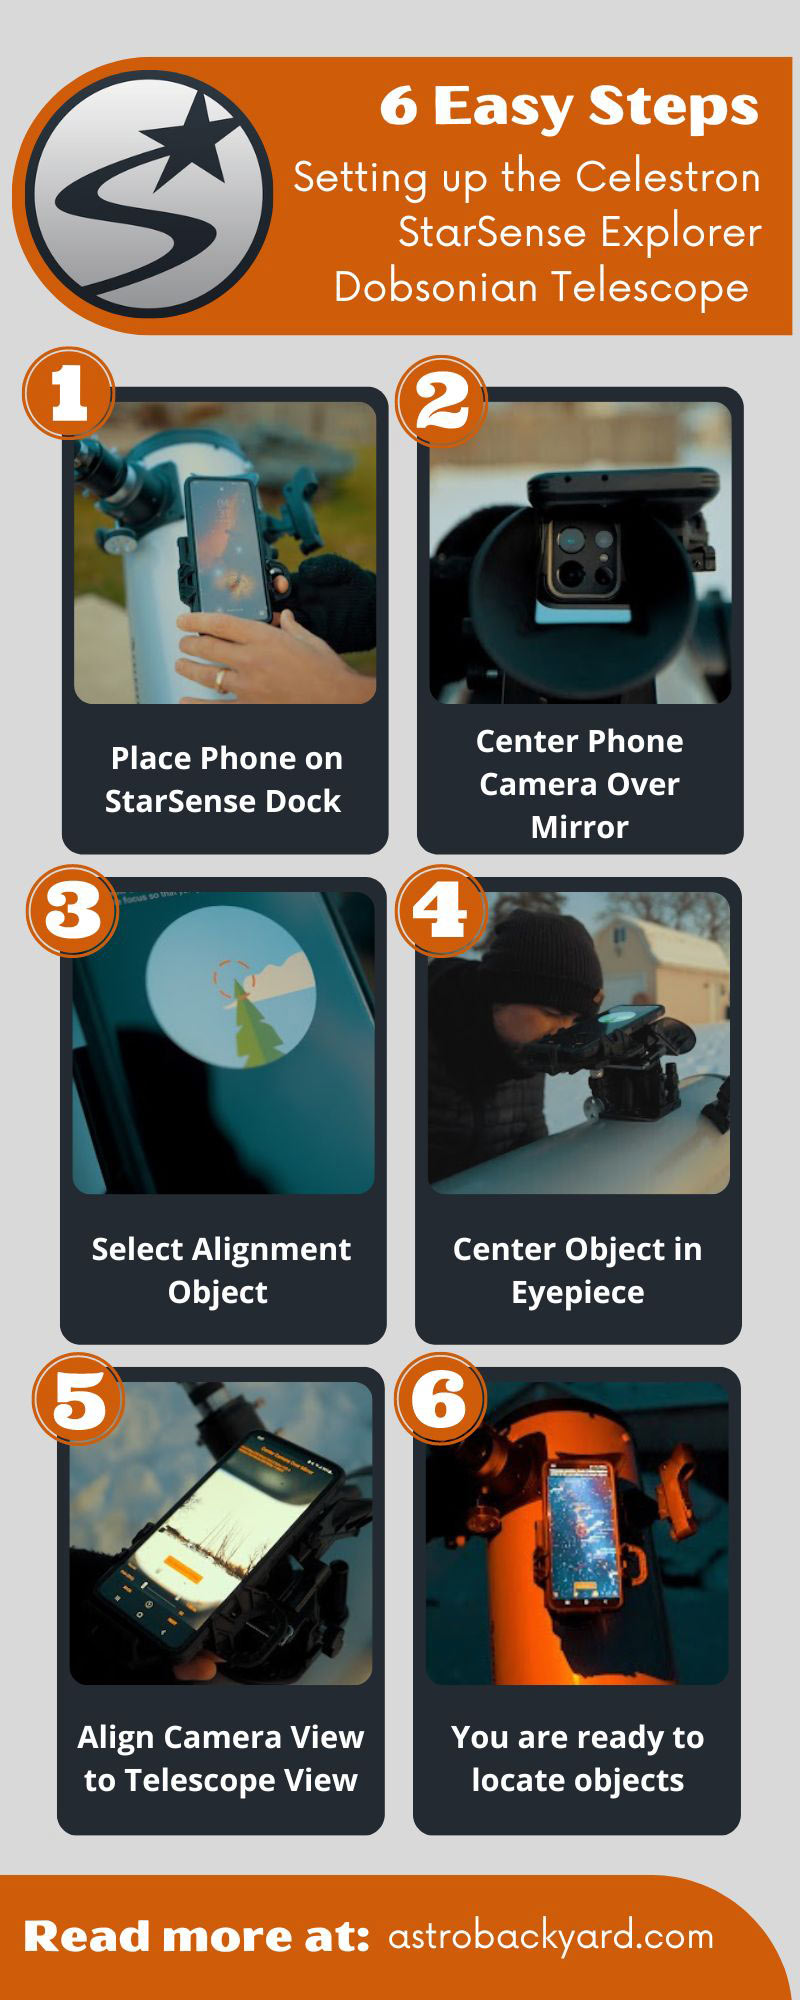
Alignment Steps
- Place Phone on StarSense Dock. Mount your phone on the StarSense dock
- Center Phone Camera Over Mirror. Turn the knobs at the bottom of the bracket until your phone’s camera view is centered in the mirror.
- Select Alignment Object. Align your phone’s view to the telescope view. Point your telescope at a terrestrial object at least 100 yards/100 meters away and center the object in the telescope’s red dot finderscope.
- Centre Object in Eyepiece. Adjust the focus so that you get a sharp image.
- Align Camera View to Telescope View. Slide the camera view until the same object is centered in the crosshairs.
- You are ready to locate objects. Point your telescope at a clear patch of sky with stars and wait for the red bullseye to turn yellow. Follow the direction arrows to target and when the bullseye turns green, look through the eyepiece.
The status bar at the top of the screen provides additional guidance.
Alignment Tips
Be sure to follow these tips for the alignment process:
- Make sure your phone’s camera is properly aligned with the telescope and avoid bumping your phone once positioned in the StarSense dock to avoid having to realign your camera.
- After aligning and centering your camera, you may see small areas that are cut off or showing in black. This is due to the variety, and often, wide-angle views of most of today’s cell phone cameras. There will still be enough sky showing for StarSense to determine its current position.
- If your bullseye continues to appear ‘red’ it means that it is not sensing the sky in order to determine its position. When this happens it could be due to: cloud cover, it’s still too bright out, something shining into the mirror, something in the field of view or a bright moon. It could also mean that it’s not aligned properly (i.e. not centred over the Starsense dock), or there’s dew on the mirror.
- When centering your camera over the StarSense dock, you may notice reflections in your field of view. This could be from light reflecting off the back of your cell phone case into the mirror and camera. You may want to swap out your case for something non-reflective to get this to work
- It is a good idea to align your phone and telescope each time you use it for the most accurate reading.
Collimation
The Newtonian reflector design requires regular collimation for optimal performance. There are many useful guides available online to aid in this process.
If your Dobsonian reflector telescope is ‘out’ of collimation, it will still work, but the image will not be as good as it could be (it will look blurry). The process involves aligning the primary and secondary mirrors with each other.
Beginners may find this task a bit daunting at first, but once you get used to the process and understand how to fix it, it becomes second nature. A laser collimator may help, but this particular telescope package does not include one.
A laser collimator can help you collimate your Dobsonian reflector quickly and accurately (sold separately).
Frequently Asked Questions
- This scope cannot find objects during the day.
- It only shows the sky as it currently appears – no ability for future sky views
- You cannot use it with a tablet, it is too big for the star sense dock
- You can unlock 5 different devices with the code
- It is a good idea to fully charge your phone before using it and maybe even get a little battery pack as the continuous images and processing them to determine your location, can drain your battery
- Objects higher than 70-75 degrees in altitude are not included in the best list of items, since it is hard to position closer to the zenith.
- For those in the southern hemisphere, StarSense will already know your location and adjust accordingly
Celestron StarSense Explorer 8″ Specifications
Optical tube:
- Aperture: 203mm (8″)
- Focal Length: 1200mm
- Focal Ratio: f/5.9
- Tube Weight: 20.6 lbs
- Optical Design: Newtonian Reflector
- Tube Dimensions: 1117.6mm x 241.3mm diameter (44″ x 9.5″ diameter)
- Tube Material: Steel
- Focuser: 2″ Crayford focuser, includes 2″ extension tube and 2″-to-1.25″ adapter
- Finderscope: StarPointer red-dot
- Primary mirror thickness: 30mm (1.18″) (approx. 1:8 thickness ratio)
Base:
- Type: Altazimuth Dobsonian base
- Dimensions: 685.8mm x 482.6mm x 482.6mm (27″ x 19″ x 19″)
- Weight: 22.8 lbs (10.3 kg)
- Total Weight with base: 43.4 lbs (19.68 kg)
Included Items
- Optical tube
- Dobsonian Base
- 25mm eyepiece
- 2″ Crayford focuser
- StarPointer™ red-dot finderscope
- StarSense Explorer dock
- StarSense Explorer unlock code
- Eyepiece rack
- Collimation cap
- Celestron Starry Night Basic Edition Software
Celestron StarSense Explorer Comparisons
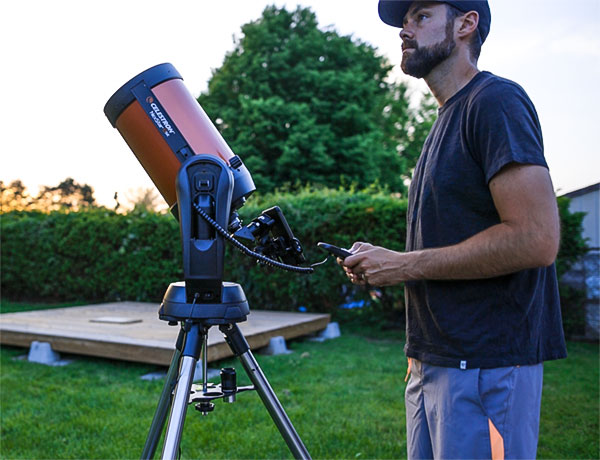
I thought it would be helpful to compare this telescope with two other popular visual telescopes for beginners; the Celestron NexStar 8SE and the Apertura AD8 Dobsonian 8″.
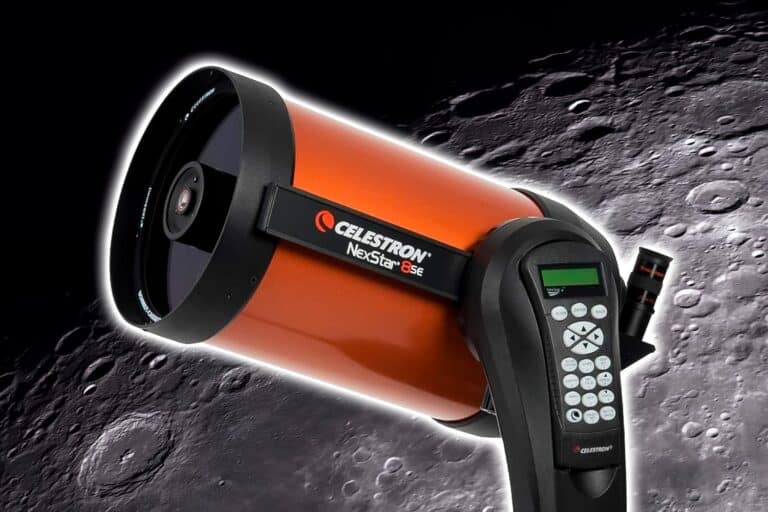
Celestron Explorer vs Celestron NexStar 8SE
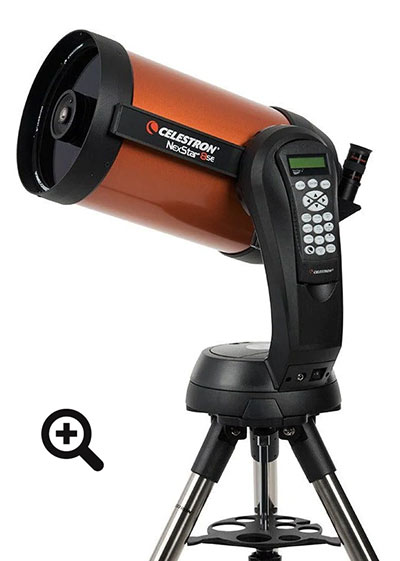
The NexStar 8SE is an extremely popular visual telescope for beginners thanks to its Go-To technology and focal length. It is an 8-inch Schmidt Cassegrain telescope with a focal length of 2032mm at F/10.
This particular telescope excels in views of the moon and planets. The slower focal ratio does means that fainter nebulae and galaxies will be harder to observe, which is especially true if you’re observing from a light-polluted city.
One of the biggest draws to this telescope, aside from the compact, travel-friendly design, is its computerized GoTo functionality. You can choose an object you would like to view on the hand controller, and the telescope will point right to it. These types of electronics though come at a price.
| Celestron StarSense 8” Explorer | Celestron NexStar 8SE | |
|---|---|---|
| Telescope Type | Dobsonian | Schmidt-Cassegrain |
| Aperture | 8 inch | 8 inch |
| Focal ratio | f/5.9 | f/10 |
| Focal length | 1200mm | 2032mm |
| Go To Capabilities | No | Yes |
| Total Kit Weight | 43.4 lbs (19.68 kg) | 24 lbs (10.88 kg) |
| Price | 799.95 USD | 1,599 USD |
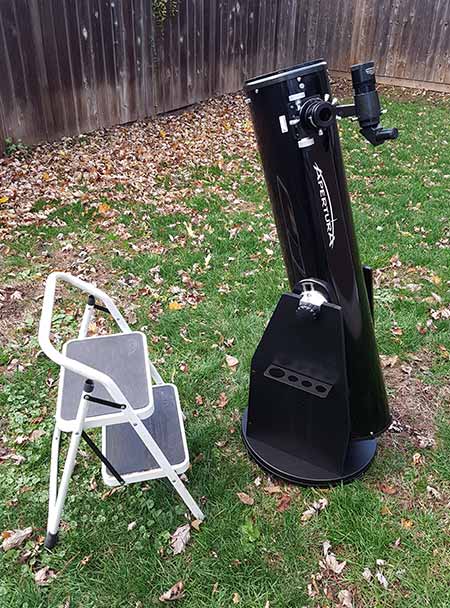
Celestron Explorer vs Apertura AD8
If you have been following my channel for a while, you know that the telescope type I recommend most to beginners is a Dobsonian telescope. I consider this to be the best telescope type for a beginner due to its combination of ease of use, function, and affordability.
By starting with visual astronomy through a simple to use, and well-built telescope, you can learn the night sky on your own, casually experience the joys of stargazing, and spend time outside at night.
In the past, I have had great success with the Apertura AD8 8″ Dobsonian, and think it’s a great choice for beginners. Given the similarities and benefits of both telescopes, I thought it would be interesting to compare these two head-to-head.
The Apertura AD8 is the 8-inch model and has enough aperture to show more objects and detail in the night sky than smaller instruments.
| Celestron StarSense 8” Explorer Dobsonian | Apertura AD8 Dobsonian 8" | |
|---|---|---|
| Focal Ratio | f/5.9 | f/5.9 |
| Focal Length | 1200mm | 1200mm |
| Type of Electronics | StarSense | None |
| Included Accessories | Focuser Finderscope Eyepiece rack Collimation cap 1 eyepiece (25mm) StarSense Dock StarSense unlock code Starry Night (Basic) Software | Focuser Laser Collimator Eyepiece tray 25mm Extension tube 2 eyepieces (9mm, 30mm) Primary mirror cooling fan Adaptor for focuser Image finder and bracket |
| Total Kit Weight | 43.4 lbs (19.68 kg) | 52.2 lbs (23.67 kg) |
| Price | 799.95 USD | 699.95USD |
Astrophotography
Seeing as how this is a fully manual, non-tracking, telescope, long-exposure deep-sky imaging is out of the question. However, the big aperture of this telescope means a bright image at the eyepiece. This will make taking pictures of the moon, and brightest planets possible with your smartphone or point-and-shoot digital camera.
For best results, use a smartphone adapter such as Celestron’s NexYZ to steady the camera. Even then, it will be tricky to get a clear shot of a ‘moving target’ without any sort of tracking. The long focal length of 1200mm makes this task even more difficult.
Don’t forget that if you want to continue using the StarSense Explorer mobile app while you take pictures, you will need to use a separate camera at the eyepiece.
However, that is not to say that it can’t be done. You may have been told ‘you can’t use a Dob for astrophotography’, but I think that taking your first shot of the moon or even Saturn through the eyepiece is still astrophotography, it’s just the starting point.
My first image of the Orion Nebula was taken through a dob, and, well, you know how the rest of that story goes.
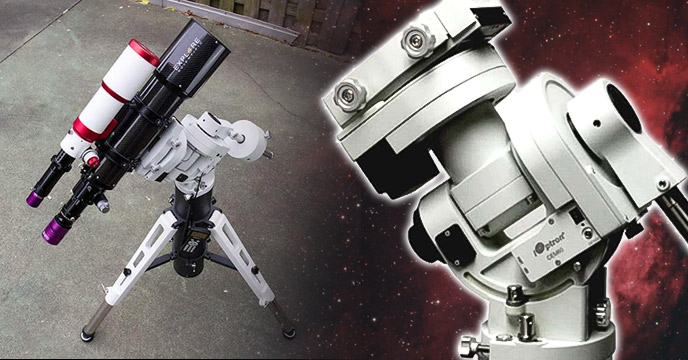
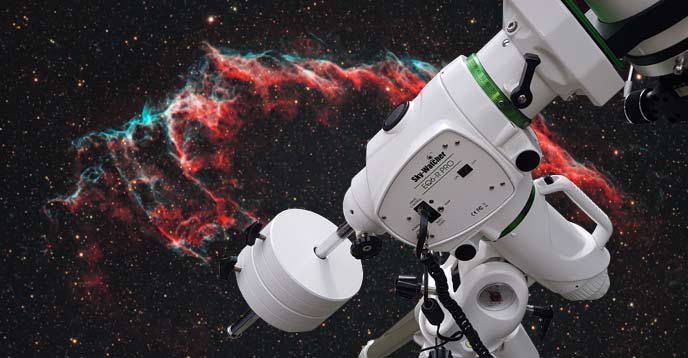
In terms of the optical tube itself, there is some serious imaging potential there, if you are willing to go through the painstaking process of mounting it to an equatorial tracking telescope mount.
In the image below, you’ll see that Oscar Viteri did just that. He mounted the Celestron StarSense Explorer optical tube assembly to a Sky-Watcher EQ6-R Pro, and these are his results:
Oscar Viteri mounted his Celestron StarSense Explorer OTA to a computerized equatorial tracking mount for astrophotography.
Final Thoughts
There have been numerous attempts by astronomy manufacturers to add GoTo or hybrid-GoTo systems to the Dobsonian design in the past. Tools to help users avoid the ‘I have no idea how to find anything‘ scenario.
Some of them took off, others didn’t. The difference this time is the StarSense Explorer system uses your own phone as the technology component, saving you the cost of bolting on an additional piece of hardware with computing power.
If you are an observing purest, I doubt you will want to employ a system that has you staring at your phone for so long. Yes, the app has a ‘night mode’ to help keep your eyes adapted, but as many of you know, a completely ‘screen-free’ observing session is an entirely different experience.
If you have your heart set on astrophotography in the future, the element of tech in this system likely won’t deter you from using it, and you’ll even get a sneak peek into the incredible power of plate-solving.
If you’re in the market for a fantastic beginner telescope that nearly guarantees a positive first experience, an 8-inch Dob continues to be one of the best options available.
If adding an additional layer of guidance via your smartphone is worth it to you, then the Celestron StarSense Exlploerer Dob is an incredible value.
The StarSense Explorer makes astronomy more approachable for beginners and gets you to your first victory faster, and that’s a pretty special thing.
Other StarSense Explorer Models
- Celestron StarSense Explorer LT 114AZ
- Celestron StarSense Explorer DX 130AZ
- Celestron StarSense Explorer DX 102AZ

Thanks for a very nice and thorough review. I’ve just started trying to use my new 8″ Dob with Starsense. It’s proven to be a huge frustration despite optimal conditions. With very limited help from Celestron support, and a lot of review of online forum posts, I’m concluding that some newer smartphones are incompatible despite Celestron’s website’s claims to the contrary. My Pixel 6a aligns and sees the sky easy enough, but the app continually fails to find its location. Sounds like users of Pixel 6, 6pro, 7 and iPhone 14 have the same trouble and have had to resort to using older phones. I’m in the process of doing the same and hope that allows Starsense to work.
I am sorry to hear that, Fred. I tested a Samsung Galaxy S21 Ultra and an iPhone 8 with no issues. I guess you could find a cheap old phone on ebay/local classifieds just to use StarSense – but you shouldn’t have to!
Our local library has started to provide the opportunity to use their telescope. It’s an Orion Starblast, Altazimuth (what does that even mean?) Reflector, but so far I haven’t been able to see anything out of it. It’s just one big blur. the Dia is 113mm, F.L.(what is FL?) 450mm, f/4. I’m surrounded by porch lights everywhere so I’m assuming that’s the issue, but maybe it isn’t. it came with a 6mm and 17 mm eyepiece. Is it the eyepieces or the surrounding lights that are preventing me from seeing anything? And I am adjusting the focus, but nothing seems to work! my binoculars work better than this, so of course I’m disappointed. Steer me in the right direction. I’d like to own a telescope some day but this is turning me off to the idea. thank you!
Hi Sally – that’s a great little telescope. You should be able to get some slightly better views of the planets through that telescope than your binoculars. The “FL” is the focal length, which is basically the default magnification of the telescope. You can increase magnification using those eyepieces. Speaking of eyepieces, I think this is where you’re running into trouble. 16mm is much to narrow to find objects in the sky – the 6mm will be even worse. Basically, you are looking at a dim, small patch of sky at a time – making it nearly impossible to find anything and focus on it. Your best bet is to use the 16mm eyepiece and point it toward the moon. It may be WAY out of focus, but you should be abe to find it. You should get a GREAT view of the moon, and then you can keep this focus position to point to Venus and Mars – which are both out right now. Good luck!!
Is the Apertura AD8 Dobsonian 8” still your top choice and recommendation for beginner first time buyer? Thanks
Hi Luke – for the absolute beginner, an 8-inch Dobsonian like the Apertura AD8 is your best bet. It’s the best entry point into astronomy. That said, if you want some additional features that can help you find objects, the StarSense is a great option. Clear skies!