Astrophotography Setup Spotlight
In this section of the website, I will feature an astrophotography setup with a complete breakdown of each component.
These equipment profiles will include all items needed for deep-sky astrophotography including the tracking mount, imaging telescope, camera, and filters.
You’ll be able to see the exact camera settings I use, and any additional accessories needed to produce results similar to my own.
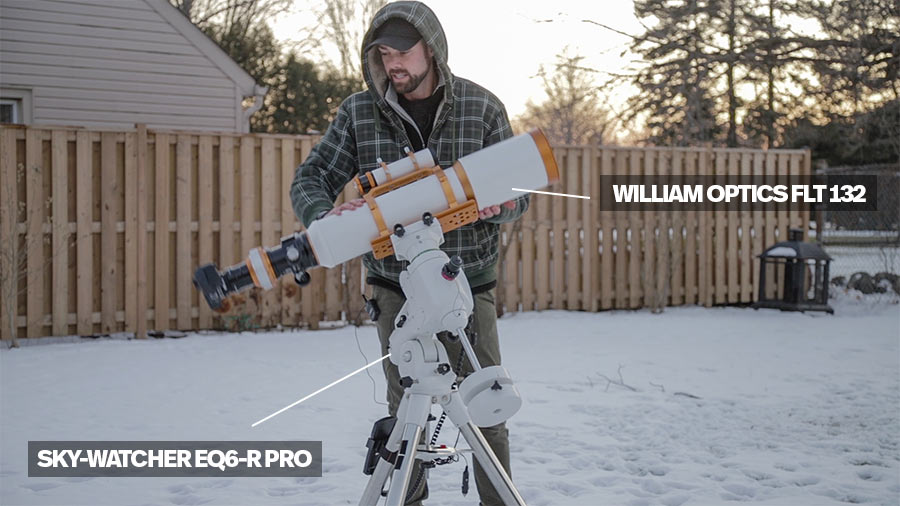
The image below provides you with a brief overview of the components of this astrophotography kit.

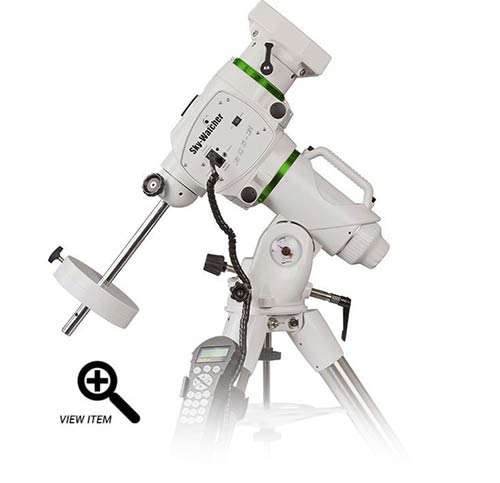
The Sky-Watcher EQ6-R Pro mount with Esprit 100 refractor on top.
Every detail, from the backspacing to the astrophotography software used to capture the image will be listed.
Whether you choose to invest in a similar configuration or not, I know that this will be a valuable resource to those looking to build their own deep-sky astrophotography setup.
In the future, I would like to include setups built by other amateur astrophotographers that are completely new to me as well.
Again, this is not the only way to go, but it’s worked very well for me in the backyard.
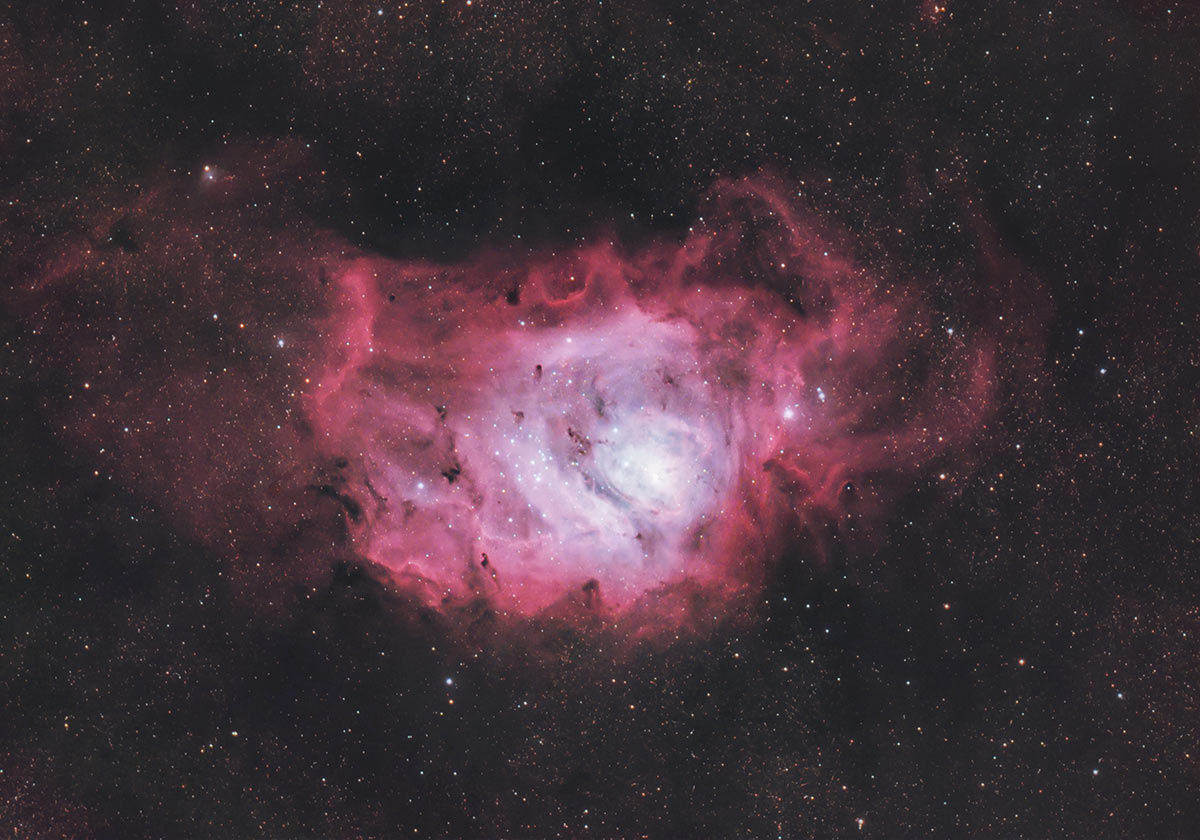
The Lagoon Nebula shot using the equipment listed in this post.
Astrophotography Setup Spotlight
For the first astrophotography setup spotlight, I would like to highlight one of the most reliable rigs I have ever experienced. What I mean by this is, I have had very few headaches and/or problems to troubleshoot with this configuration.
The mount, camera, and telescope used in this setup provide a notably pain-free experience overall, which is not the case in many other configurations.
I call this the “Sky-Watcher One-Shot-Color Combo”, and it is responsible for dozens of successful astrophotography images captured in my backyard.
Here it is set up in the backyard, without the computer or cabling plugged in yet. It’s portable enough to bring in and out of the garage when the weather clears.

The Sky-Watcher One-Shot-Color Combo.
Spotlight 1: The Sky-Watcher OSC Combo
The following setup was built slowly over time and is not offered as a complete package kit from vendors (that I am aware of).
You will need to build this setup based on your own imaging goals and desired user-experience. I have seen several variations of this type of configuration, with minor differences in the telescope and camera used.
One obvious “upgrade” you might want to consider, is to use a monochrome camera in place of the color one shown. But be warned, this adds complexity and time to the overall experience.
The setup shown above is responsible for a staggering amount of astrophotography images I have shared on Instagram. I captured the majority of the images with this setup in 2019, and continue to tackle new projects with variations of this exact rig.
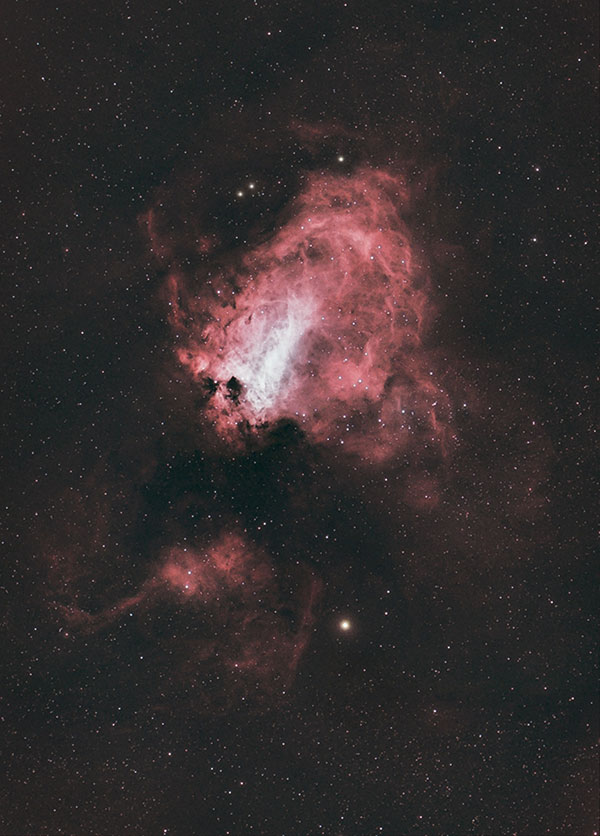
This setup excels at deep-sky astrophotography of medium-sized nebulae and galaxy targets. With the right filters, detailed portraits of impressive nebulae like the Cave Nebula are possible.
At its core, this configuration excels at capturing quality, full-color images in a short period of time. There are many factors that weigh into this function.
The following image is the “deepest” photo taken using this setup, an image with a total exposure time of 6 hours and 10 minutes from my backyard.

Here is a complete breakdown of the setup shown above:
- Telescope Mount: Sky-Watcher EQ6-R Pro
- Telescope: Sky-Watcher Esprit 100 ED APO
- Camera: ZWO ASI294MC Pro
- Filter: Optolong L-eNhance
- Guide Scope: Starfield 60mm Guide Scope
- Guide Camera: ZWO ASI290MM Mini
- Polar Alignment: QHY PoleMaster
- Accessories: Pegasus Astro Pocket PowerBox
The backbone of the entire rig is, of course, the equatorial tracking mount. The Sky-Watcher EQ6-R Pro has become one of the most widely-used and appreciated telescope mounts in the amateur astronomy community.
If you’re looking for a deep dive into the telescope mount’s specifications and features, be sure to read my detailed review.
Of course, variations of this setup will also yield promising results. For example, if you are looking to save a little bit of money on the imaging telescope, I suggest looking at the William Optics Zenithstar 73 APO.
The photo of the Sadr region below is one of my favorite images taken with this setup.
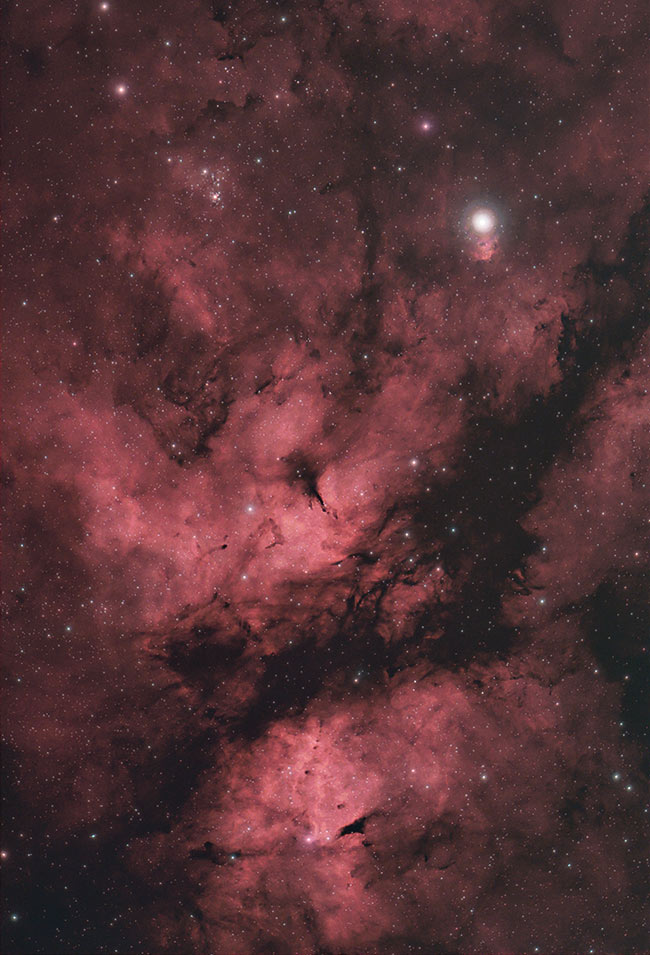
The Sadr Region. Sky-Watcher Esprit 100 ED APO.
The Mount: Sky-Watcher EQ6-R Pro
The Sky-Watcher EQ6-R Pro has a maximum payload capacity of 44 pounds. This equatorial tracking mount has GoTo capabilities, meaning it can automatically slew to a list of deep-sky and solar system targets from its internal database.
Robust astrophotography mounts can be very heavy, but the EQ6-R offers a good balance between capability and portability. I can carry the mount in and out of the garage with the EQ head attached without issue.
It’s an ideal choice for anyone taking images through medium-to-large-sized refractor telescope. The Sky-Watcher Esprit 100 requires only a single counterweight to effortlessly slew around the night sky.
Sky-Watcher mounts use the SynScan computer system, one that I have found to be extremely reliable and easy to use. I enjoy using the hand controller to align the telescope mount, using the handy 2-star alignment routine.
Others may prefer to utilize the official Sky-Watcher SynScan app or the popular third-party software known as EQMOD.
The EQ6-R is suitable for telescopes of all types, but I would keep your maximum payload to under 30 pounds for astrophotography.
For reference, the William Optics Fluorostar 132 refractor is about as heavy as I would go on a mount with this payload capacity rating. Below, is a picture of me using the EQ6-R with the FLT 132 and Canon EOS Ra attached.
The tracking accuracy of the Sky-Watcher EQ6-R Pro is impressive. The built-in autoguider port (ST-4) is a convenient way to improve tracking accuracy through the use of autoguiding.
I have had great success taking exposures of 5-minutes or more on the EQ6-R, although shooting 10-minute+ sub-exposures is certainly possible.
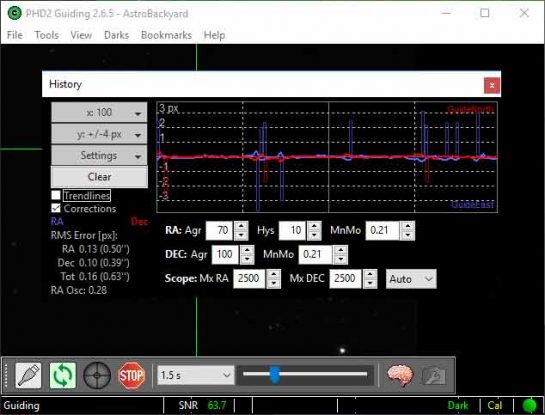
I don’t scrutinize the guiding graph in PHD2 guiding the way others do, but rest assured, the EQ6-R is capable of precise tracking when properly polar-aligned.
In the PHD2 Guiding graph shown below, you’ll notice a total RMS error of 0.63″. These are impressive results for the configuration used and produce sharp long-exposure images.
You can see me use the Sky-Watcher EQ6-R Pro with autoguiding in the following video. I set up a new autoguiding system with a 60mm guide scope and ZWO ASI120mm mini guide camera.
The bottom line is, this mount is capable of impressive tracking and autoguiding for deep-sky astrophotography. It’s a smart choice.
The telescope shown in the video (William Optics FLT 132) is different than the one featured in this post, but the guide scope package is very similar.
The Telescope: Sky-Watcher Esprit 100
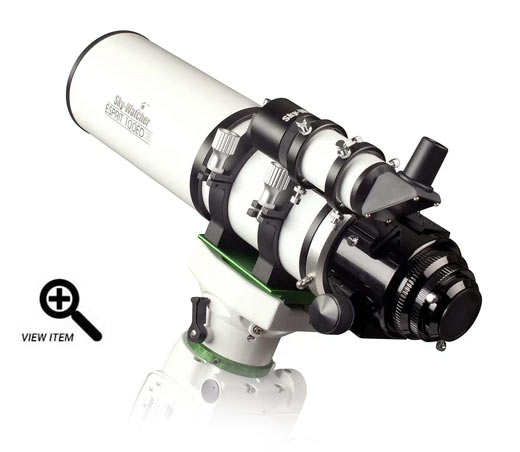
The Sky-Watcher Esprit series of refractors is Sky-Watcher’s premium line of apochromatic triplets. The Esprit 100 sits in between the smaller Esprit 80, and larger Esprit 120, and Esprit 150 models.
This is an F/5.5 telescope with a focal length of 550mm. It is an air-spaced triplet apo, capable of capturing high-contrast, sharp, well-corrected images.
Sky-Watcher’s Esprit line of refractors are top-of-the-line triplet apo’s and include a number of helpful extras including a carry case and dedicated focal corrector.
The color correction, clarity, and overall sharpness of the images taken with the Esprit 100 are remarkable. I’ve seen a number of professional astrophotographers (Terry Hancock, Richard Wright) use these telescopes as well.
The Sky-Watcher Esprit 100 comes with a robust carrying case, diagonal, and a dedicated focal corrector.
- Optics: Triplet APO
- Field Flattener: Included
- Focal Length: 550
- F-Ratio: F/5.5
- Diameter: 100mm
- Weight: 16 pounds
- Mounting: D-Style
The focal length (magnification) of this telescope (combined with the pixel size of the camera) makes it a fantastic fit for medium-sized deep-sky objects.
The telescope has a focal length of 550mm at F/5.5, but the micro four-thirds sensor of the camera I use pulls the images forward quite a bit.
Compare the framing of the Lagoon Nebula in the graphic shown below between 3 camera types. Micro four-thirds (ASI294MC Pro), APS-C (ASI2600 MC Pro), and full-frame (ASI6200MC Pro).
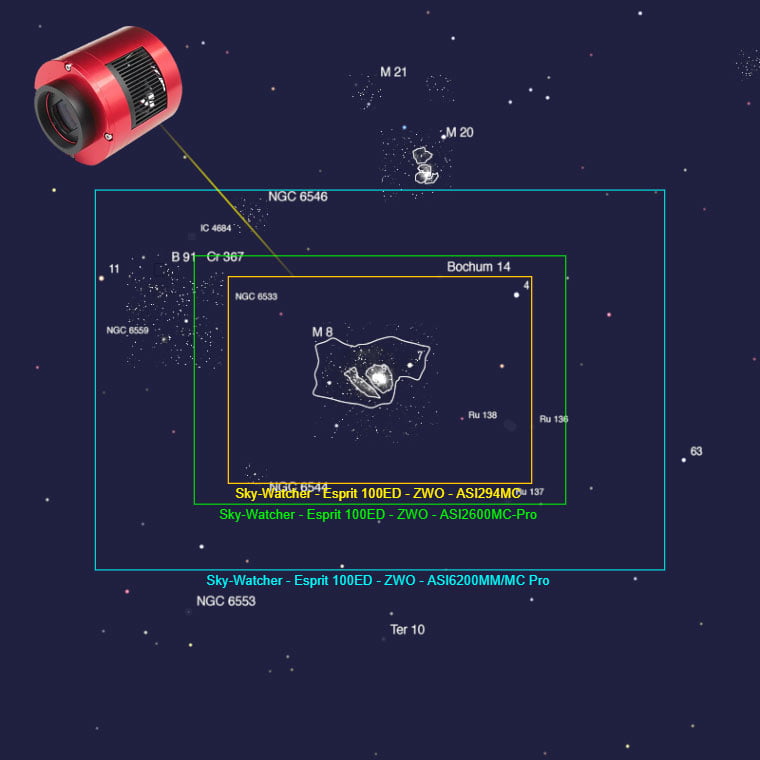
You can calculate the image scale of your optical system and camera using this invaluable tool from First Light Optics.
When deciding on a camera for astrophotography, it is essential that you understand how the sensor and pixel size of your camera will affect image scale and resolution.
One of my favorite projects using this system was the Triangulum Galaxy photographed under dark skies. As you can see, the size of this galaxy was a great fit for this system.
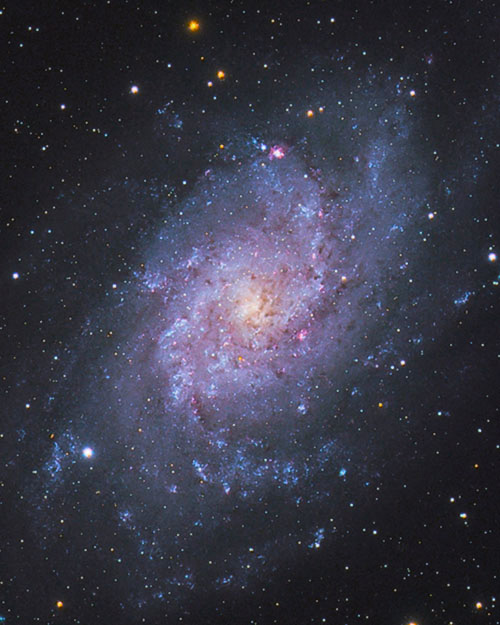
The Triangulum Galaxy. Sky-Watcher Esprit 100 and ZWO ASI294MC Pro.
No matter which camera you choose, if it’s a cooled CMOS, it will mirror a similar experience to the one shared in this article.
Let’s examine the exact camera used in the equipment profile listed above. I’ll now provide a helpful overview of the camera in the featured setup.
If you’re looking for more information, I’ve covered my experiences using the ZWO ASI294MC Pro in detail over the last 3 years.

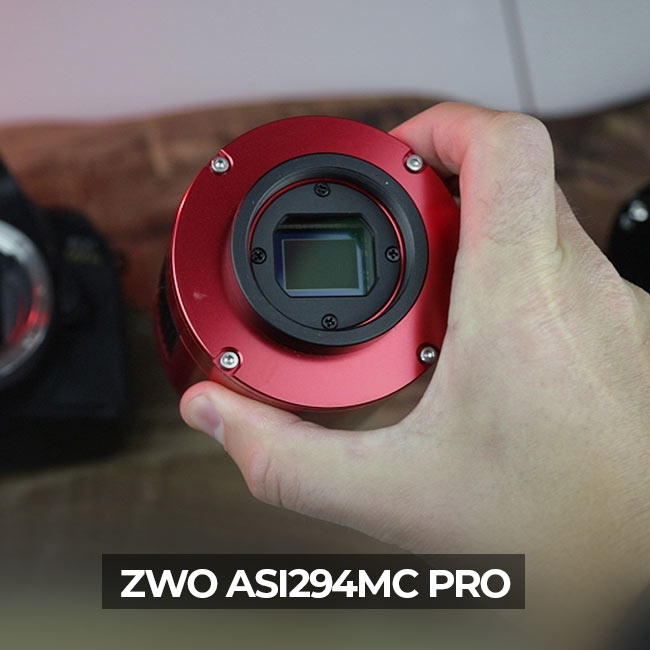
The Camera: ZWO ASI294MC Pro
The camera used is a one-shot-color CMOS dedicated astronomy camera, or as I like prefer to call it, the ZWO ASI294MC Pro.
You’ll find a lot of amateur astrophotographers debating over the value of color astronomy camera (vs. mono). Consider the images shared on this page to be a testament to the capability, value, and convenience of a one-shot-color camera.
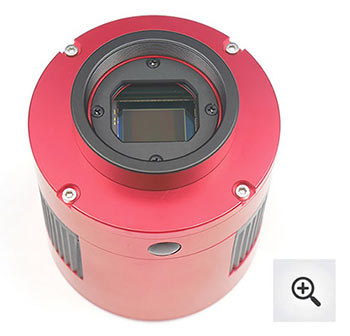
This cooled camera is a capable choice for anyone that is looking to upgrade from a DSLR or mirrorless camera for astrophotography. You can control the camera using your computer and dedicated software via the onboard USB 3.0 port.
I use Astro Photography Tool for this task, and I enjoy it very much. I find it easier to use than some of the other image acquisition software choices available, but that’s just a personal preference.
I regularly use DSLR and Mirrorless cameras (such as the Canon EOS Ra) for astrophotography, but a cooled CMOS or CCD is the obvious choice for many folks capturing long-exposure images.
The ASI294MC Pro is a micro four-thirds sensor camera, and it captures beautiful color images with the help of a cooled, back-illuminated CMOS sensor.
This camera requires a back focus distance of 55mm to capture sharp images. The camera includes 2 extension tubes (16.5mm and 21mm) to help you achieve this distance in your optical train.
I suggest looking into a Starizona filter drawer system to make changing filters easier.
Other choices to consider in the cooled CMOS category to consider are the ZWO ASI533MC Pro, QHY 183C, and QHY247.
These are all dedicated astronomy cameras, but their specifications and best uses vary depending on the model.
You can dig deep into all of the technical specifications of this astronomy camera including the full-well capacity, dark current, and quantum efficiency on the ZWO website.
The Filter: Optolong L-eNhance
The Optolong L-eNhance filter has become a popular choice since I first reviewed it last summer. It is a suitable choice for those shooting with color cameras in a light-polluted area.
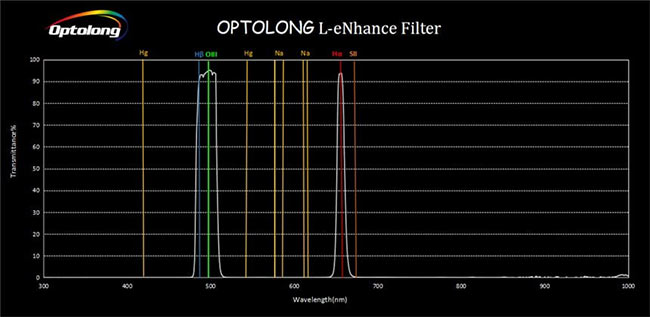
My backyard is a Bortle Scale Class 7, and it works very well for me. It is a dual bandpass narrowband filter that allows light from the h-alpha and OIII wavelengths to reach the sensor.
It even allows some of the h-beta transmission line to pass through, but in my experience, it’s very weak. Have a look at the transmission graph below.
In terms of color images, this translates to data that leans towards the green/magenta side of the spectrum. When processing your data, you may find it difficult to correct areas containing blue such as a reflection nebula or galaxy.
However, for emission nebulae, it works absolutely brilliantly. The contrast between your light-polluted (or moonlit) sky and your target is substantial. In fact, I find it difficult to justify capturing data in pure h-alpha when I could use the L-eNhance to get a color image.
Here is one of my favorite images shot using the Optolong L-eNhance filter and the ZWO ASI294MC Pro. As you can see, the L-eNhance works great on planetary nebulae as well.
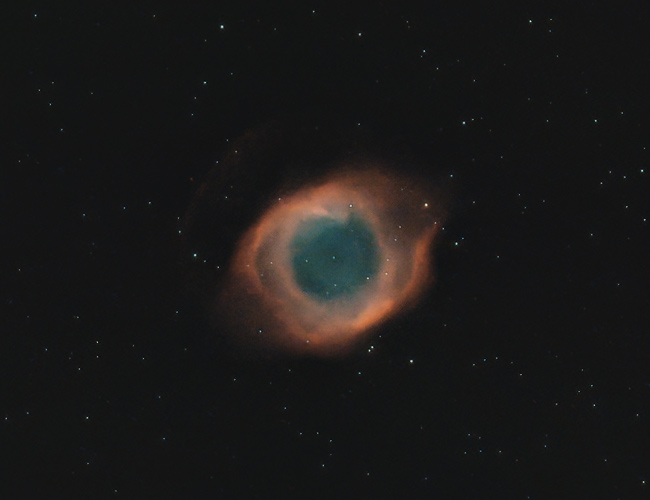
The Helix Nebula. Optolong L-eNhance + ASI294MC Pro.
No matter which filter you use, you will need to make some corrections to the color in the post-processing stages. The direction you choose to steer the image in is up to you.
Final Thoughts
The reason I chose to feature this equipment profile first, is because I believe it is one of the surest routes to take. It’s a winning combination, and I’ve got plenty of successful images to prove it.
If I were forced to find fault with this system, there are only 1 aspect I can think of that is worth mentioning. Magnification and Field-of-View.
For large targets like the Lagoon Nebula and Eagle Nebula, the Esprit 100 and ZWO ASI294MC Pro are an ideal choice. When investing in a telescope to match your camera, the projected field of view should be calculated.
For smaller nebulae or galaxies, 550mm focal length is not deep enough for a detailed portrait. In the image below, compare the size of the Dumbbell Nebula shot with the Sky-Watcher Esprit 100, and Esprit 150.
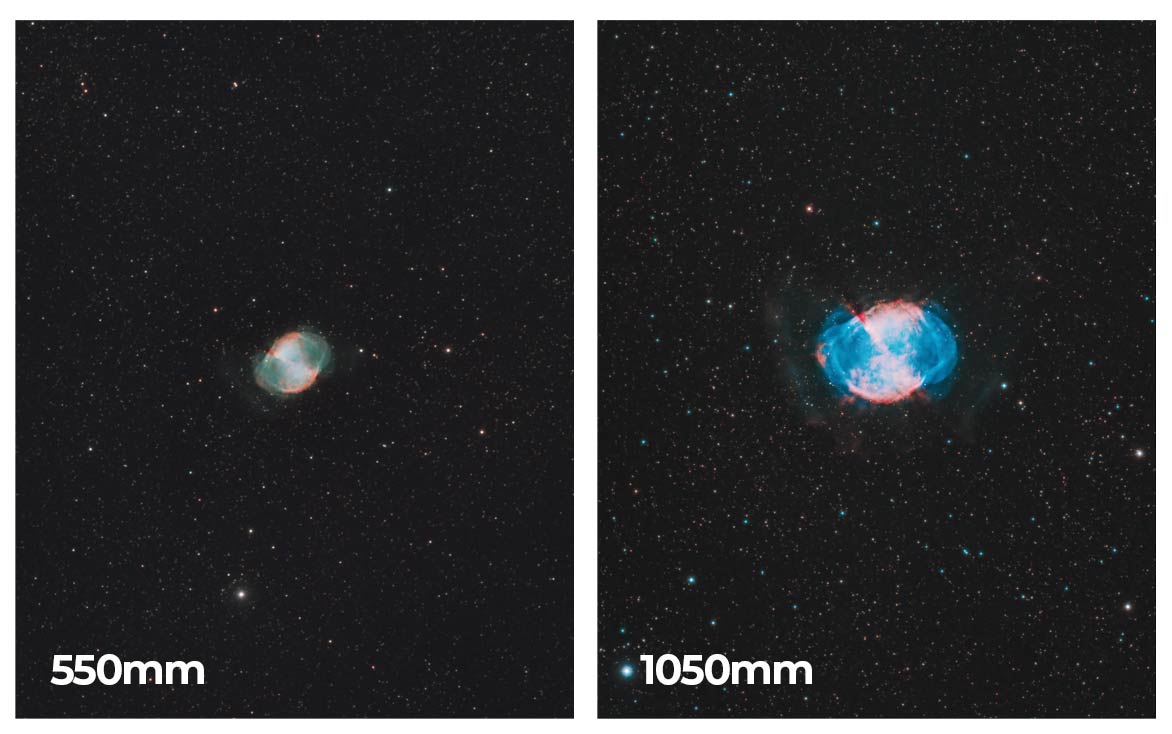
Magnification of the Esprit 100 vs. Esprit 150.
As with any telescope you’re researching, your final choice will depend on the types of projects you intend to take on.
If you’re interested in shooting medium-sized nebulae like the ones featured on this page, this configuration is a fantastic choice.
If you would like some help on the image processing front, be sure to check out my premium astrophotography image processing guide.