Which Telescope to use with the iOptron SkyGuider Pro
I am often asked which telescope is best suited for the iOptron SkyGuider Pro camera mount. The SkyGuider is an entry-level astrophotography mount, which means that a lot of beginners start out with this piece of equipment.
Although this compact single-axis EQ mount is small and lightweight (3.2 lbs with the base), it is capable of carrying a small astrophotography telescope for deep sky imaging. The 11-pound payload capacity is often the biggest factor considered when choosing a telescope for the SkyGuider Pro.
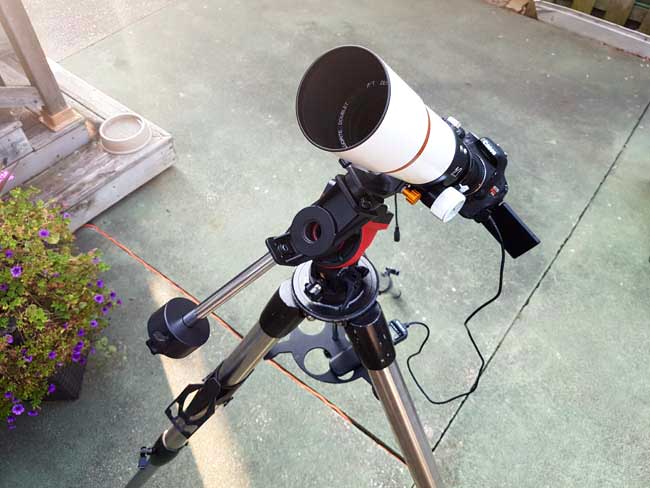
I recommend the William Optics Zenithstar 61 refractor for the SkyGuider Pro. This is a high performance imaging APO that uses high-end optical materials (FPL-53) in its objective lens to produce high contrast images with excellent color correction. The wide field of view (360mm), compact size, and optical performance of this little doublet make it the perfect companion to the SkyGuider Pro.
Which Telescope to Use with the iOptron SkyGuider Pro
The SkyGuider is an incredible portable little astrophotography mount. Its compact size makes it a fantastic choice when traveling to darker skies. It’s small enough to fit in a backpack when on foot, and easily fits in your carry-on bag on an airplane.
The SkyGuider Pro includes an internal, rechargeable 3.2V li-poly battery so you don’t have to worry about finding a power supply in the middle of nowhere. To charge this star tracker, you simply plug in the mini USB charging cable that you find with modern smartphones and electronic devices. Once fully charged, this tracker will last for a full night of astrophotography in the field.
I’ve never run out of battery power during an imaging session before, but I always charge the mount beforehand during the day. iOptron lists the official duration length of the battery to be 20 hours operating at 20ºC.
The included ST-4 compatible guiding port is an attractive bonus of this mount, and a big differentiating factor between its younger sibling, the SkyTracker Pro. This feature presents an opportunity for improved tracking, but also adds a layer of complexity, additional weight, and loss of portability.
Without the use of an autoguiding system, you are completely free to roam around with this setup wherever the dark skies take you. The SkyGuider was designed for portability and freedom, and I believe you will enjoy it most when keeping the payload and camera gear to a minimum.
To retain the ultra-portable functionality of the SkyGuider Pro for deep sky astrophotography, it is wise to use a portable and lightweight telescope that falls well below the listed payload capacity of the SkyGuider Pro. Weighing in at only 3.5 lbs, the William Optics Zenithstar 61 is up to the task.
Although I have only personally used the SkyGuider Pro with the Z61 telescope and a number of camera lenses, I have researched a number of popular scenarios to help you make an informed decision.
The listed payload capacity of the iOptron SkyGuider Pro is 11 lbs (5 kg). Compare the overall weight of these popular telescope options with a DSLR camera attached:
| Telescope | Weight | With Crop Sensor DSLR | With Full Frame DSLR |
|---|---|---|---|
| William Optics Z61 | 3.2 lbs | 4.7 lbs | 5.2 lbs |
| Meade 70mm Quad | 4.5 lbs | 6.0 lbs | 6.5 lbs |
| Astro-Tech 72 ED | 5.0 lbs | 6.5 lbs | 7.0 lbs |
| William Optics Z73 | 5.5 lbs | 7.0 lbs | 7.5 lbs |
| Astro-Tech 65mm Quad | 6.1 lbs | 7.6 lbs | 8.1 lbs |
Keep in mind, the weight of these configurations will vary depending on the exact camera body you are using, and does not include any extra weight such as field flatteners, filters, or guide telescopes. All of the telescopes in the chart above fall under the listed payload capacity of the mount, but will require accurate balance for the best results.
The extra reach (focal length) provided by a slightly larger refractor such as the Zenithstar 73 is tempting, but this option will demand that your imaging payload is precisely balanced. The less the camera tracker has to “work” to rotate in the RA axis, the better.
In the past I have used this combo to photograph deep-sky objects such as the Andromeda Galaxy, and the Heart Nebula. The adorable Z61 only weighs 3.2 pounds, which means that even with a full frame DSLR camera attached, it can effortlessly track the sky while riding on the SkyGuider Pro.
When calculating the payload capacity of your load, you need to remember to factor in the weight of your camera gear. For example, a full-frame DSLR camera such as the Canon EOS 5D Mk II weighs about 2-3 lbs (body only). So, a small refractor that weighs about 5 lbs or less falls well below the 11-pound limit of SkyGuider Pro when the counterweight is used.
A field flattener such as the Flat61 (for the Zenithstar 61) is recommended when imaging with your refractor. Luckily, this component adds very little extra weight. An autoguiding system, however, may put you over the limit. I’ll suggest options for this scenario shortly.
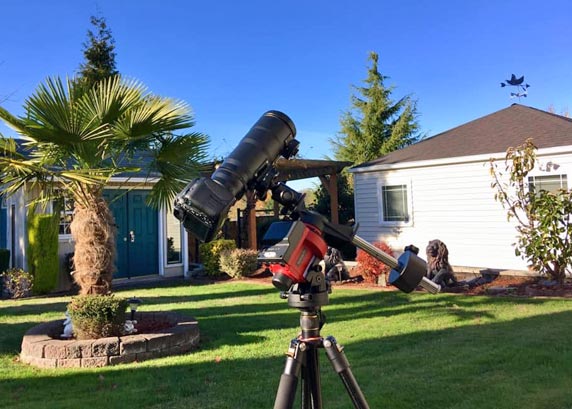
William Optics Z61 APO on the iOptron SkyGuider Pro
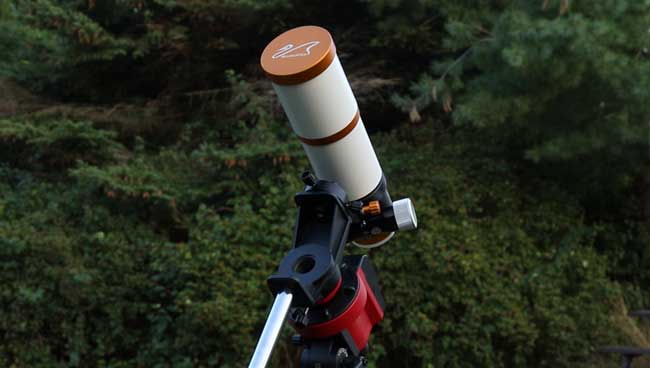
The William Optics Zenithstar 61
The Z61 is a high-quality doublet apochromatic refractor. The “APO” optical design ensures that you’ll capture high contrast images with impressive color correction.
The imaging circle was designed for full-frame camera sensors, so owners of cameras such as the Canon EOS 6D Mark II or Nikon D610 will appreciate this feature of the Z61.
Don’t forget to consider using a light pollution filter for your deep-sky astrophotography. A clip-in filter such as the Optolong L Pro is a smart choice for those looking to capture natural-looking star colors while reducing the efforts of artificial lighting.
The IDAS LPS filter is also a great choice, and the clip-in filter I used for the photo of Andromeda below.
In my experience, taking shots at ISO 1600 for 2-minutes in length yielded some fantastic images using this F/5.9 telescope. With a sound polar alignment, your images will be nice sharp using the Z61 for a 2-minute exposure. At this focal length, it is not essential to use autoguiding as long as your polar alignment and balance are precise.
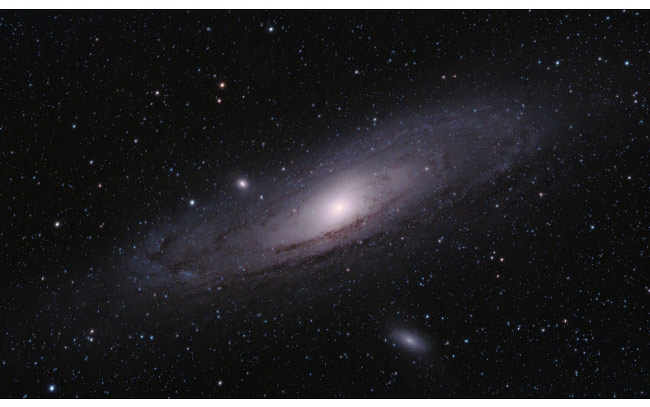
The Andromeda Galaxy using the William Optics Zenithstar 61
The focal length of the Zenithstar 61 is 360mm, which creates a useful field of view for many deep-sky astrophotography objects. Also, this magnification is very forgiving in terms of tracking accuracy. In my experience, 2+ minute exposures on the SkyGuider showed round stars in each and every image, without the aid of autoguiding.
Polar alignment and balance are the keys to a successful shot. When the mount does not need to work very hard to match the apparent rotation of the sky, your images will be razor-sharp. Use a remote shutter release cable or delay timer on your DSLR to avoid any camera shake caused by pressing the camera shutter.
Examples of Other Telescopes and Configurations
In February 2019, I asked the AstroBackyard Facebook community to share their deep-sky imaging rigs that featured an iOptron SkyGuider Pro. As usual, this resulted in a flood of amazing real-world examples of this setup in backyards around the world.
Many of these amateur astrophotographers used the iOptron SkyGuider Pro, but other portable star trackers were also shared such as several generations of the Sky-Watcher Star Adventurer.
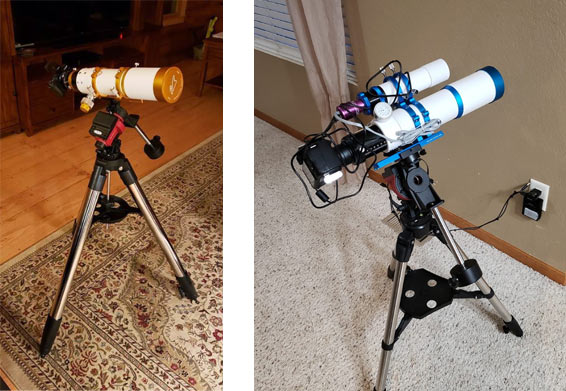
iOptron SkyGuider Pro with William Optics Z73 refractors attached. Tony Bevis and Ryan Herron.
The photos above include setups that use a William Optics Zenithstar 73 APO as the primary imaging telescope. The Z73 is about as heavy as I would go on the SkyGuider Pro. Balance becomes increasingly important as you mount larger telescopes to the SkyGuider. As your focal length and payload capacity increase, so do the importance of polar alignment and balance.
Many users of the iOptron SkyGuider Pro are transitioning for landscape photography or nightscape photography, but want to start collecting longer, tracked shots of the night sky. This audience usually already owns a number of lenses, many of which can be used for astrophotography. A prime lens in the range of 200-300mm is ideal for capturing wide-field astrophotography images.
The below photo shows a Nikon telephoto lens mounted to the SkyGuider Pro using a ball head and Nikon lens collar.
A Nikon telephoto lens mounted to the SkyGuider Pro. Bryan Phan.
Most of the configurations I have seen feature a DSLR as the imaging camera. This makes a lot of sense because a DSLR camera can be controlled using a simple shutter release cable to run an imaging session when in the field. However, some amateur astrophotographers prefer to harness the benefits of a cooled CMOS camera on their portable imaging setup.
This adds a layer of complexity to the setup, including the need for a power supply and computer control software to run the camera. If you are up to the challenge, a setup like the one from Adam Toder below can take incredible, wide-field astrophotos with minimal noise. The setup below features a ZWO ASI1600mm with an electronic filter wheel (EFW), mounted to a Samyang 135mm F/2 camera lens.
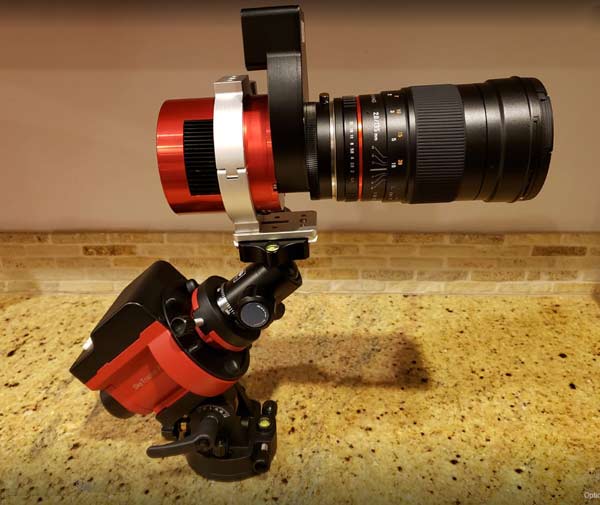
ZWO ASI1600MM, Mini EFW, and Samyang 135mm F/2 mounted to the SkyGuider Pro. Adam Toder.
Locating Deep Sky Objects
I’m often asked how I locate and frame up objects using the SkyGuider Pro mount. Since it is not a “GoTo” mount, to find and frame your deep-sky object you must manually release the Right ascension clutch, and rotate the DEC mounting plate. You can also use the handy directional arrows on the mount to dial in your position once you’re close.
To find your object, you’ll need to have a rough idea of where it is. For many of the most popular targets, you may already have a good idea of where they are. For more obscure nebulae and galaxies, you can use a planetarium app like Stellarium to plan your imaging session.
Related Post: Recommended Smartphone Apps for Astronomy
Once you know where to point your telescope in the night sky, it’s a process of test exposures to frame up the object in your desired orientation. A 10-second exposure at ISO 3200 is often enough to reveal your deep-sky object. The arrows on the mount allow you to slew the RA axis of the mount to align your target in the imaging frame properly.
To achieve a sharp focus, you can either pre-focus the telescope on a bright star before framing your target or use the brightest star in the frame. Be sure to use your DSLR camera’s maximum ISO setting, and set the exposure to bulb while focusing in live view.
Autoguiding with the SkyGuider Pro
It may surprise you to hear this, but I have never utilized the autoguiding feature of the SkyGuider Pro. I mean, the name of the product has “guiding” in it, how could this be? Hear me out…
Adding a small autoguiding combo will add weight to your imaging payload, and with a small telescope or heavy camera lens attached – that may put you over the 11-lb limit. However, if you must autoguide using the SkyGuider, I would suggest an ultra-lightweight guide scope such as the QHY mini guide scope or Orion StarShoot autoguider & 30mm ultra-mini guide scope combo shown below.
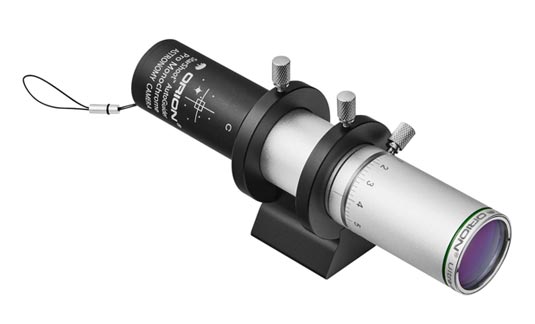
Orion StarShoot AutoGuider Pro & 30mm Ultra Mini Guide Scope
A guide scope like this weighs only 0.4 lbs, and includes a 1.25″ barrel opening. You’ll need to find a way to mount the guide scope to the telescope via the 1/4″ threaded socket on the dovetail.
Again, I’ve not mounted a guide scope to the Z61 before, but this is the road I would take when used on the SkyGuider Pro. As for a guide camera, stick to one with a low profile like the SSAG pictured above, or the ZWO ASI290mm mini.
Mounting a Telephoto Camera Lens
Portable star trackers like the SkyGuider are a great entry point into the art of capturing long exposure astrophotography images at night. The included counterweight adds some much-needed balance for heavier loads, including a large camera lens or small telescope.
I have successfully mounted a Canon EF 300mm F/4L lens to the SkyGuider Pro in the past, and the results were impressive. Weighing in at just under 3 lbs, it’s a similar payload to a small refractor telescope such as the Z61.
As seen in the photo shared by Adam Toder, a lens such as the Samyang 135mm F/2 is also an exciting option, especially when coupled with a dedicated monochrome astronomy camera and mini filter wheel. I usually reach for the lighter iOptron SkyTracker Pro when using an ultra-wide-angle camera lens such as the Rokinon 14mm F/2.8.
The William Optics Z61 Refractor is a great fit for the iOptron SkyGuider Pro.
The Bottom Line
I highly recommend the William Optics Zenithstar 61 APO refractor as a telescope for the iOptron SkyGuider Pro. Slightly heavier telescopes such as the Z73 offer extra reach, but also demand a higher level of tracking accuracy and balance. With that being said, it appears many members of the AstroBackyard community on Facebook are using a configuration that includes the 5.5 lb Z73.
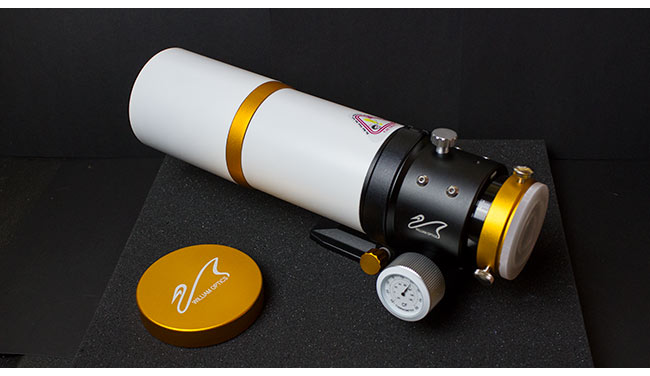
Another telescope that is an excellent match for this mount is the stunning RedCat 51 Petzval APO. This is a more expensive option than the Z61 but does not require an additional field flattener thanks to its quadruplet design. The field of view is also much wider on the RedCat (250mm), which makes it better suited for the largest astrophotography targets in the night sky.
If you already own a lightweight refractor in the 70-80mm range and are looking for a capable telescope mount, I suggest taking a good look at the Celestron Advanced VX. The price is comparable, yet offers a heavier payload capacity, albeit at the cost of portability.
If you want to learn more about the operation of the iOptron SkyGuider Pro camera mount, I highly suggest you check out this video from iOptron.