Can you Take Pictures of Objects in Space Through a Telescope?
Yes, you can take pictures of objects in space through a telescope, but the approach and equipment configurations will vary depending on the subject matter.
With a manual telescope (such as a tabletop Dobsonian) you can take pictures with your smartphone through the eyepiece of the Moon, and larger planets such as Jupiter and Saturn.
Many people take their first pictures of the Moon using a smartphone telescope adapter, and an entry-level telescope. This can be a great first step towards photographing other objects in space, as you can familiarize yourself with the process of capturing steady images at high magnification.
Solar system photography is often the best place to start, as these objects are very bright compared to deep-sky objects such as nebulae and galaxies. I took my first pictures of Jupiter, Venus, Mars, and Saturn through the eyepiece of my stationary Dobsonian telescope.
Observing Saturn through a telescope for the first time is one of the most memorable experiences one can have in astronomy. Photographing the ringed planet is much more challenging.
The brightest planets and the Moon are suitable subjects for a beginner. You can take snapshots of these objects with your smartphone at the eyepiece but don’t expect a Hubble-quality image.

Solar system objects captured using a point-and-shoot camera and Dobsonian telescope.
To capture a long-exposure image of the Orion Nebula, you need to securely attach your camera to the telescope, and it must follow the apparent motion of the night sky on an equatorial mount (tracking).
This is known as deep-sky astrophotography and requires the largest investment of time and money overall. Afocal photography (or eyepiece projection astrophotography) is much less involved and requires minimal equipment.
Because the Earth rotates on its axis, images that involve leaving the shutter open for an extended period of time (even a few seconds) will record star trails. Luckily, some objects in the night sky are so bright that you can take a picture of them without a tracking telescope mount.
Can you Take Pictures of Space Through a Telescope?
In this article, I will list the types of objects in space you can shoot through various telescope types. Depending on the telescope type you have, and the camera you own, you may be able to start taking pictures of objects in space right now.
I will also explain how I take pictures of celestial objects using an astronomical telescope, an astronomy camera, and a computerized equatorial telescope mount. You can take pictures of objects in space through nearly every kind of telescope. Each design excels in certain areas and not others.
Certain types of telescopes offer a better observing experience at an affordable price (such as Dobsonian reflector), while others excel at capturing, sharp deep-sky objects with a premium price tag (such as an apochromatic refractor).

Dobsonian reflector telescopes allow you to enjoy celestial objects in space visually but also let you take snapshots of the brightest solar system objects in the sky.
A question that I often receive is “which telescope do you recommend to view and photograph all types of objects in space?”
Someone wants to purchase their first telescope and expects to be able to “see” detailed images of nebulae and galaxies through the eyepiece.
They also wish to see the planet Saturn up-close and take a picture of it using the same telescope for galaxies, star clusters, and nebulae.
Unfortunately, there is no one-size-fits-all telescope that can allow you to view and photograph all of the objects in space in a formidable manner. Certain telescopes are great for deep-sky astrophotography but are not great at viewing the planets in detail.

The telescope on the left excels at visual astronomy. The one on the right is best suited for deep-sky astrophotography.
What Type of Telescope Can You Use?
My number one choice of telescope for beginners is a Dobsonian reflector because it allows the user to explore the night sky on their own and enjoy visual observing before getting lost in the challenging world of astrophotography.
Most visual telescopes include 1 or 2 eyepieces with them, and these are usually fine to get started. A medium-powered eyepiece of about 15mm is a good choice. It offers a good balance between magnification and clarity.
You will not be able to photograph galaxies or nebulae through a stationary telescope such as a Dobsonian reflector. To photograph deep-sky objects in the night sky, you must use a tracking mount that allows you to collect a long-exposure image without star trailing.
It is important to buy a telescope that compliments the experience you are looking for. One road will nurture a love for the night sky and the wonders of space, while another may lead to disappointment and frustration.

The Apertura DT8 Dobsonian is a great choice for beginners that want to maximize light gathering power on a budget.
What Kind of Camera Do You Need for Astrophotography?
The term “astrophotography” covers many areas of photography. This includes everything from wide-angle photos of the Milky Way (using a camera lens), to long-exposure deep-sky astrophotography through a telescope.
There are many different types of astrophotography cameras, but the one that’s best for you depends on the type of subjects you intend to photograph. For example, the best camera for planetary imaging is much different than the one used for wide-angle nightscapes.
Sensor size and type, image scale, and practicality are just some of the factors involved with choosing the right camera for astrophotography. DSLR and Mirrorless cameras are a great all-purpose choice, while monochrome CCD cameras are better and handling things like noise and the headaches of calibration.
For simple snapshots of the Moon and planets through an entry-level (manual) telescope, the camera in your pocket is likely the best choice. You can use your smartphone to capture images of the brightest objects in space through the eyepiece of a small telescope.
Smartphone Astrophotography
Today’s smartphones are capable of taking many types of astrophotography images from wide-angle Milky Way shots to star trail compositions. These types of images do not require a telescope to accomplish.
When you’re ready to hold your camera up to the eyepiece, the Moon is probably the best subject to start with. This experience will allow you to get comfortable with challenges such as exposure, focus, and dynamic range.
The Moon is extremely bright, against a black sky. Daytime photography cameras (including your smartphone) have a hard time properly exposing the details of the Moon’s surface using “auto” mode.

If you are using a telescope with an eyepiece that magnifies the moon to fill the field-of-view, your camera may be able to automatically adjust the exposure length to one that captures the detailed, cratered surface of the Moon.
More often than not, however, you will need to tap into the manual settings of your camera to properly expose the image. A live-view image through the camera will help you set the shutter speed that is fast enough to not blow out the highlights of the image.
Experiment with different camera settings to find the right balance of shutter speed (exposure), ISO, and F-ratio. Generally, you will want to use the lowest ISO setting possible to avoid excessive noise in the image.
A smartphone telescope adapter will help you securely attach your phone to the eyepiece, and align the camera lens.

The Celestron Smartphone Telescope Adapter is useful for Moon Photography.
Photographing bright planets such as Mars, Venus, Jupiter, and Saturn is also possible via this method but will be very challenging. The most difficult aspect of capturing planets through a telescope on a stationary base is that they move very quickly at high magnification.
To capture the surface details of Jupiter, you must keep the camera steady long enough to record several hundred frames in a video format. A single exposure of the planet will likely be too blurry and dim to reveal recognizable features such as the cloud bands or Great Red Spot.
The bottom line is, you will need to experiment with your camera and telescope for numerous nights to see what works. You can use a stargazing app to plan your imaging sessions in advance, as you’ll need to invest some serious time in the project before achieving satisfying results.
Keys to Success:
- Set your telescope on a stable platform. Any shake becomes intensified at high magnification.
- Use a medium-powered eyepiece (10mm-20mm) for a good balance between magnification and clarity.
- Use a smartphone adapter to hold your camera steady and centered in the eyepiece.
- The more aperture your telescope has, the more light it can concentrate into the eyepiece
- Use your camera’s manual settings to adjust exposure length, ISO, f-ratio, and focus. Do not use “auto” mode.
- Objects higher in the sky will suffer less from atmospheric conditions such as poor transparency.
- Try shooting a short video on your subject instead of a single picture. Use software (such as AutoStakkert) to extract the single image frames and stack them.
In the following video, the author explains how he takes images of the Moon and planets using his smartphone camera.
Aperture is More Important than Magnification
For visual use, a large telescope with plenty of aperture is recommended. This is often a Dobsonian reflector telescope with at least 8″ of aperture. With this telescope, you can observe many objects in the night sky including planets, nebulae, galaxies, and star clusters.
People often get aperture and magnification mixed up. Magnification is much less important overall than aperture, as an increased magnification will not provide any benefits if there is not enough light available.
In the telescope world, aperture (not to be confused with f-ratio) refers to the size of the mirror or objective lens of the telescope. An 8″ Dobsonian has an 8-inch primary mirror to collect and concentrate light to the eyepiece. The bigger the aperture, the more light that can be collected at once.
The refractor telescope shown below includes a 3X Barlow lens, but the resulting views at this magnification may be dim and underwhelming. There is just not enough aperture (In this case, 50mm diameter at F/12) to collect enough light for a decent picture of anything except the Moon.

Contrary to what you may think, it is often more useful to use a low magnification instrument and eyepiece when viewing/photographing objects in space. High magnification eyepieces will increase the effects of Earth’s rotation and make it harder to photograph objects on a stationary mount.
A Barlow lens can magnify the image by 2X or more. This may sound like an obvious choice to increase the size of your subject, but remember that the added magnification will reduce clarity and intensify any shake in the optical system.

A generic 2X Barlow Lens can double your magnification, at the cost of clarity and sharpness.
Taking Pictures with a Dobsonian
To take pictures through a Dobsonian telescope, you must carefully align the camera lens of your smartphone or point-and-shoot camera with the eyepiece of the telescope. The magnification of the eyepiece inserted into the telescope focus drawtube will determine the size of the object in your image.
This method can produce some exciting results on the brightest objects in the night sky such as planets, and the Moon. However, because the telescope mount (the base that holds the optical tube) is stationary, higher magnifications will result in a fast-moving target, which is tough to photograph successfully.
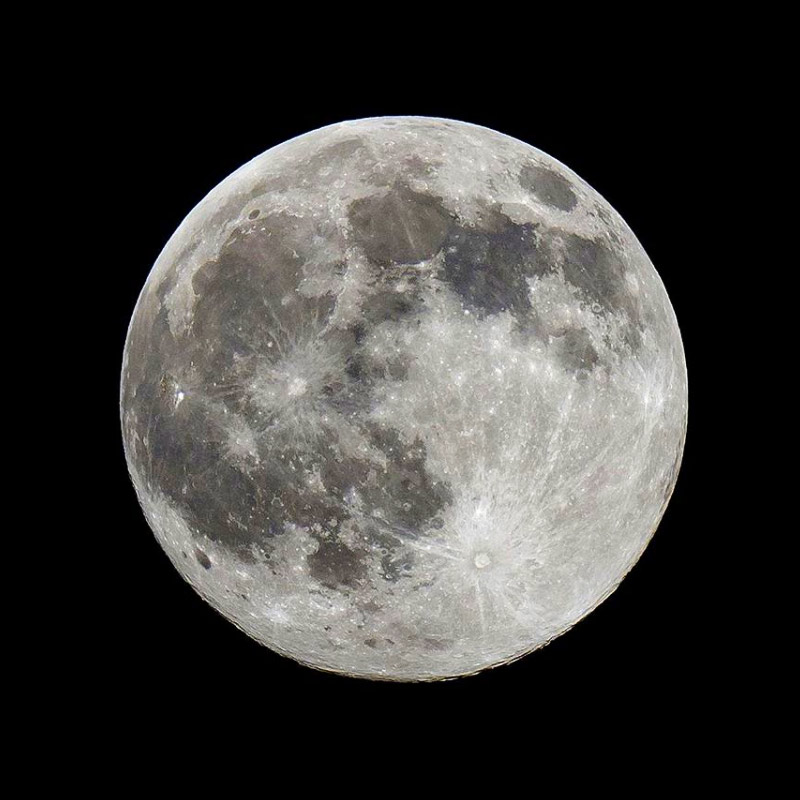
The Full Moon. Captured through the eyepiece of a Dobsonian Telescope with a Point-and-shoot digital camera.
To photograph planets, astrophotographers shoot short video files of the object and select the best frames to “stack” together. This can help compensate for poor seeing and transparency in the air, and produce a sharp image of the planets or the Moon.
Even though a computerized tracking equatorial mount will provide the stability for amazing planet photographs, it is not recommended for beginners that are looking to casually enjoy space and share their photos.
Here is an example of a Dobsonian telescope that will provide a positive experience early on, and allow you to take simple pictures of the Moon and brightest planets through your smartphone:

The model shown above is small and affordable. For better views, a larger aperture Dobsonian such as the Apertura DT8 8″ is a solid choice.
My first photos of space were captured through the eyepiece of my Dobsonian telescope like the one shown above. This included the planets Jupiter, Saturn, and Mars, as well as some incredibly detailed portraits of the Moon’s surface.
Related Post: How Much Does a Telescope Cost?
Advancing to Deep-Sky Astrophotography
I have been photographing objects in space through my telescope for nearly a decade. I began my journey as most do, photographing the Moon through the eyepiece of a telescope.
Now, I focus my attention on deep-sky nebulae and galaxies using sophisticated astronomy cameras and large computerized telescopes. The camera is attached directly to the focuser of the telescope (prime focus astrophotography) and I am able to take long-exposure images of 5-minutes in length or more.
The deep-sky astrophotography setup shown below is capable of capturing impressive images of faint nebulae in the night sky, but this type of astrophotography requires extensive knowledge and a big budget.
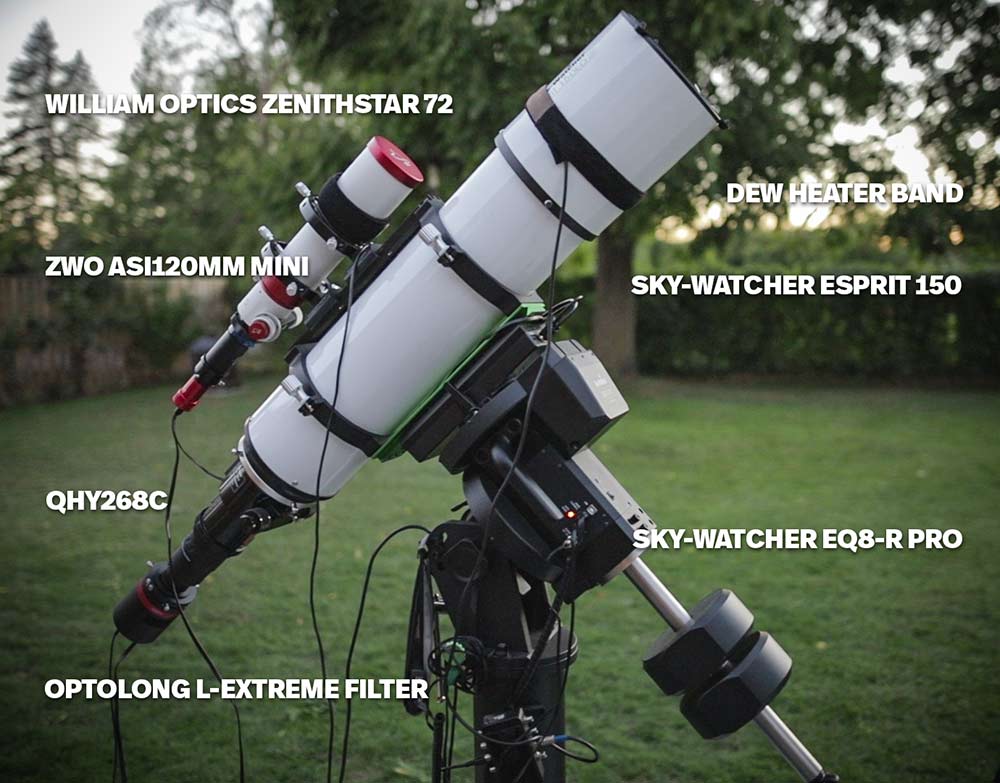
A sophisticated deep-sky astrophotography telescope setup.
Additional measures must be taken to successfully photograph nebulae and galaxies in the night sky, such as autoguiding. Special filters are used to isolate the light emitted by specific types of nebulae, such as the hydrogen found in emission nebulae.
Building a setup like this takes a lot of time and patience, but is well worth the effort (in my opinion) in the end. If you start your journey with a visual telescope that allows you to learn the night sky before taking pictures, you will have a better foundation to build from.
As the old saying goes, you need to learn how to walk before you run.
The first step I recommend for beginners looking to tackle deep-sky astrophotography is to invest in a portable star tracker. This will allow you to experiment with long-exposure images of 30-seconds or more using a modern DSLR or Mirrorless camera.
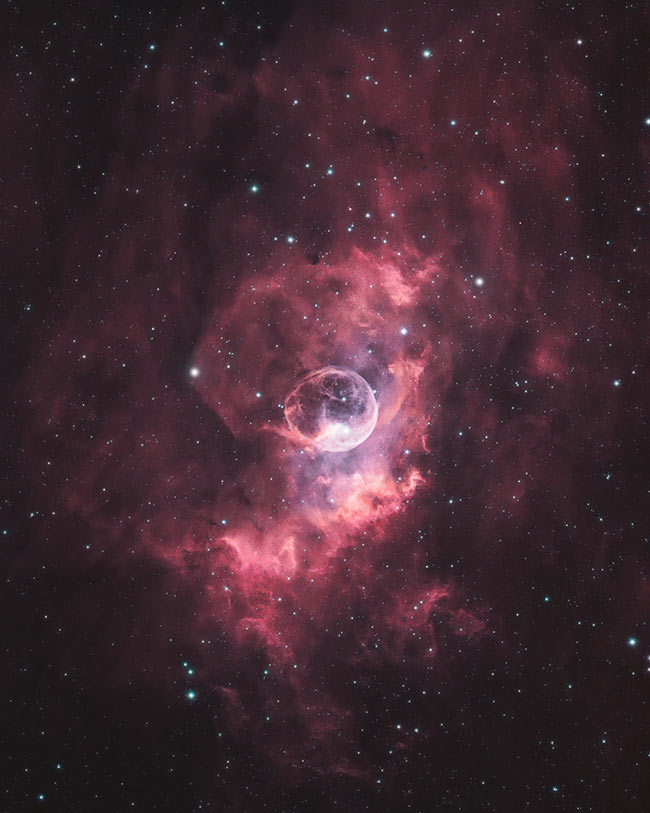
A deep-sky image of the Bubble Nebula using a dedicated astronomy camera and professional tracking mount.