Using a Canon EF 24-105mm Lens for Astrophotography
Do you already own a Canon EF 24-105mm F/4L lens and want to use it for astrophotography purposes? If so, you’re in luck. I’ve tested this very lens for some wide-field deep sky images from my backyard. I love testing new camera lenses at different focal lengths and playing with new ways to frame objects in the night sky.
In this post, I’ll share some of the astrophotography images I’ve captured using the Canon EF 24-105mm F/4L lens. At this lens’s widest field of view (24mm), it allows you to capture entire constellations of stars, with just enough extra magnification to create an entirely different looking scene than a standard wide-angle (18mm) shot.
With a tracking camera mount that has been polar aligned (and enough exposure time), you can create impressive images of a number of large deep sky objects including the Orion Nebula, Andromeda Galaxy, and many more.
The Canon EF 24-105mm F/4L USM IS lens is an excellent choice for astrophotography. This unique focal length offers a way to create interesting photo opportunities not available with a traditional wide-angle lens. Because it’s an L-series lens by Canon, you can be sure that the image quality and performance of the 24-105mm meet the demanding aspects of astrophotography such as focus and star quality.

Another lens to consider at this focal length (at maximum zoom) is the Rokinon 135mm F/2. This lens has the benefits of being much faster (F/2), as well as an improved overall sharpness you can only achieve using a prime lens.
If you already own the Canon EF 24-104mm F/4, I don’t see an immediate need to upgrade to the Rokinon 135mm F/2, but it’s worth considering if you want a little more reach, and the benefits of a faster, sharp prime lens.
Using the Canon EF 24-105mm Lens for Astrophotography
24mm offers a unique field of view compared to a more traditional wide-angle shot of 18mm or wider. Wide-angle lenses such as the Rokinon 14mm F/2.8 are fantastic for capturing a large swath of the Milky Way, but a narrower field of view is better at isolating specific regions of the sky.
Because this is a zoom lens, you can also use a much deeper focal length of 105mm for an even tighter view, or anywhere in between. The tough part about using heavier zoom lenses like the Canon EF 24-105mm is that when the lens is pointed upward, gravity works against you. This means that any magnification other than its widest 24mm will result in the zoom slowly “falling” back to 24mm.
To deal with this issue, you can tape the lens to the desired focal length using scotch tape. I’ve done this before with this very lens, and it worked extremely well. It’s easiest to tape the lens at either its minimum or maximum focal lengths rather than at a stage in between the two. The image below includes the Horsehead Nebula, Flame Nebula, Orion Nebula and Running Man Nebula. Using this lens at 105mm offers enough magnification to start revealing large deep-sky objects.
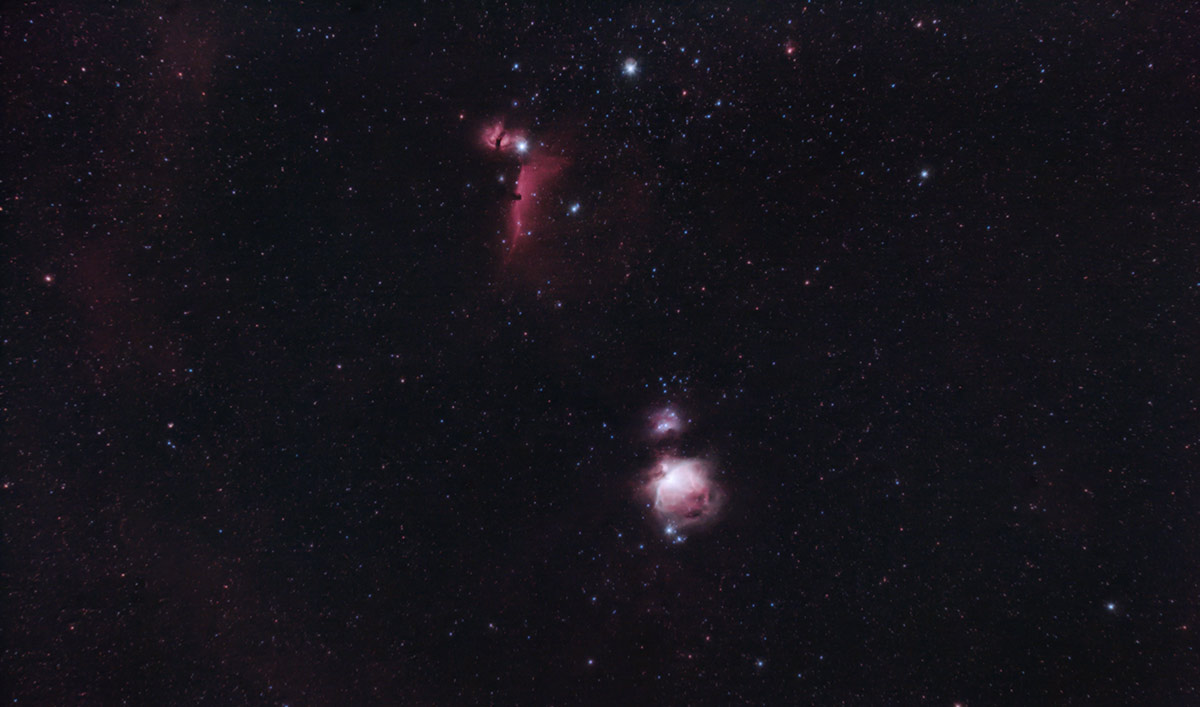
New framing opportunities available thanks to the unique field of view at 105mm – Click for larger version.
Canon EF 24-105mm F/4L IS USM
The lens is an EF mount style Canon telephoto-zoom lens that was introduced in 2005. This an L series lens, which Canon considers to be their professional line of DSLR lenses. I’ve been adding to my collection of L series lenses for several years, purchasing a used model 24-105mm in 2017.
This is the first version of the 24-105mm, not the popular “II” version that is said to have improved the Image Stabilization function. This camera lens is widely used by amateur photographers, largely due to the fact that is was included as a kit in the Canon EOS 5D Mk II, 5D Mk III and EOS 6D packages.
The lens itself it weather-sealed to protect it from dust and water, although it is not completely waterproof. It uses 77mm filters on the objective and contains a single Super-UD glass element in the lens design. When you compare this lens to an apochromatic refractor telescope, the obvious advantages are its wide field of view and impressive fixed aperture of F/4.
This lens offers some serious benefits for amateur astrophotography purposes, especially if you are looking for a mid-range focal length to create future imaging projects. If you are using a full-frame DSLR camera, the maximum magnification of 105mm is likely to be a bigger seller point for you as this presents some unique framing opportunities (think Rho Ophiuchus).
On an APS-C camera body, the 24-105mm focal length becomes 38-168mm due to a crop factor of 1.6X. This version of the lens is best suited for photography, rather than video work, as the image stabilizer motor is rather loud and is recorded along with your audio. (I found this one out the hard way!)

My DSLR and lens riding atop the iOptron SkyTracker Pro camera mount.
Using a Crop-Sensor DSLR Camera
A crop sensor DSLR camera such as the Canon EOS Rebel T3i (600D) used for the images on this page create a narrower field of view than a full-frame camera does with this lens. A full-frame DSLR such as the Canon EOS 6D would produce images at a true native focal length of 24mm with this lens.
The crop factor (1.6X) applies an extra bit of magnification with any lens attached, for better or for worse. In situations where an ultra-wide field of view is important such as a Milky Way nightscape or Meteor shower, a full-frame DSLR is best.
For creative shots that feature a selected region of sky such as this, perhaps an APS-C sensor is a better choice. In the end, it doesn’t really matter all that much. The key is that you understand the field of view you can expect to capture with a particular lens. In this case, the focal length will actually be 38mm (24mm x 1.6), which is what I was going for. I purposely chose to use my crop-frame DSLR with this lens for this photo.
The fact that this camera is also modified for astrophotography was considered, as neither of my full-frame DSLR’s have been modified. The California nebula will show up in my images thanks to this upgrade, as a DSLR that has had its stock IR cut filter removed will allow emission nebula objects to be recorded.
Related Post: Choosing a Camera for Astrophotography
Light Pollution Filter
If you’ve spent any time browsing my website, you’ll know that I do the majority of my deep-sky imaging in a Bortle Class 8 city sky. This necessitates the use of light pollution filters for 95% of the broadband color images I take.
The filter I prefer to use most underneath my 24-105mm lens is the Optolong L-Pro broad-spectrum filter. This light pollution filter specializes in preserving the natural star colors in the night sky while reducing as much artificial light and sky glow as possible. It clips into the camera body to fit securely underneath my camera lens.
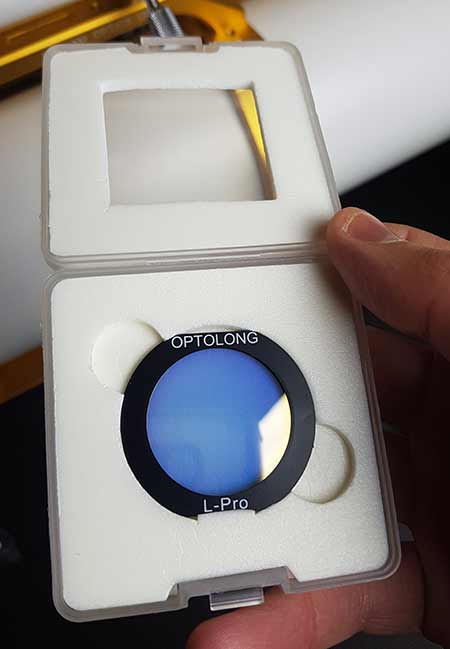
A clip-in filter like the Optolong L-Pro fits inside the body of your camera and can be used with lenses attached.
When shooting star clusters with a DSLR camera in the city, it’s often better to shoot shorter exposures with a mild light pollution filter. This will help to reduce the harsh effects of color degradation associated with light pollution filters.
Ideally, you’d shoot under dark skies without the use of a filter at all, but the L-Pro has been the best option I’ve seen from the city thus far.
Typical individual images with this lens in the city are quite conservative at ISO 400, and 1-minute in length. The fast F/4 speed of the Canon EF 24-105mm lens helps to collect a healthy amount of signal, even if a lot of noise comes with it. The signal to noise ratio is the holy grail of capturing great data from the city, so take every advantage you can get.
Whether you are using a telescope or a camera lens, subtracting dark frames to your image in the pre-processing stages will help to correct as much noise as possible.
Related Post: How to Take Dark Frames
Tips For Focusing the Camera Lens
The process of focusing the Canon EF 24-105mm F/4L is as simple as pointing the camera towards a bright light. I used a streetlight from across the street to find my initial focus position. It’s nice to know that this glaring artificial light has some sort of use for my backyard astrophotography.
Related Post: Focusing Tips for Astrophotography
Focusing the lens is a straight forward process at 24mm, and even offers a little forgiveness at an aperture of F/4. Faster lenses that can open up to F/1.8 are beneficial for astrophotography but often result in a challenging focus routine. There is very little room for error when shooting the night sky at F/2.8 or below.
The recommended camera settings for focusing your lens at night include your widest aperture (f-stop) and a high ISO setting (I use ISO 6400 on my Canon EOS Rebel T3i). Set the exposure length to “bulb mode” (one exposure passed 30″) so the camera is collecting the absolute maximum amount of light possible.
Use your DSLR cameras “live view” mode, which is essentially a live video of view your camera sees. As long as you’ve used the settings above, you should see the brightest stars in the night sky on the live view screen.
For the image below, I used the bright red star, Aldebaran to focus the lens. Using 10X magnification in live view mode, the star was very close to perfect focus based on the rough position achieved using the streetlamp. To really nail the focus, simple move the focus ring slowly in and out while zoomed in on the star. You can also take short 5-second test exposures and compare the images against each other if you want to get it bang-on.
At this point, I usually shoot one full test image at my desired exposure length. Then, I zoom in to the image on the DSLR display screen and inspect the sharpness of my shot. This is also a great time to check the accuracy of your polar alignment. Shots that are 2-minutes in length or shorter should not show any star trailing at this focal length.
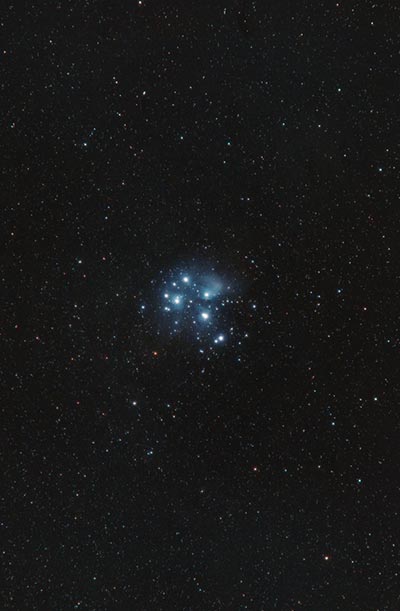
Here is a photo of the Pleiades using this lens at its maximum magnification, 105mm.
Tracking the Night Sky
Unless the type of images you’re into include star-trailing, you’re going to need a star tracker for astrophotography. Fortunately, smaller deep-sky imaging setups like a DSLR and the 24-105mm lens don’t require a robust German equatorial mount like you would for a telescope.
I use the iOptron SkyTracker Pro to move with the apparent rotation of the night sky and capture crisp images with sharp stars. This lightweight camera mount (2.5 lbs) easily fastens to your existing photography tripod for tracked images.
Polar alignment and balance are the keys to a successful image when using a star tracker like this. Once the mount has been accurately aligned with the rotational axis of the Earth, you can expect to collect long exposure images of up to 2-minutes or longer depending on the focal length of your camera lens. Higher magnifications are less forgiving to alignment, as the increased magnification will highlight even the slightest error in your setup routine.
I prefer to use a ball-head mount so I can point the camera in any sort of upward direction I wish. Once I have framed the object(s) up the way I want, I let the mount do it’s thing and run a sequence of long exposure images using a remote shutter release cable.

The iOptron SkyTracker Pro allows me to capture 2-minute + tracked exposures.
Camera Control with a Remote Shutter
A remote shutter release cable like this one creates an enjoyable way to automate your imaging sequence. Rather than connecting the camera to a computer and running it with external software, this lightweight cable takes up very little space and does its job effectively.
A typical imaging sequence will include about 60-100 exposure of 1-minute or more, with a 5-second delay between shots. The cable reduces the chances of camera shake or jarring the cameras focus as you no longer need to touch the DSLR camera body whatsoever.
For my imaging sessions in the backyard, I usually leave the SkyTracker Pro and camera running for hours on its own while I catch up on other things in the house. Be sure to set a large number of shots to go off continuously, as you don’t want the sequence to finish shooting because you have lost track of time. I use this device to capture a set of dark frames after each shoot as well.
Camera Settings Used:
- Mode: Manual
- Exposure: 1-Minute
- ISO: 400
- White Balance: Daylight
- F-Ratio: F/4
- Filter: Optolong L-Pro

The Taurus region of the night sky at 24mm – Click the image for a larger view.
As you may have noticed, some clouds crept into the photo. In the end, it wasn’t a great night to test the lens as my clear sky time was extremely limited. The photo above includes 10 x 1-minute exposures at ISO 400 using the Canon EF 24-105mm lens on a Canon EOS Rebel T3i.
The larger version of the image shows the impressive star colors found in the image. If you look closely, you should be able to make out the California nebula near the upper left of the frame.
The Bottom Line
I have to admit, astrophotography was not my primary intended purpose for the Canon EF 24-105mm lens when I purchased it. I bought it to fill the void of not having a high-quality telephoto-zoom camera lens for general daytime photography purposes. It truly is a versatile lens that any amateur photographer can appreciate, as Bryan Carnathan says in his review, “If I had only one lens, this would be the one.”
Along with enjoying this lens for daytime photography, I have discovered that both its minimum and maximum magnifications have opened up some incredible astrophotography opportunities to shoot the night sky in new ways. At 24mm, the view is slightly more targeted towards a specific area of the night sky than a traditional wide-angle lens. At 105mm, the lens is perfect for large targets such as the North America Nebula, or to highlight the beauty of the Sagittarius star cloud in the Milky Way.
I find 105mm to be a creative focal length to capture the Andromeda Galaxy, as you can really get a feel for the vastness of space surrounding this deep sky object. The photo below was captured from my Bortle Class 8 backyard using this lens on an iOptron SkyTracker Pro.
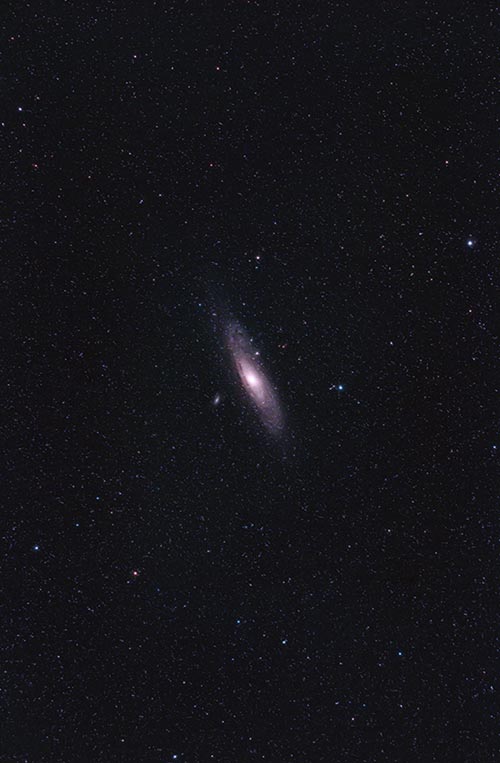
The Andromeda Galaxy at 105mm.
The creative framing opportunities available would be squandered if the lens showed any signs of color fringing or chromatic aberration. Thankfully, this is a Canon L series lens. The red stripe indicates that you can count of these lenses to live up to the scrutiny of the amateur astrophotographers keen eye.
Related: Example astrophotography images captured using the Canon EF 24-105 F/4L on Astrobin
The stars are sharp, colorful and flat to the edges of the field in my crop-sensor DSLR. I am able to use the Canon EF 24-105mm F/4L with a wide variety of clip-in light-pollution and narrowband filters. All in all, it’s been a fantastic addition to my gear, and a lens I am sure that will get plenty of use in the future.