Frequently Asked Questions
In this section, I hope to offer answers to some of your beginner astrophotography questions.
I receive a lot of questions about astrophotography each day by e-mail and through my social media accounts. I decided that it was time to dedicate an area of this website to group all of these common questions so that we can all learn from each other.
In the following video, I answer these questions:
- Which filter should I use?
- Should I use a refractor telescope or a camera lens?
- Which telescope should I upgrade to?
- Do I need to modify my camera for astrophotography?
- Where can I buy used astrophotography gear?
- What is the right backspacing for my camera and telescope?
- How do I focus my camera and telescope?
- How do you power your setup in the field?
- Do you really leave your gear out in the cold?
- Which software should I use for image processing?
My complete beginner’s guide to DSLR astrophotography
Astrophotography Questions – Table of Contents
- Is it normal to have horizontal banding noise in my stacked image?
- If I modify my DSLR for astrophotography, will it ruin it for regular daytime use?
- Should I modify my DSLR for astrophotography?
- What’s the best advice you can give to someone brand new to astrophotography?
- How do I stack different sets of light frames over multiple nights in Deep Sky Stacker?
- How do I take Flat Frames for stacking in Deep Sky Stacker
- How do I take Dark Frames for stacking in Deep Sky Stacker
- How do I take Bias Frames for stacking in Deep Sky Stacker.
- What astrophotography software do you recommend for beginners?
- What is Hyperstar?
- Do you need a telescope for astrophotography?
Q: Is it normal to have horizontal banding noise in my stacked image?
A. Yes! This type of horizontal banding noise looks very familiar. In this instance, the astrophotographer aggressively stretched under 20 minutes worth of exposures. This type of noise is an artifact that shows itself by stretching the data captured with your camera past its limits. By stacking more exposures and capturing a minimum of 15 dark and 15 bias frames, the horizontal banding should subside. Soaking more time into an astrophoto is always a good idea. Thank you, Joey, for the question.
Q. If I modify my DSLR for astrophotography, will it ruin it for regular daytime use?
A. Potentially. Because I use my Canon T3i for astro-imaging exclusively, I removed the IR cut filter and did not add any additional filters or glass to protect the sensor. This renders the auto-focus function of the DSLR useless and voids the Camera of any existing warranty. This is considered a “full-spectrum” modification, or “naked-sensor” mod. My IDAS lps EOS clip-in filter protects the sensor from the elements.
It is possible to retain the daytime functionality of the camera by replacing the IR cut filter with a clear filter, and/or compensating for the modification with a custom white balance. Gary Honis offers fantastic advice as well as his services here.
Q. Should I modify my DSLR for astrophotography?
For the record, I think that you should definitely modify your DSLR for astrophotography. The difference in the amount of data that can be acquired with an astro-modified DSLR vs. a stock camera is impressive. Stock cameras are missing out on a wealth of detail for many deep-sky objects. (I shot with a stock camera for 3 years!)
If you are serious about astrophotography, you are going to have to consider purchasing a dedicated astrophotography DSLR. The good news is, entry-level DSLR’s from Canon and Nikon are more than capable of producing incredible astrophotos. When you compare the price of an entry-level modified DSLR (Such as the Canon T3i) to a CCD camera, you quickly realize that a DSLR is a fantastic deal.
Q. What’s the best advice you can give to someone brand new to astrophotography?
A. The best advice I can give a newcomer to this hobby is to be persistent. Astrophotography with a DSLR and telescope is challenging, frustrating and daunting. If you learn one new thing each time your set your telescope and camera up under the stars, you are making progress. Try to take the positives out of a frustrating night. I think the pressure of missing out on imaging time under clear skies adds to your frustration. There will be more clear nights, and you will eventually capture the images of your dreams if you want it bad enough!
Q. What astrophotography software do you recommend for beginners?
DeepSkyStacker
For deep-sky astrophotography, I recommend downloading a free copy of DeepSkyStacker. I use this program to register and stack all of my deep sky astrophotos.
BackyardEOS
For camera control and an overall more pleasant acquisition experience, I recommend BackyardEOS. BackyardEOS has several features designed for astrophotographers. These functions help you focus the camera, frame your object, and automate your camera captures. There is also BackyardNIKON for Nikon imagers.
PHD2 Guiding
PHD guiding 2 (Push here dummy) handles the autoguiding for my telescope rig. This software communicates with the telescope mount to make adjustments and helps to keep your images sharp.
Adobe Photoshop CC
Adobe Photoshop CC is my post-processing software of choice. You may hear amateur astrophotographers mention applications such as Images Plus, MaxIm DL and PixInsight, but I still prefer to use Adobe Photoshop for image processing.
Q. How do I stack different sets of light frames over multiple nights in Deep Sky Stacker?
A. To do this you need to use the tabs at the bottom of the DSS application. Add your light, dark, bias and flat frames for your first set of images like normal. Then click on the tab next to the “main group”, and add your images from your next night of imaging into “Group 1”. You can add even more sets of images in Group 2 and 3 if applicable. When you “Register checked pictures” – it will pull the data from each group together for your final image!

Q. How do I take Flat Frames for stacking in Deep Sky Stacker
A. The best way to take “Flat Frames” to stack in Deep Sky Stacker is to stretch a plain white t-shirt over the objective of your telescope, and take a number of shots on “AV” mode while pointing the telescope at a bright area. (Like the dawn sky, or a bright light) It is important that you do not change the focus or the ISO of your camera from your light frames. You can read more about the subject here.
View my tutorial: How to take Flat Frames for astrophotography
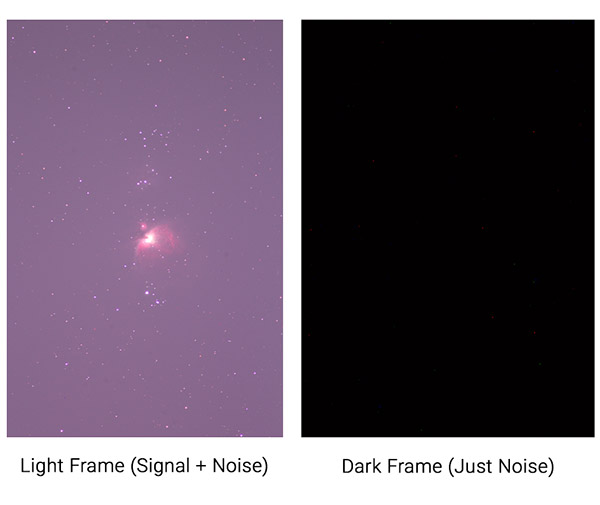
Q. How do I take Dark Frames for stacking in Deep Sky Stacker
A. Taking dark frames to subtract from your final astrophotography image is quite simple. You need them to be the same ISO, exposure length, and temperature as your light frames – but with the lens cap on! Because temperature is important, it is best to take these image right after or during your imaging session.
Many software applications have the ability of providing you with the EXIF data for your image exposures. Adobe Bridge, and DeepSkyStacker include handy exposure details such as temperature.
Q. How do I take Bias Frames for stacking in Deep Sky Stacker
A. Bias frames are the easiest ones yet, and fastest. Just like dark frames, you shoot these with your lens cap on. This time, however, you need to shoot the fastest possible exposure your camera can take. (For my 450D that’s a 1/4000 second exposure. The ISO must be the same as your lights, but the temperature is not important.
Q. What is Hyperstar?
A. For certain SCT owners, they can use the hyperstar configuration to capture deep-sky images in a short amount of time. This can transform the focal ratio of a Schmidt-Cassegrain telescope from f/10 to F/2! It looks strange, as the primary imaging camera is placed on the front of the telescope objective. Some DSLR have successfully used this method, but it’s most effective with CCD cameras.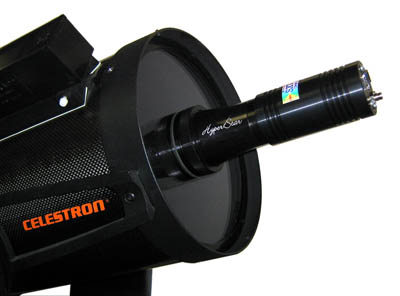
Watch: Cheating with Hyperstar (Dylan O’Donnell)
Q. Do I need a telescope to get started in astrophotography?
A. You do not need a telescope to start enjoying astrophotography. Most people (myself included) start out with a DSLR camera and a basic kit lens. You can start photographing objects like the Planets, the Moon, the constellations and much more using a stationary tripod.
Related Post: Basic Camera Settings and Tips for Astrophotography

A wide-angle camera lens is best, as you’ll be able to capture beautiful long exposure nightscapes. Here are some of the most popular types of astrophotography images to take using a camera lens: