Lyrid Meteor Shower
The Lyrid meteor shower is one of the oldest known annual meteor showers, lighting up the night sky each April with fast, bright streaks of light.
Peaking in late April, the Lyrids are a favorite among stargazers and astrophotographers because they are easy to watch and have been observed for more than 2,700 years.
According to NASA, the first recorded sighting of the Lyrids dates back to 687 BC, making this spring meteor shower one of the longest-documented celestial events in human history.
Lyrid Meteor Shower Fast Facts
- Active dates: Typically April 15 to April 29
- Peak: Usually around April 22 to 23
- Meteor rate: About 10 to 20 meteors per hour under dark skies
- Best time to watch: After midnight until dawn
- Radiant: Near the constellation Lyra, close to the bright star Vega
- Parent comet: Comet C/1861 G1 (Thatcher)
- Best viewed from: The Northern Hemisphere
- Known for: Fast, bright meteors and the occasional fireball
- History: First recorded in 687 BC, making the Lyrids one of the oldest known meteor showers
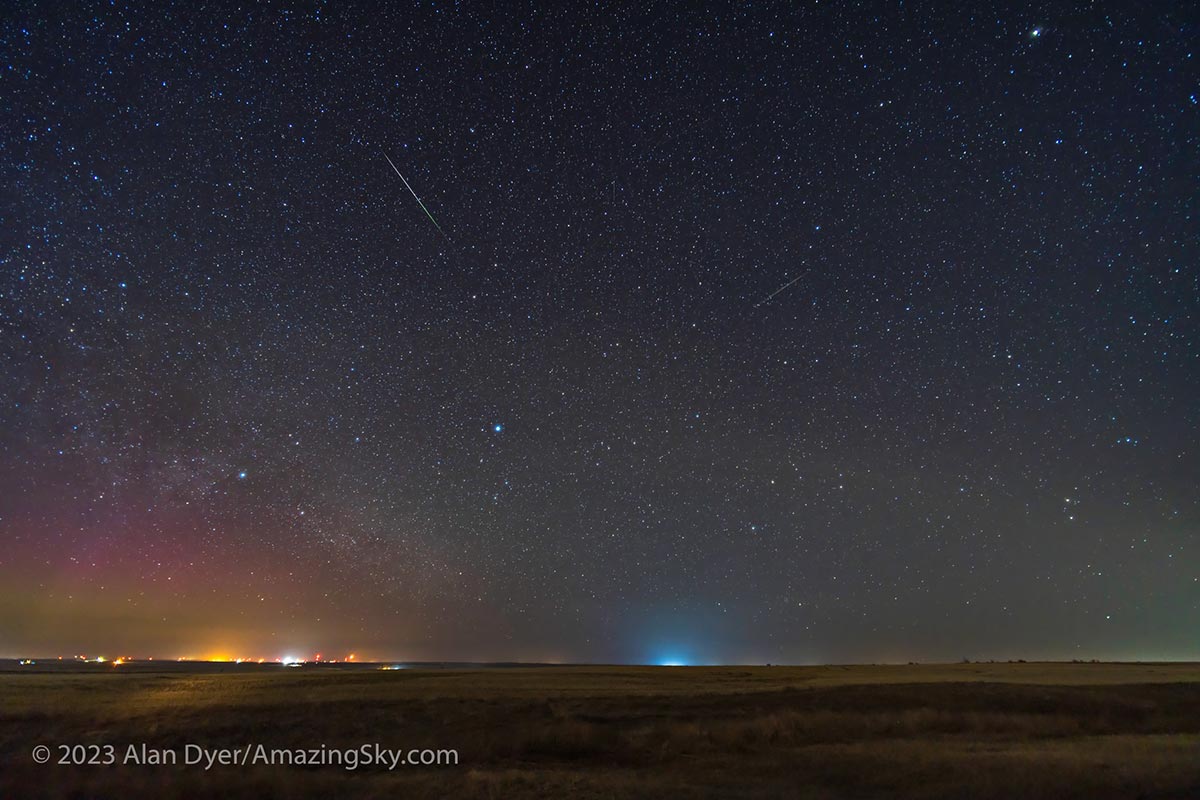
Two lone Lyrid meteors on the peak of the meteor shower night, April 22, 2023. Photo by Alan Dyer.
Lyrid Meteor Shower
The Lyrid meteor shower produces anywhere from 5 to 20 meteors per hour, averaging 10. Your observing conditions will impact your overall views of the shower. For example, the new moon phase and the absence of light pollution will reveal more meteors.
The name ‘Lyrids’ comes from Lyra, the constellation from which the meteor shower appears to originate. This serves as a guide to help you locate the radiant point, though the meteors can be visible in any part of the sky.
- Constellation: Lyra
- Right Ascension: 18h 08m
- Declination: +32°
- Date: April 16 – 25
- Peak: April 22 (varying by a day or two each year)
- Hourly Rate (at peak): 15-20 meteors per hour
When And Where to See the Lyrids
The Lyrids meteor shower takes place each year from April 16 to April 25, with the peak of the shower happening on or around April 22. Though this meteor shower happens annually in late April, the peak time may vary by a day depending on the year.
The radiant point of the Lyrids meteor shower is located in the constellation Lyra, near the bright star Vega. This is the point in the sky from where the meteor appears to originate. The best time for viewing will be from late evening until dawn the following morning.

Lyrids radiant near Vega in the Lyra constellation | PA Graphic
Though the meteors will radiate from the northeast, it is actually better to view the Lyrids away from their radiant point. If you do look directly at the radiant, you will find short meteors versus the longer tails that can be viewed away from the radiant.
In the northern hemisphere, the best views will be at midnight when Vega rises high in the sky. From this vantage point, meteors can be seen streaking from the radiant point across the sky.
Viewing the Lyrid Meteor Shower
You don’t need any equipment (i.e. telescopes or binoculars) to view this event. However, it is recommended that you view from a dark location away from city lights and allow your eyes to adjust to the dark (30-40 minutes).
Below are some additional tips for viewing the Lyrids and any meteor shower:
- Dress accordingly: if you plan to stay out for a long time to view the meteors, be sure to warm something warm and maybe bring a blanket. It would also help to have something warm to drink.
- Create the View: lie down to view the shower. A zero gravity chair is great to keep you off the ground but still allows you to look directly up at the sky.
- Relax your eye: try not to look at any particular spot. This will help you notice movement in the sky to allow you to see more meteors.
- Be patient: the frequency of meteors will vary. Keep in mind, you will see more meteors during the peak of the shower.
- Observing Conditions: your views will depend on your observing conditions and other things like the moon phase, your Bortle Scale, and the amount of light pollution.

Photographing the Lyrid Meteor Shower
To photograph a meteor shower, it is often best to capture a timelapse of the night sky. This will increase the chances of capturing a meteor streak because your camera is continuously firing over a long period.
You do not need a telescope to enjoy and photograph a meteor shower. In fact, the odds of seeing a meteor streak across the sky through the narrow field of view of a telescope are extremely low.
Instead, use a wide-angle camera lens that can capture a large area of the sky at once. For the Lyrid Meteor Shower, you will want to point your camera and lens toward the constellation Lyra because this is where the majority of meteors will radiate from.
I recommend using a DSLR or mirrorless camera with a lens in the 14-24mm range to photograph the Lyrid Meteor Shower. As with any nightscape-style photography, you will also need a sturdy tripod to mount the camera on.
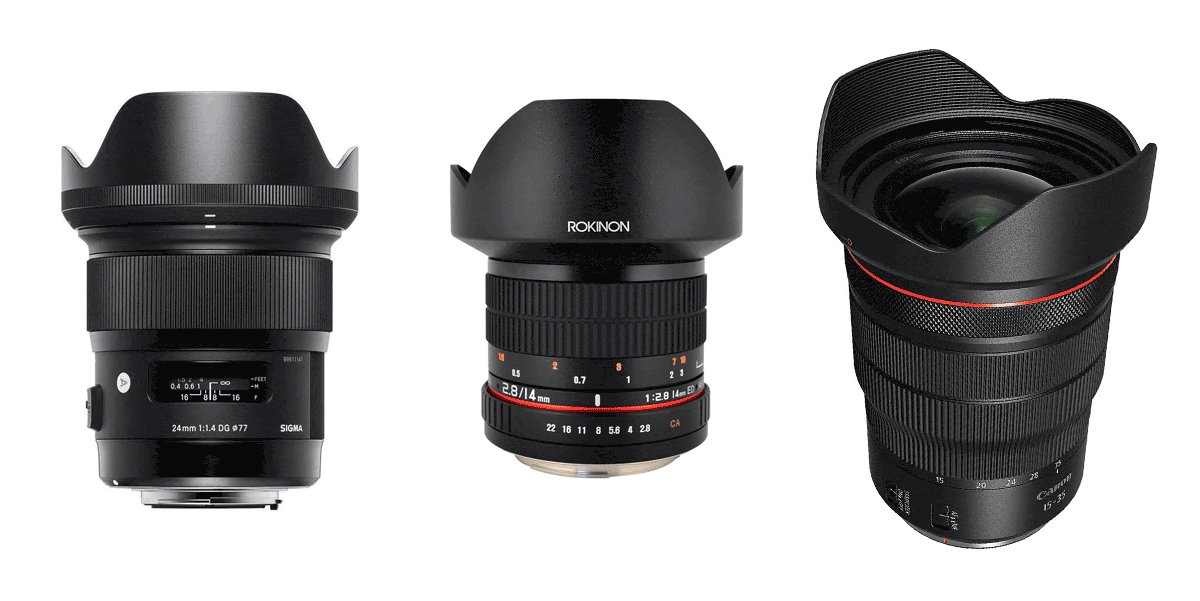
Related Article: The Best Milky Way Lenses
Camera Settings for a Meteor Shower
I suggest adjusting the settings on your camera to collect a well-exposed image of about 15-20 seconds using an intervalometer or simple remote shutter release cable.
You do not need a star tracker to capture an impressive meteor shower photo, a stationary tripod will work just fine. Consider using the 500 Rule to help you decide on the perfect exposure time to use.
Even though a lower low f-stop (F/4 or below) is typically a smart choice for astrophotography, you may want to experiment with a higher aperture setting to allow the image to expose longer.
This is simply to increase the chances that you capture a streaking meteor, as you never know where and when it will occur. Here are some example settings to try when photographing a meteor shower:
- Focal Length: 18mm
- Type: RAW
- Mode: Manual/Bulb
- White Balance: Daylight
- ISO: 400
- F-Stop: F/4
- Exposure: 20-Seconds
Using a remote shutter release cable, set your camera to take 120 x 20-second images, with a 2-second break in between. The idea is to have your camera collect as much of the action (for the longest period of time) as possible.
This is why it is important to not use camera settings that allow the maximum amount of light to be collected. For example, using an ISO setting of 1600 at F/2.8 will likely limit your exposure time to under 10 seconds before the sky is completely blown out.

Reviewing my single image exposures for meteor streaks.
Instead, use settings that limit the amount of light collected so you can capture a longer exposure. These settings will change dramatically depending on your sky conditions, particularly if you are in an area of heavy light pollution.
After you feel like you have captured enough image exposures (which could be over several hours), it’s time to inspect your images and look for streaking meteors.
If you stayed outside to enjoy the show with your naked eye, you may even remember a certain moment when you caught one.
Creating a Meteor Shower Composite Image
Then, you can create a meteor shower composite image containing all of the meteor streaks that occurred throughout the night. This involves using a single exposure for the constellations and sky, and only the meter streaks from several other images frames.
For a memorable shot, you may even want to stack a number of image exposures together to create a better base image to start from. Including a foreground interest, such as a forest treeline, will make the image even better.
This can be accomplished in Adobe Photoshop by using layers. The idea is to use a single image frame as a base and reveal the meteor streaks within this image. For a more accurate composite, be sure to align the stars and constellations with each other before revealing the meteor streak location.