Skip to Content

night photography

8 Nightscape Photography Tips for Amazing Astrophotography

|Camera Lenses|9 Comments

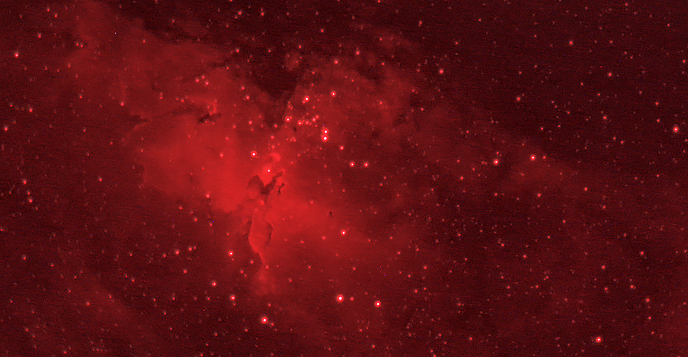
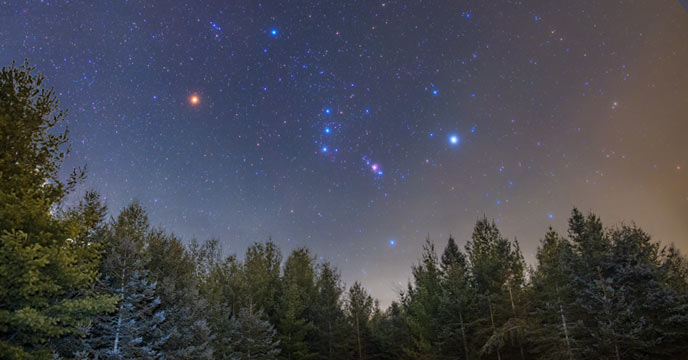
Nightscape photography involves capturing a landscape style image, at night. It can include the beautiful Milky Way, a starry sky, or your favorite constellation.

This is a type of astrophotography, where long exposure images are taken to reveal the beautiful light of a seemingly ‘dark’ sky. Star photography requires quality optics, and some camera lenses are better suited for it than others. 

To really make your nightscape image amazing, you’ll want to capture an interesting foreground, too. This can be snowy mountains, a waterfall, or in my case, just a dark, wooded forest.

In the video below, I capture the constellation Orion on a not-so-clear night, using my nightscape photography camera setup including a star tracker.

8 Nightscape Photography Tips for Beginners

Astrophotography has one of the steepest learning curves of any type of photography, but it’s also one of the most exciting. It may seem easier to take a great nightscape image than a high magnification deep-sky image of a galaxy or nebula, but I consider it to be much harder.

If you have a background in landscape photography, you’ll have a huge head start going in. All of the daytime photography best practices including composition and the rule of thirds can help your nightscape image stand out. 

The Milky Way

The Milky Way stretches across the night sky. Several nebulae in Cygnus are visible.

If you want to take beautiful nightscape photography images, there are a few best practices to keep in mind. I have captured many astro-landscapes using a regular DSLR camera and kit lens that absolutely blew me away, and there are a few things all of those photos had in common.

  1. Get to a dark sky location (Bortle scale class 4 or better)
  2. Use a star tracker for long exposure images (Separate images of sky and foreground)
  3. Shoot during the new moon phase (Use crescent phases to illuminate the scene)
  4. Visit your location during the day first (Plan a safe route back to your location)
  5. Choose a subject that compliments your location and time (Seasonal constellations)
  6. Frame your subject in a creative way (composition, rule of thirds, light painting)
  7. Live-view focus on a bright star (stop down your lens for better stars)
  8. Use the right settings for a clean shot (keep ISO low, and shoot long)

As simple as these tips may seem, in a real-world setting, everything must come together at once for a truly amazing nightscape image. I will now explain each of these steps in detail. 

Milky Way Photography

Get Dark

Unlike deep-sky astrophotography through a telescope, it is very difficult to calibrate wide-angle nightscape shots to remove light-pollution and gradients. 

To capture vivid star colors, defined constellations, and even faint deep-sky nebulae and galaxies within the starfield, you must get away from the city lights.

Fortunately, this lends itself well to nightscape photography. Locations that are free of light-pollution are often natural areas that include beautiful landscapes of trees, water, mountains, and more natural wonders. 

Plan your nightscape photography session using an app such as Photopills, or simply a light pollution map that reveals the darkest spots in your area. 

light pollution map

Plan your next photography trip using a light pollution map.

Even a dark sky site will usually have a glow coming from a certain direction. You can either avoid this area of the sky, or play off of the glow to add to the overall composition of the image.

In the image of the Milky Way core shown below, you’ll notice a warm glow at the bottom right of the image frame. This is light pollution from the city of Erie, Pennsylvania across Lake Erie. 

Milky Way astrophotography

Track the Motion of the Sky

A star tracker is a convenient way to capture long-exposure night sky images free of star trailing. Once polar aligned with the celestial pole, you can capture incredibly deep images of space that include areas of nebulae, galaxies, and star clusters.

It is possible to capture amazing nightscape images without a star tracker, but you’re camera settings and approach to the shot will be more limited.

For example, when your camera is tracking the motion of the night sky, you can scale back ISO and aperture settings, and let the exposure time compensate for any lack of signal. This can help collect a cleaner, sharper shot.

Because the exposures of the night sky are moving independently from the ground below, you will need to capture a separate (still) image of the foreground and merge the two together (more on this below).

star tracker for astrophotography

My Sky-Watcher Star Adventurer 2i (star tracker). 

A star tracker must be accurately polar aligned to track the stars effectively. I use an app on my mobile phone called ‘Polar Finder’ to give me a real-time reference for the position of Polaris (the North Star).

Related: Ultimate List of Astronomy and Stargazing Apps for Your Mobile Phone

New Moon Phase

Unless you are planning to photograph a moonlit landscape (there are benefits to the moon’s light for the foreground landscape), you’ll want to plan your session during the new moon phase. 

I regularly see new astrophotographers planning trips to a dark sky location during a full moon. This defeats the purpose of finding a dark sky because the moon washes out everything except the brightest stars in the night sky.

Use a moon phase calendar to plan your trip around the week surrounding the new moon. This will give you the best chance of capturing the most amount of stars in your image as possible.

A waxing crescent moon that sets later on in the night (or waning crescent that rises late) is okay, too. The closer your trip lands to the new moon phase, the better.

Over-exposed moon

The moon is beautiful in its own right, but it is not ideal when capturing starry nightscape images. Moon photography is another type of astrophotography all together. 

A Journey in the Dark

Depending on where you are located, it may be difficult to find areas with a good mix of land and sky. Looking over a large, open body of water is great, but the foreground lacks interest because it is flat.

An area with high elevation has advantages in terms of sky transparency, and can also help you line up fascinating landscape features below the sky. A location that looks down over a valley or rocky water’s edge is a great start.

Make a trip out to your location during the day, and pay attention to features that may add interest to the shot. Like any great landscape photo location, you’ll need to make sure you can safely set up your camera equipment.

Taking photos in the dark adds another challenge to the mix. Take note of the area during the day, and any spots that will be difficult to navigate with only a headlamp to guide your way. 

The Milky Way Galaxy

The Milky Way photographed from a dark sky site away from city light pollution.

The Perfect Subject

The constellations and stars in the night sky appear to move throughout the year. This means that you can’t just choose the area of the sky you want to shoot and find it when the sky clears.

Use a planetarium app on your phone like Stellarium to get a preview of the night sky on the day of your photography trip. Not only are you limited to the constellations and stars of the season, but the ones that lie in the direction of your intended landscape. 

I like to photograph constellations as they rise in the east, so I typically look for landscape locations that include a clear open view in this direction. Capturing constellations setting in the west feels like a race against the clock, as they slowly fall deeper into the ground. 

Some of the best nightscapes are photos that tell a story about the location and time of year. An example is the constellation Orion in the winter sky, with a cold, snowy landscape below. 

star map

The Stellarium Online Star Map is a free tool to plan your night sky scene.

Framing the Scene

A wide-angle lens is a landscape photographer’s best friend, and the same is often true for nightscape photography as well. This will allow you to collect the widest possible scene that includes land and sky.

How wide is too wide? Unless a ‘fisheye’ view is the look you are going for, a lens with a focal length of about 14-18mm is great. The type of camera you’re using will change your overall field of view.

I find that my Sigma 24mm F/1.4 Art lens is great for wide-angle nightscape shots on my full-frame camera. On a crop sensor camera, this would be a little tight. If you’re using a crop-sensor (APS-C) camera, stick to a wider focal length of at least 18mm. 

A wide-angle landscape lens is ideal because you can capture a wide area of the night sky that includes multiple constellations and stars. Then, you can crop the image in post to isolate a particular area of interest. 

Achieving a Sharp Focus

Focusing a camera lens for astrophotography can be challenging. The trick is to allow as much light to reach the sensor as possible, and then use the camera’s live view setting to adjust focus in real-time.

You can then zoom in on an area of the image at the focal plane of the stars, and manually focus the lens. On Canon DSLR and mirrorless cameras, you’ll be able to magnify your image by 5X and 10X (30X with the Canon EOS Ra).

Once you have focused the lens, you can dial back the settings and take your shot. Some people like to mark the focus point on the lens with a white piece of tape. 

how to focus camera lens for nightscapes

I recommend the following camera settings to use when focusing your camera lens: 

Camera Lens Settings for Focus (Adjust After)

  • Mode: Manual/Bulb
  • Focus Mode: Manual
  • ISO: 6400 
  • F-Stop: F/2.8 (or below)
  • Exposure: 30-seconds

These settings should allow enough light in so that you can focus on a bright star. If you can find some medium-sized stars in the frame (or better yet, a cluster of varying star sizes), you can really dial in the focus.

Remember to scale back the settings like ISO, exposure, and f-stop for your long exposure images. Next, I’ll explain the camera settings I use to take nightscape photography images like the one below.

nightscape photography example

Nightscape Photography Camera Settings

For nightscape photography (and astrophotography in general), you want to maximize light transmission through the optics to the camera sensor. There is an exception to this of course when you begin to lose the quality of the stars in your image.

Photography at night requires exposures that are much longer than they would typically be during the day. This could be anywhere from 5-seconds to 3-minutes. 

If your camera lens has a maximum aperture of F/2.8, that’s a great place to start. Lenses that are even faster than that, in the F/1.8-F/2 range have an edge over the competition when it comes to astrophotography.

Milky Way Photography

The lens aperture is a critical specification to consider when choosing a camera lens for astrophotography. For nightscape photography, you will find the maximum aperture of your lens (or close to it) the most effective for your projects.

Your exposure time on each individual image will depend on the focal length of your lens, and whether you are using a star tracker or not. You can use the 500 Rule as a general rule of thumb when capturing images of the night sky on a stationary tripod.

The best ISO settings for night photography is a conversation that has been debated to death. Generally, a high ISO setting will introduce more camera noise in the image than a low one. Some cameras are ISO invariant for much of their ISO range.

The answer to this question depends on the camera you are using. For my Canon EOS Ra, ISO 1600, or ISO 3200 work well. I recommend shooting your nightscapes at ISO 800 to start. If the images appear clean, you can try bumping the ISO setting to 1600 for a brighter image.

The file type must be RAW for you to tap into the powerful features of software like Adobe Camera Raw after the image has been taken. This will allow you to change the white balance, adjust clarity and saturation, and much more. 

Here is a breakdown of the settings I use for a typical nightscape image:

Camera Settings for Nightscape Images

  • Mode: Manual/Bulb
  • Focus Mode: Manual
  • ISO: 1600 
  • White Balance: Auto/Daylight
  • F-Stop: F/3.2
  • Exposure: 90-seconds

As you can see, I have adjusted the settings from the ones used to focus the camera lens. The reason I like to lower the f-stop from F/2.8 to F/3.2 (despite losing light-gathering ability), is because this will sharpen up the image, particularly the stars at the edges of the frame.

The exposure time is also much longer (90-seconds), and this is only possible when a star tracker is used to compensate for the apparent rotation of the night sky. A separate, shorter exposure should be captured for the foreground to avoid blurring the landscape. 

To automate a sequence of exposures to fire off, I use a simple remote shutter release cable to control the camera. This allows me to choose the duration of the image, the number of images, and any delay between shots.

I typically shoot between 25-50 image exposures for a single project. Aim for at least an hour of overall exposure time to create an image with a healthy signal-to-noise ratio. I do not normally take dark calibration frames for my nightscape images as I would for a deep-sky project. 

As for choosing the right exposure, use the histogram to guide you. A well-exposed image will show the bulk of the data in the center, or just to the right of the histogram without clipping in either side. 

If you notice the highlights are clipped on the right-hand side of the histogram, you can reduce the exposure time, lower the f-stop, or dial back your ISO. I recommend lowering your ISO setting if possible. 

Below, is a typical looking histogram for one of my nightscape images. The second (left) peak of data is the shadows in the foreground portion of the image. 

histogram

A typical foreground image exposure could be 30-seconds long, enough to expose the dark landscape beneath the sky. This is where a setting or rising crescent moon can help illuminate the scene.

If you do not have a star tracker, stick to 30-second exposures. If the stars begin to trail in a 30-second exposure, scale the exposure time back until they are recorded at an acceptable level of sharpness. 

Light Painting

The concept of light painting refers to the act of shining light on a dark area to brighten it through a long exposure image. Even a subtle shine of a red headlamp can add color and light to selective areas of your image.

You simply need to take a long exposure image (eg. 10-seconds), and shine a light on the area you wish to highlight. It is very experimental, and the right settings will depend on the lighting effect you are going for. 

White light can help illuminate an otherwise dark area of the foreground, whether it is a rock, a handsome tree, or a path on the ground. Light painting allows you to add interest to the image by highlighting specific areas of the landscape.

In the image below, I used my red headlamp to draw the viewer’s eye to the crunchy snow and footprints on the ground. Painting with light can help add to a pleasing composition.

light painting

Post Processing

Processing a nightscape photography image takes time and patience. A great shot starts in the field behind the camera, but your processing skills will take it to the next level.

Adobe Photoshop is the tool of choice for most nightscape photographers. It offers the advanced processing tools needed to correct gradients, boost saturation, adjust levels, and much more. 

Some of the basic post-processing techniques applied to a nightscape image include color balancing, curves adjustments, noise reduction, saturation boost, and sharpening. 

Image Stacking

Before processing the final image, I recommend creating an intermediate file by stacking a series of exposures together. The stacking can be done manually in Photoshop, or with the help of an image stacking tool like Sequator

Seqautor is extremely easy to use and gives you some simple tools to enhance the image. This includes auto-brightness, high dynamic range, and enhance starlight. I use this tool in its simplest form, and leave all of the additional settings ‘off’ except for ‘remove dynamic noises’.

The main purpose of the tool is to build a clean image with less noise than a single exposure, and even a stack of 10 light frames will accomplish this. Make sure you use the irregular mask to select the night sky in the image without including the foreground landscape. (Here is a great tutorial by Alyn Wallace).

sequator tutorial

Sequator is a free astrophotography stacking program. 

Stacking a set of 10 image exposures or more will improve the signal-to-noise ratio, providing you with a cleaner image with plenty of depth and detail. You can still create a great image with a single exposure, but noise will creep up as you adjust levels and perform other enhancements to the image. 

To complete the image, you must merge the stationary foreground landscape with a ‘moving’ sky. The foreground will appear blurry in a tracked shot, so separating the two elements of the image using a layer mask is recommended (see below).

how to create nightscape image

Adobe Photoshop’s Select and Mask tool is a great way to carefully make your selection, and refine the edges of your landscape. Keep the foreground element of your image separate, and carefully remove the sky from the horizon upwards. 

Then, apply the foreground to the stacked image (of the night sky and blurry ground below) as a new layer on top. This way, you’ll have the benefits of a stacked sky image, with a sharp landscape below. You can move the background sky layer independently from the foreground, an experiment with different compositions.

Enhance Stars and Constellations 

If you’ve ever noticed how certain constellations, asterisms, and bright stars seem to stand out in a nightscape image, there is some magic behind this. You can carefully select these elements of the image and brighten them. You can also boost saturation. and add a subtle glow.

The easiest way to achieve this effect is during the image acquisition stage. A thin layer of high clouds in the sky (poor transparency), will naturally add a beautiful glow to the brightest stars in the sky. You never know when these conditions will occur, but it’s something to look out for.

Starglow Filter

You can also use a filter (such as the Alyn Wallace Starglow Filter), to create this effect when the skies are completely clear. A starglow filter threads externally to your camera lens and can be combined with other nightscape filters if desired. 

There are a few techniques you can try in Adobe Camera Raw to add interest to specific stars (and bright nebulae) in the night sky. The clarity and dehaze sliders can make a dramatic difference to your night sky image. You will need to experiment with these settings and adjust this enhancement to your liking.

Creating a star mask on the brightest stars of the image lets you adjust aspects such as saturation, and brightness independently from the rest of the image. This is a great way to help isolate a specific constellation or star pattern in the image.

clarity and dehaze

Use the Clarity and Dehaze sliders in Adobe Camera Raw to enhance a starry landscape. 

Top Processing Tools

The process of enhancing a nightscape image mirrors many of the techniques used for deep-sky astrophotography. If you are interested in learning the specifics of this process, consider buying my premium astrophotography image processing guide.

image processing guide

My image processing guide includes topics such as image stacking, and create a composite nightscape image in Photoshop.

Recommended Camera Equipment

It may surprise you to know that the camera equipment needed for nightscape photography is much more affordable than a deep-sky imaging rig. You do not need a robust equatorial tracking telescope mount to take great, wide-angle images of the night sky. 

Many of the same camera settings and tips that work well for deep-sky astrophotography apply to nightscapes, on a smaller scale. A large telescope with plenty of magnification is of no use for wide-field nightscape images.

For nightscapes, being portable and lightweight is of the utmost importance.

Tripod

Whenever you are taking long-exposure images (tracked or not), your tripod becomes very important. This is the stable platform that anchors your entire camera setup.

Do not skimp on your tripod, invest in a high-quality base that will reliably carry your expensive camera and lens in all sorts of outdoor situations. Choose a tripod that is strong, but also light enough to travel with for long distances.

An aluminum tripod is strong, but some are too heavy for travel. I suggest a high-quality carbon fiber tripod with a weight capacity of at least 25-30 pounds. I use a Radian Carbon Fiber tripod that is very lightweight, and very strong (50-pound payload capacity).

The best part about this tripod is its ability to unlock at the base, and rotate freely. This comes in handy when the equatorial head of the star tracker needs to be rotated during polar alignment. 

best tripod for nightscapes

Star Tracker

A star tracker will not only allow you to take long-exposure images that have sharp, round stars but will reveal deep-sky nebulae and galaxies as well. Under dark skies, a 90-second exposure will reveal faint dust, glowing nebulae, and rich star fields. 

A star tracker is essentially a simplified, portable version of a large GoTo computerized telescope mount. It does not include a computer database of deep-space targets for you to slew to, you’ll have to find objects on your own.

The iOptron SkyGuider Pro and Sky-Watcher Star Adventurer are my top choices. You can see the Sky-Watcher Star Adventurer camera tracker attached to the base of the tripod in the image below. 

astrophotography equipment

Camera

Any modern DLSR or Mirrorless camera with an interchangeable lens is capable of amazing nightscapes. My first astrophotography camera was a Canon EOS Rebel XSi (450D), and I took some amazing images of constellations, aurora, and starscapes. 

A full-frame sensor has a big advantage when it comes to nightscapes. The large sensor will utilize the native focal length of a wide-angle camera lens without cropping the image. 

A DSLR/Mirrorless camera allows you to take RAW images (that can be adjusted on your computer later) and gives you complete manual control of the settings. I currently use a Canon EOS Ra mirrorless camera for nightscape photography. 

best camera

I use a Canon EOS Ra Mirrorless camera for nightscape photography. 

It features an astro-modified camera sensor that is sensitive to the h-alpha wavelength of the visible spectrum. This is handy when photographing areas that include many of the most popular nebulae in the night sky. 

You do not need a modified astrophotography camera to take stunning nightscapes. A stock camera will simply limit the amount of ‘red’ that is recorded in certain areas of nebulosity. Reflection nebulae, star clusters, and most galaxies are totally unaffected.

In my experience, light-pollution filters are not nearly as effective when used with a camera lens in a wide-angle photo. Shoot unfiltered, and get away from city lights for a natural-looking sky. 

Camera Lens

A standard kit lens will do just fine, but a camera lens with a faster f-stop is even better. My personal favorite nightscape photography lens at the moment is the Sigma 24mm F/1.4 Art series lens. 

A 24mm focal length is just wide enough to capture a large area of the night sky when used with a full-frame camera. If you are using a crop-sensor camera, you’ll want something wider for capturing nightscapes. 

Sigma 24mm F/1.4

When it comes to camera lenses for astrophotography, the most important features are a fast f-ratio, a sharp/flat field, and a chromatic aberration-free image. Some lenses cause color-fringing around the bright stars, which can be difficult to correct in post.

The Canon EF 17-40mm F/4L is a solid choice, although faster optics would help collect more light in a single shot.

Another great lens for landscape astrophotography is the Rokinon 14mm F/2.8. This lens is extremely affordable and performs exceptionally well considering the price. 

A wide-angle lens allows you to capture longer exposures without star trailing when mounted to a stationary tripod. A longer focal length lens of 50mm or more will limit your exposure times (untracked) and will make framing a landscape scene a challenge. 

There are many great camera lens options available for nightscape photography, but here are a few of my personal favorites. All of these lenses were mounted to Canon cameras.

If you use a Canon camera with the new RF mount (such as the Canon EOS Ra), you will need to buy a Canon EF – EOS R adapter to use these EF mount lenses.

The Bottom Line

A great nightscape image can include a constellation, the Milky Way, auroras, or even the moon and planets. I believe the key to a memorable nightscape image is to tell a story of the location and time of where it was taken.

Try to replicate the feeling you had in the moment, and how magical the sky appeared above your head that night.

Space is impossibly beautiful and captivating. Once you learn the basics of nightscape photography and begin to apply some of the tips outlined on this page, I think you’ll find it a lot easier to tell your story.

star photography

Helpful Resources

Related Tags

Delta Aquarid Meteor Shower 2016

|Meteor Shower|3 Comments

The Delta Aquarid meteor shower is heading towards it’s peak at the end of this month.  But let me make one thing clear right away, this is not going to be a dazzling show of constant meteors that light up the night sky.  This meteor shower is not known to be  a great performer, although these celestial events have been known to be somewhat unpredictable.  July 28th and 29th offer the best chance at catching a few “fireballs” in the night sky.  The Delta Aquarid meteor shower begins on July 12, and runs until August 23rd.  If you are watching the Perseid meteor shower in early August (peaking August 11, 12), you may see a few Delta Aquarids then as well.  This meteor shower can produce up to 20 meteors per hour at it’s peak, as the debris from comets Marsden and Kracht enter our atmosphere.

Expect between 10-20 meteors per hour under dark skies, away from city light pollution.

Delta Aquarid meteor shower

A photograph of a meteor I took in 2013 during the Perseid meteor shower


Moon vs. Meteor Showers

Just like the moon washes out the stars and deep-sky objects during astrophotography, the moon also hides the dim meteors produced from the Delta Aquarid meteor shower, and the others.  This year, the moon will be in it’s waning crescent phase during the peak time for this meteor shower.  The best time to view the Delta Aquarid meteor shower is after around midnight on Thursday, July 28th into the morning of the 29th.  If you are in the city, you may only see 1 or 2 meteors per hour.  If you are blessed with darker skies away from light pollution, you can expect to see as many as 10-20 per hour.

Meteor Definition (Graphic)

There seems to be some misunderstanding when it comes to what a meteor actually is, and what you are actually seeing during a meteor shower.  Please see the definition of a meteor in the simple graphic below:


What is a meteor?


Photographing the Delta Aquarid meteor shower


[adrotate banner=”27″]
 

The best way to find the radiant point for this meteor shower is to find the bright star, Fomalhaut.  Moving North from Fomalhaut, look for the star named Skat, or Delta Aquarii.  This is the radiant point for the Delta Aquarids, and where you will want to aim your camera lens.  A planetarium app for your phone will make the whole process a lot easier!  I prefer to use Stellarium for my Android Galaxy phone.  This is especially helpful because you can hold your phone up the sky from your desired location (In my case the backyard) and make sure that your camera has a clear view of the radiant point. By moving your phone around in the air, you can get a clear picture of the other elements you would like to include/exclude from the shot.

Observing this Meteor Shower in the Northern hemisphere

From my latitude in Ontario, Canada, the radiant point is below the horizon.  This means that I will set my sights low to the horizon in the direction of this meteor shower.  It is still possible to see many meteors over the course of a night from mid-northern latitudes.  If Fomalhaut is below the horizon, I would focus on the area of sky consisting of the constellations Pegasus and Aquarius.  This is where you are most likely to see a Delta Aquarid meteor.


Constellations Pegasus and Aquarius

Pegasus and Aquarius from Mid-Northern Latitudes


The radiant point for the Delta Aquarids is the star “Skat”


Delta Aquarid meteor shower radiant point

The radiant point for the Delta Aquarid meteor shower – Astronomy Magazine


You will want attach your camera to a sturdy tripod and aim it roughly towards Fomalhaut/Skat.  Try to frame the photo to include an interesting foreground object such as a tree to make the image more interesting.  A wide-field lens will increase the amount of sky you can include in your shot, and your chances of capturing a meteor!   I prefer to use my Canon 17-40mm F/4 L for the widest view of the sky possible.

Wide field camera lens

My wide field camera lens – Canon 17-40mm f/4 L

Camera settings for meteor showers

I would suggest using a low to medium aperture (f/4 – 4/8) and an exposure time of about 20-30 seconds.  The fast aperture will allow a significant amount of light onto your camera sensor, to soak in the stars (and hopefully a meteor or two!) throughout the night.  The longer exposure lengths of 20-30 seconds will give you a good shot at collecting a passing meteor in the sky, as your camera will be “recording” the action for a full 30 seconds.  You can either set your camera to continue taking 30 second exposures on it’s own by using an intervalometer, or by connecting it to your laptop and using a program like BackyardEOS.


[adrotate banner=”38″]
 

Your ISO setting will depend on the amount of light pollution in your area, as darker skies will allow you to bump the ISO up, and capture more stars and less sky-glow.  Pay attention to your histogram, and make sure your data (the mountain) is situated near the center, or just to the right.  This will give you a fair shot at a successful processing session when you pull the image in Adobe Photoshop later.  Take time at the begging of your session to

Spend time at the beginning of your astrophotography session to make sure that your focus is spot-on. Using manual focus, adjust your focus ring using a distant street-light or tree top as a point of reference.  Then take a few test exposures to to get those stars as sharp as possible.   Depending on your focal length, the stars may begin to trail after about 15-20 seconds.  This may not be apparent in your final image, but its worth pointing out if it is something you want to avoid.


My Camera Settings:

Mode: Manual

Aperture: f/4

ISO: 800

Exposure: 25 Seconds

White Balance: Auto


The next meteor shower

Example of photographing a meteor shower – Perseid meteor shower


If you are lucky enough to have captured a meteor streaking across the sky in one or more of your exposures, you can stack them together using Adobe Photoshop to create a composite image.   This creates a captivating image that better represents the glorious spectacle that meteor showers provide.  Let’s hope that the Delta Aquarid meteor shower produces a decent show this year despite the waning crescent moon, and less frequent meteors compared to other meteor showers.  And hey, the best meteor shower of the year will be here in just a few short weeks:)

Related Tags

HaRGB Astrophotography

|HaRGB|6 Comments

Right now is the absolute best time of the year for backyard astrophotography.  The days are warm and the nights are clear, summer star gazing is here!  The core of our Milky Way galaxy has returned to our night sky here in the Northern Hemisphere, and with it comes many celestial delights such as the colorful nebulae located in and around the constellation Sagittarius.  For me, Summer astrophotography means pointing my telescope right where the action is – in the core of the Milky Way, soaking in as much exposure time as possible.  These days do not last long!  We have but a brief window to capture glorious deep-sky objects such as the Lagoon Nebula, Trifid Nebula, Swan Nebula, and Eagle Nebula.  All four of these glorious Messier Objects are worthy of several sleepless nights in the backyard.

Camping and Star Gazing

The warmer weather also means astronomy camping, to seek out darker skies and spend all night under the stars.  Spending time with family and friends around the campfire with my telescope collecting photons in the background is my idea of a good time!  My camping gear would not be complete without all of my astrophotography equipment coming along with me.  This includes everything from my tracking mount to my laptop!  I always book my camping trips on or around the new moon phase, and with a campsite that has a clear view to the South.  Luckily for me, there are many fantastic campgrounds located on the North shore of Lake Erie, which creates a vast dark area directly south of our location.  I recently spent a night at Selkirk Provincial Park for some astronomy camping on a warm, clear night in early June.


Camping and Star Gazing

The Big Dipper from our Campsite


Photography with the New APO

I am excited to announce that I am the proud new owner of an Explore Scientific ED102 CF astrophotography telescope.  This is a portable, light weight triplet apochromatic refractor – built for deep-sky imaging.  The increase in aperture is a welcome change from my now departed ED80 telescope I enjoyed for the past 5 years.  I have now had this refractor out a few times, and could not be more pleased with it.  I am thrilled with the fact that I can produce images with deeper, and more detailed results due to the increased size.  Going from 80mm to 102mm may not seem like a large increase, but when it comes to astrophotography, 22mm makes a BIG difference!


Explore Scientific ED102 CF

My new Explore Scientific ED102 CF Telescope


My first imaging session with the new Explore Scientific 102mm CF was on June 8th.  My deep-sky target of choice was the beautiful Eagle Nebula, an emission nebula in  the constellation Serpens.  I managed to capture just over 2 hours on this object from the backyard.  It was a weeknight, and I got about 2 hours of sleep before work the next morning.  WORTH IT!  I made a video about the dedication to this hobby, a small pep-talk if you will.  Despite the videos mixed reviews, I am still proud of this wacky, short little astrophotography video.

Speaking of YouTube, my channel has over 500 subscribers!  I cannot believe the response generated from my astrophotography videos.  It turns out that I am not the only one obsessed with photographing stars in the night sky.  If you haven’t subscribed yet, please do!  I can promise you many more useful astrophotography tutorials, vlogs, and equipment reviews in the future!

Astronomik 12nm Ha Filter

To add to the excitement, I have also added a new Astronomik 12nm Ha filter to my growing list of astrophotography equipment.  This is my first time diving into narrowband imaging, something I’ve been interested in for years.  This clip-in filter blocks out almost all wavelengths of light and only allows the light produced from emission nebulae and starlight to pass through.  What makes this feature so powerful t astrophotographers is the fact that it allows to image under heavy moonlight and light-pollution.  For a backyard astrophotographer such as myself, it is an absolute game-changer.  This means I can image twice as often, and produce more vivid and detailed deep-sky photos by adding Ha (Hydrogen Alpha) data to my existing RGB images.


Astronomik Ha Filter

Filter Purchased (For use with my Canon DSLR)
Clip-Filter (EOS) with ASTRONOMIK H-Alpha-CCD 12nm

Bought online from OPT Telescopes and shipped to Canada


HaRGB Astrophotography

Combining the RGB data with Ha for a stronger image

HaRGB Astrophotography

M16 – The Eagle Nebula in HaRGB

Anyways – about the Eagle Nebula.  I noticed the increased detail in M16 using the new telescope right away.  The super-sharp, high contrast images I have come to expect using a triplet apo were also evident right away.  I captured my RGB data of the Eagle Nebula on June 8th (About 2 hours), and returned to the subject on June 14th to photograph it using the Astronomik Ha Filter.  Because I use the filter ring adapter for my IDAS LPS filter on my Canon Xsi, the Astronomik 12nm Ha clip-in filter would not fit into the camera without the stock interior.  To make life easier – I captured the Ha data by clipping the Astronomik filter into my Canon 7D body.  This is the first time I have used the Canon 7D for deep-sky astrophotography.  I must say that I was impressed with the increased image resolution.  This makes me want to upgrade my aging 450D.  It never ends!  Here is my image of the Eagle Nebula combining the RGB data with the Ha:


Eagle Nebula in Ha + RGB

M16 – The Eagle Nebula in HaRGB

Photo Details

RGB:

Total Exposure: 2 Hours, 9 Minutes (43 frames) 
Exposure Length:  3 Minutes
ISO: 1600
Telescope: Explore Scientific ED102 CF
Camera: Canon Rebel Xsi (modified)
Filter:  IDAS Lps 


Ha:

Total Exposure: 1 Hours, 40 Minutes (20 frames) 
Exposure Length:  5 Minutes
ISO: 1600
Telescope: Explore Scientific ED102 CF
Camera: Canon EOS 7D
Filter: Astronomik 12nm Ha


Using H-Alpha as a Luminance Channel

Creating a HaRGB image in Photoshop

I still have a lot to learn about processing HaRGB images using a DSLR.  However, my early results are very promising!  I really love the way the H-Alpha data brings out the nebulosity without bloating the surrounding stars.  The common processing method of combining the Hydrogen Alpha data is to add it to your existing RGB data as a luminosity layer in Adobe Photoshop.  This is the method I have chosen to use, although I am still learning how to best accomplish this task.  You can read a simple tutorial on the process from Starizona.com.


Ha luminance layer

The H-Alpha (Ha) Layer of my image

Dark Sky Camping Trip

Camping Trip with Telescope

Our campsite at Selkirk PP

I wanted to take advantage of the dark skies at Selkirk Provincial park by imaging the Swan nebula from my campsite.  I had everything all ready to go including a perfect polar alignment, and my autoguiding system with PHD running smoothly.  The only problem – MY BATTERY DIED!  I captured one amazing 5 minute frame on the Swan Nebula before my battery pack’s low-power alarm sounded off.  What a heart breaker.  Normally this battery is enough to power my astrophotography equipment all night long, but I didn’t charge it long enough before we left.  Lesson learned!

To make the most of a bad situation, I decided to turn my attention to some wide-filed landscape astrophotography using my Canon 70D and tripod.  The moon finally set, and the sky was incredibly dark after midnight.  The milky way could easily be seen with the naked eye as it stretched across the sky.  This is something everyone should witness at some point in there life.  There is something about it that makes me feel connected with our universe.


Camping Milky Way

The Milky Way from Selkirk Provincial Park


As always, thank you for your interest my website, and this incredible hobby.  I’ll do my best to answer your questions so we can continue our journey together.  Please follow my Facebook Page for the most up-to-date astrophotography information.  It’s a great way to connect with me and other backyard astrophotographers chasing the same feeling.

AstroBackyard is on Facebook

Related Tags

Screen Calibration

|Image Processing|5 Comments

When I purchased a new laptop computer back in 2016 for image processing and video editing and was quickly reminded of the importance of having a well-calibrated computer monitor.

The brightness of my new laptop screen was intense. It appears to be about 25% brighter than my well-calibrated 23 Inch external IPS monitor.  

When it comes to editing and viewing astrophotography images, the screen you’re using can really change the appearance of your results. If it’s too dim, you may not see all of the hidden imperfections in your data.

This results in astrophotography images that are less than pleasing to the eye. I’ve had to re-process many of my own photos in the photo gallery after discovered that they did not look the way I intended them to on different screens.

Screen Calibration for Astrophotography

If you have been processing your astrophotography images on a dim monitor, you may be in for an unpleasant surprise when you see them on a bright screen for the first time.

This can be a bit of an unsettling moment, especially if you’ve never been through this exercise before.

When you upload your image to the web, you have to accept the fact that people from all over the world may view your work on monitors and screens that display images MUCH different than yours.

Having a monitor that is too bright will show all of the impurities in your background sky.

One of the most extreme examples of the “bright screen effect” is to view your image on a mobile phone with the brightness tuned all the way up. Most people do not leave their mobile screens at this intense level at all times, but its interesting to see a potential worst-case scenario.

astrophotography tutorial

A common tactic beginners use (myself included), is to decrease the brightness or contrast of the image to “hide” the imperfections present in the background sky.

Noise, color blotches, and a generally poor signal-to-noise ratio turn to black. Unfortunately, this method degrades image quality and you lose an incredible amount of detail in your image. Don’t hide your sky!

It is wise to make sure your computer screen is giving you an accurate rendition of the image you worked so hard to capture. There are many ways to calibrate your computer monitor settings, including online tools and dedicated devices that can match specific color profiles.

The device below (Spyder5 Colorimeter), helps you share and print your images with the look you intended.

colorimeter

The Dataclor Spyder5Pro color accuracy device

A colorimeter will usually have a room light sensor that measures the lighting conditions of your room. If there has been a change in lighting in the room, it alerts you to modify your calibration settings for optimal color accuracy.

This creates a unique color profile for each of your monitors, and it can help you get a better match between your photos on screen and in print.

Why should you calibrate your monitor?

By spending a little time adjusting the calibration settings of your monitor, you can help ensure that the colors and brightness of your astrophotos are represented accurately.

I’ve never used a Colorimeter myself, but I have spent a lot of time adjusting settings manually to find the right balance. When I decide to start printing my photos, I think the Colorimeter is a good idea.

In terms of photography, screen calibration can have a dramatic effect on your online experience whether you are processing astrophotography images or not. You can ensure that you are seeing the images displayed on screen as they were intended to be viewed.  

This is especially important for creative professionals such as Graphic Designers, Photographers and Video Production teams.  

The idea is to have your monitor conforming to a preset color benchmark such as the sRGB or Adobe RGB color space.

screen brightness for astrophotography


How do your astrophotography images appear on other screens?

How to Manually Calibrate your Screen for Astrophotography

The first step towards adjusting your computer monitor display settings is by using the interface on the unit itself. Some models have more in-built control options than others. 

If you use an external monitor like me, it will have a set of controls, usually at the front and under the screen.

My ViewSonic LED monitor has the typical bare-bones contrast, brightness, and color mode. You’ll want to make sure that you do not have any ambient lighting in the room affecting your views, so close the blinds and turn off the light.

Do not calibrate your monitor in a bright, sunlit room, or with reflections appearing on-screen.

For accurate results, face your screen head-on, with your eye lined up with the top of the screen.

Calibration Tools and Adjustments

It is necessary to have some reference material on-screen that will let you know if you’ve pushed your settings too far one way or the other.  See the grayscale chart from APCmag below:

screen calibration tool

You should be able to distinguish between each shade of white/black

Using the Color Calibration Feature in Windows 10

If you are using Windows 10, they have a nifty color calibration walk-through that is great for making adjustments called Display Color Calibration.  

It will take you through a number of tests to see just how far off your display is.  They call it “color” calibration, but it’s really an overall screen calibration test.  

You can get to it by following this command path:  Start Menu > Settings > System > Display > Advanced Display Settings > Color Calibration.  The following calibration images are used in the Windows color calibration test.

Have you Checked Your Gamma Today?

“Gamma defines the mathematical relationship between the red, green, and blue color values that are sent to the display and the amount of light that’s ultimately emitted from it.”

Adjusting the gamma on your screen

In the image above, you should not see any overly obvious “dots” within the circles.

The Brightness Effect

As I stated earlier, having a display that is too bright can absolutely wreak havoc on an astrophoto that has been stretched too far. I know about this phenomenon all too well, as I like to stretch my data to its full potential (and sometimes go too far).

The tell-tale signs of an astronomical image that has been stretched too far, or with serious gradient and vignetting issues – is a muddy, green/brown background sky.  

The sky may appear to have a nice neutral dark grey or black on your dim monitor, but on your nephews brand new ultra-backlit iPhone, it’s a multicolored mess. 

Even images on APOD can appear to diminish in quality under the scrutiny of an overly bright display.

Here’s an image you can use as a guide.  You should be able to distinguish between the mans shirt and the background.  The black “X” in the background should be barely visible.

monitor calibration test


Contrast – Don’t Overdo it

Using the image below, adjust the contrast settings of your monitor so that the background appears black and not grey. If you have lost details in the white shirt the man is wearing, such as the buttons and creases, you have pushed the contrast too far.

adjusting contrast

My Best Advice

My advice is to process the image on image on a screen that has been calibrated as best as possible.  If you have access to an overly bright, unforgiving display – maybe have a look at your image on that as well.  

It can be useful to see an exaggerated version of your subject and fix any issues that really jump out at you.

It may be helpful to view your processed image on several different screens (including your phone) to get a feel for the middle ground. I usually preview my images on at least 3 monitors before posting online.

Take a look a few example astronomy photos taken by professionals on Astronomy Picture of the Day. Use the color, levels and background sky you see in their photos as a guideline. Chances are, the photos you see here will look great, no matter which display screen you view them on.  

Horsehead Nebula

This is because they have taken the precautions needed to ensure that their images are an accurate representation of scientific data, including screen calibration.  Many of these astrophotographers have dedicated calibration tools to help them keep their displays accurate.

I have had many issues with uneven sky backgrounds in the past, primarily due to the lack of using flat frames.

The dim monitors hide this messy background making the sky to appear a nice dark grey or black. There is value in viewing your images on a variety on screens to learn how to better process your images.  

I hope that this write-up has opened your eyes to the importance of screen calibration when processing astrophotography images.  

As for getting your night sky photos printed? I’ll save that for another post.

Watch my Astrophotography Image Processing Tutorial (Photoshop)


Related Tags