A Beginner’s Guide to Seeing & Photographing Auroras
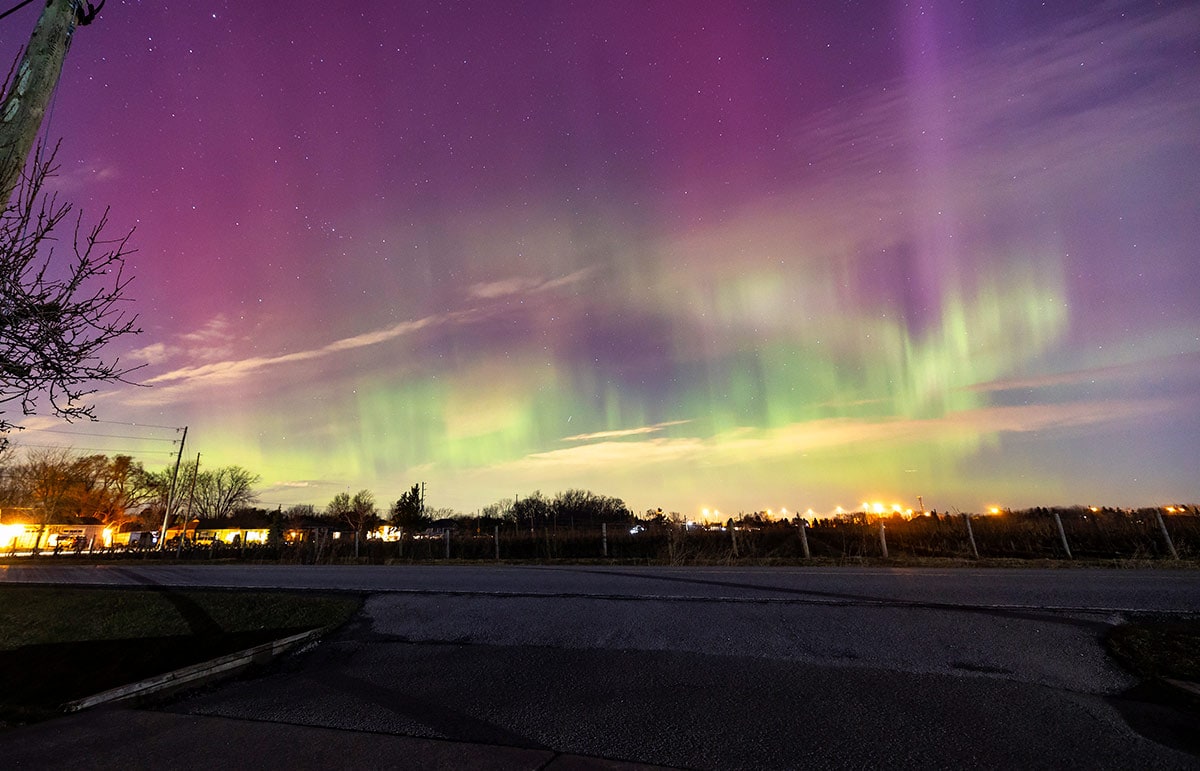
Is there anything better than stepping outside on a clear night and seeing the sky come alive with color? The greens, pinks, and purples that ripple across the horizon – the northern lights, or aurora borealis, are putting on a show.
Auroras happen when charged particles from the Sun interact with gases in Earth’s atmosphere, creating glowing curtains of light high above our heads.
They’re most common in northern regions, but during strong solar activity, they can sometimes be seen much farther south.
In this post, we’ll cover everything about auroras, including how to photograph them and why dark skies make all the difference. If you’re hoping to see or capture your first aurora, this guide will help you get started.
Quick Guide
The northern lights (aurora borealis) are colorful curtains of light caused by charged particles from the Sun interacting with Earth’s magnetic field and atmosphere. They’re most visible near the poles, but strong solar activity can bring them farther south.
- What they are: Glowing sky displays from energetic particles colliding with oxygen and nitrogen.
- Where to look: Best at high latitudes after dusk; dark skies significantly improve visibility.
- When to go: Peak chances around equinoxes and during high solar activity; midnight hours often offer the brightest shows.
- Photo tips: Use a wide lens, a tripod, and long exposures to capture the aurora’s movement and colors.
Whether you’re stepping outside or heading to a dark-sky location, planning ahead and checking aurora forecasts increases your chances of capturing a memorable show.
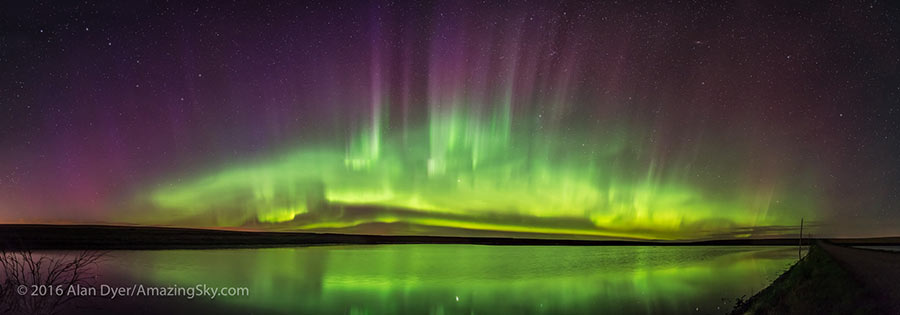
‘The Arc of the Northern Lights’ by Alan Dyer.
Understanding Auroras
Auroras are one of those rare moments when you can actually see the connection between the Earth and the Sun.
According to NASA, when charged particles from the Sun (mostly electrons and protons) are carried toward Earth by the solar wind, they are guided by Earth’s magnetosphere (or magnetic field) toward the North and South Poles.
As the particles travel along magnetic field lines, they collide with gases in Earth’s atmosphere, mostly oxygen and nitrogen. According to NOAA (National Oceanic and Atmosphere Administration) , these collisions release tiny bursts of energy in the form of light, which is what we see as glowing ribbons and curtains moving across the sky.
The Canadian Space Agency explains that magnetic events, like geomagnetic storms, can intensify these collisions, making auroras brighter and occasionally visible farther from the poles.
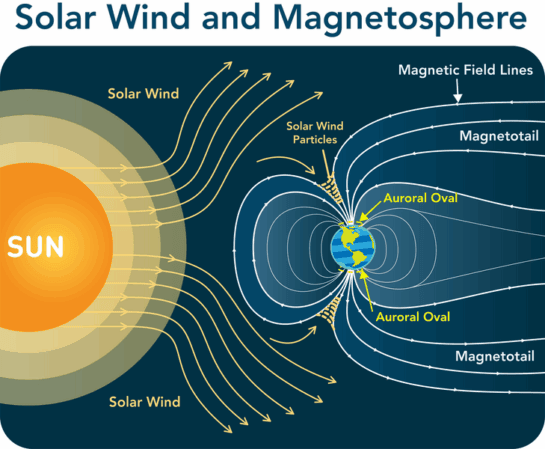
How solar wind interacts with the magnetosphere | Let’s Talk Science
The glowing rings around the poles, known as auroral ovals, mark the areas where these interactions are strongest. According to NOAA, this is why auroras are most commonly seen at high latitudes, while regions closer to the equator usually experience them much less frequently.
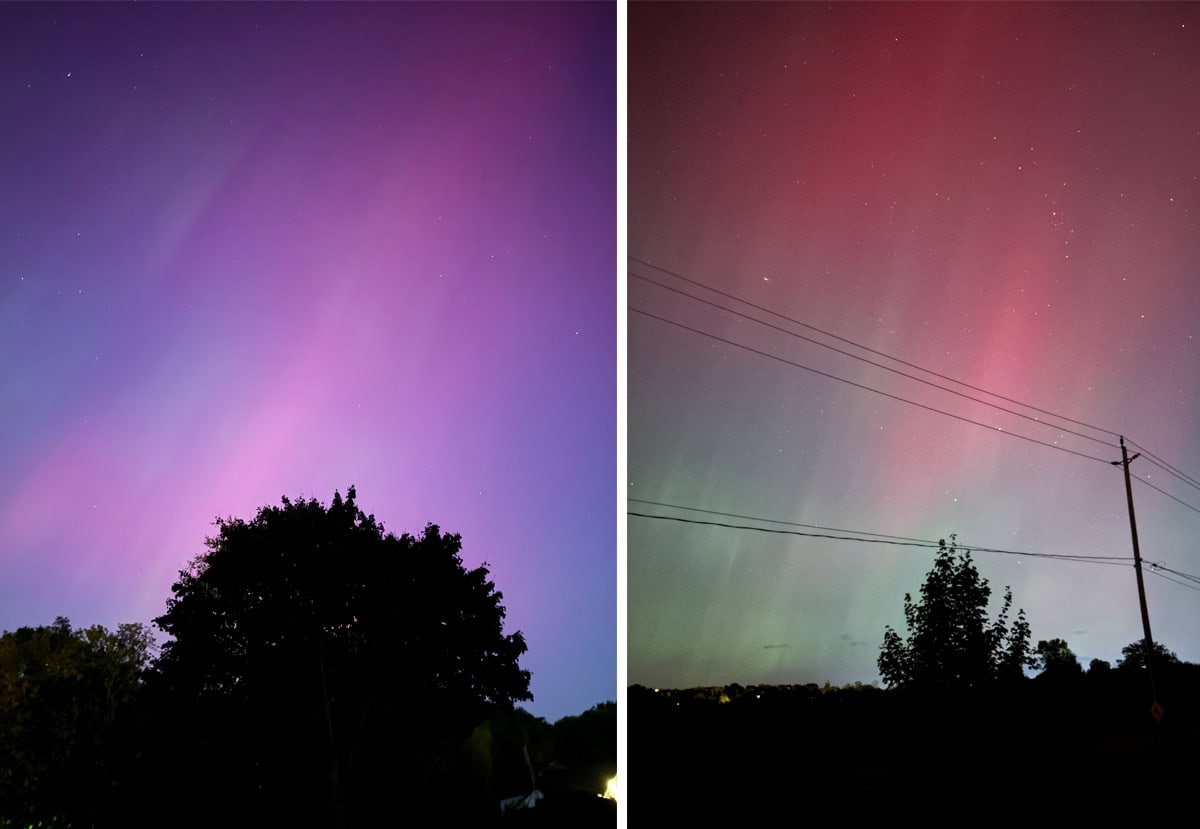
Aurora Colors
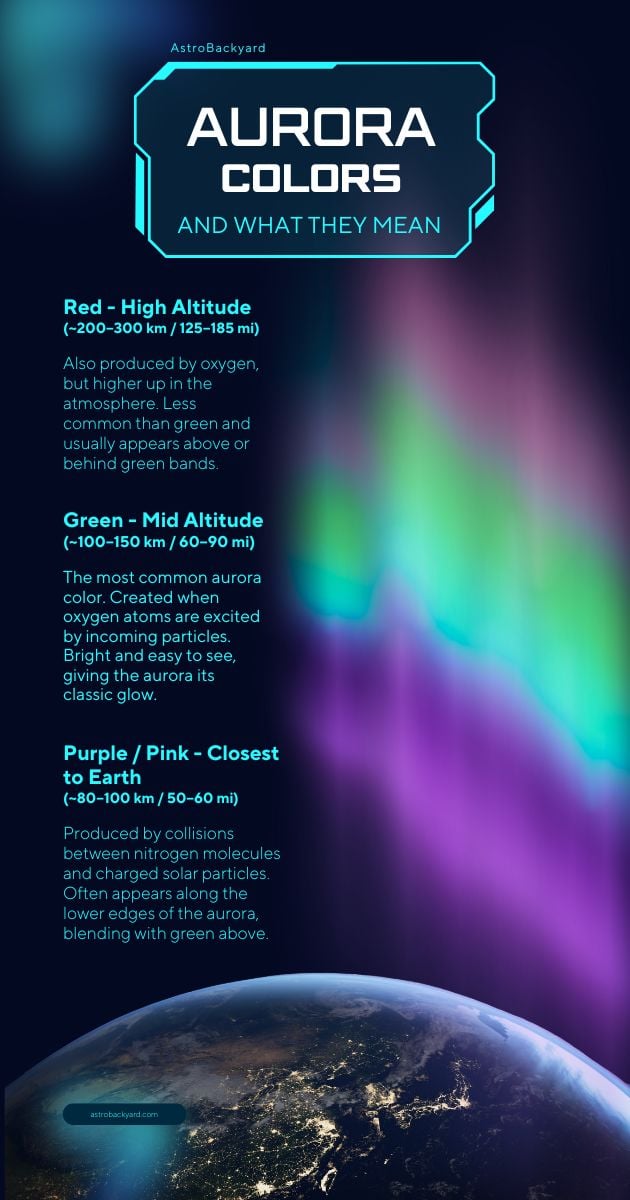
The colors you see depend on the type of gas involved and how high up the collisions happen.
- Green: The most common color, produced when oxygen atoms about 100 km (60 miles) above Earth are excited.
- Red: Rarer, caused by oxygen higher up in the atmosphere (200-300 km / 124-186 miles)
- Pink or Purple: From nitrogen molecules closer to the ground.
Every aurora display is different, and the mix of these colors can change from one night to the next.
Aurora Shapes
Auroras aren’t just about color. Their shapes and movement can tell you a lot about the activity in Earth’s upper atmosphere.
According to NASA, the most common aurora forms include:
- Diffuse Auroras: Soft, hazy glows that cover large areas of the sky. They are caused by lower-energy solar particles spreading over a wider region of the atmosphere. While less dramatic than other types, they create a beautiful, subtle backdrop for more structured aurora.
- Bands (Ribbons or Curtains): The classic, flowing ribbons of light that stretch across the sky. Bands indicate steady streams of charged particles entering the atmosphere, often creating smooth, vertical folds that appear to ripple like curtains.
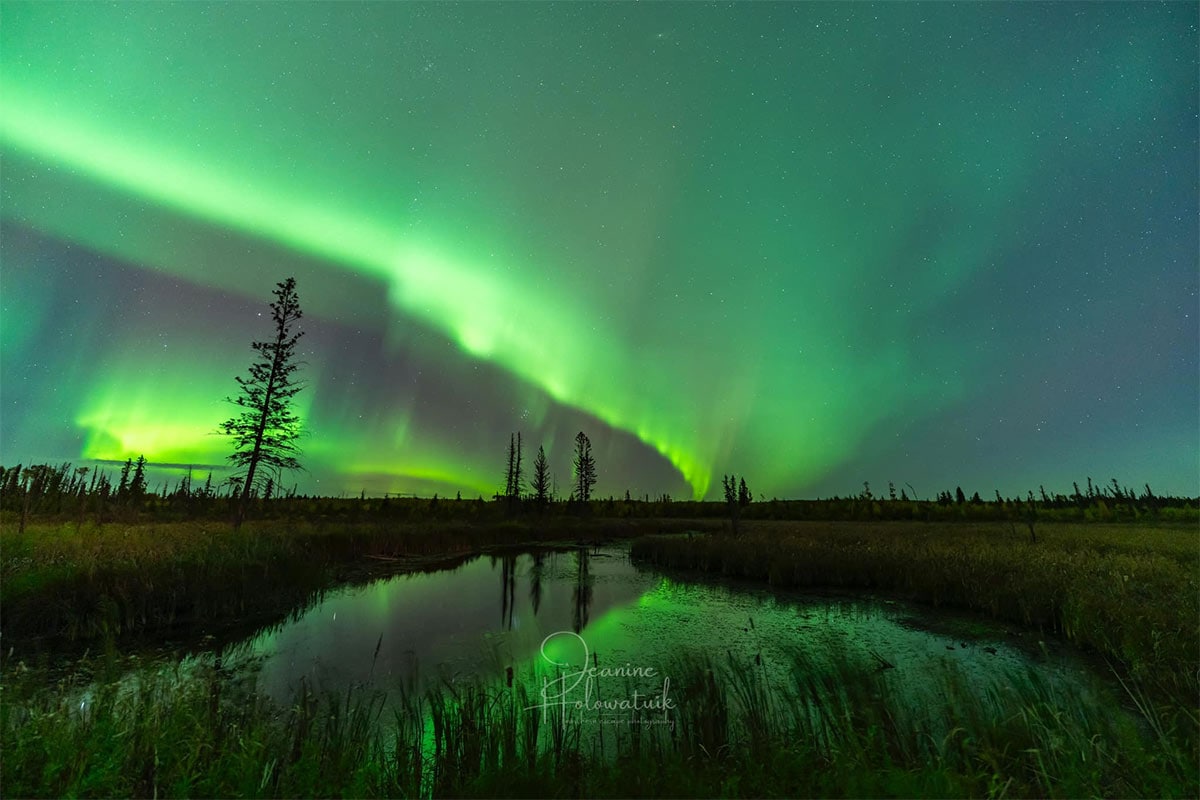
Band Aurora by Jeanine Holowatuik
- Arcs: Curved or gently bent lines of aurora that can span the horizon. Arcs are often the starting shape of auroras, which may later develop into bands or rays as activity increases.
- Pillars (Rays or Beams): Tall, vertical streaks of light that appear as columns reaching toward the sky. These forms occur along magnetic field lines and often indicate more concentrated or dynamic auroral activity.

Aurora (pillars) from the AstroBackyad
- Coronas: When auroras appear directly overhead, the rays can converge toward a single point, creating a “crown” or corona effect. This striking shape shows a strong, focused interaction between solar particles and Earth’s magnetic field and is one of the most dramatic auroral displays.
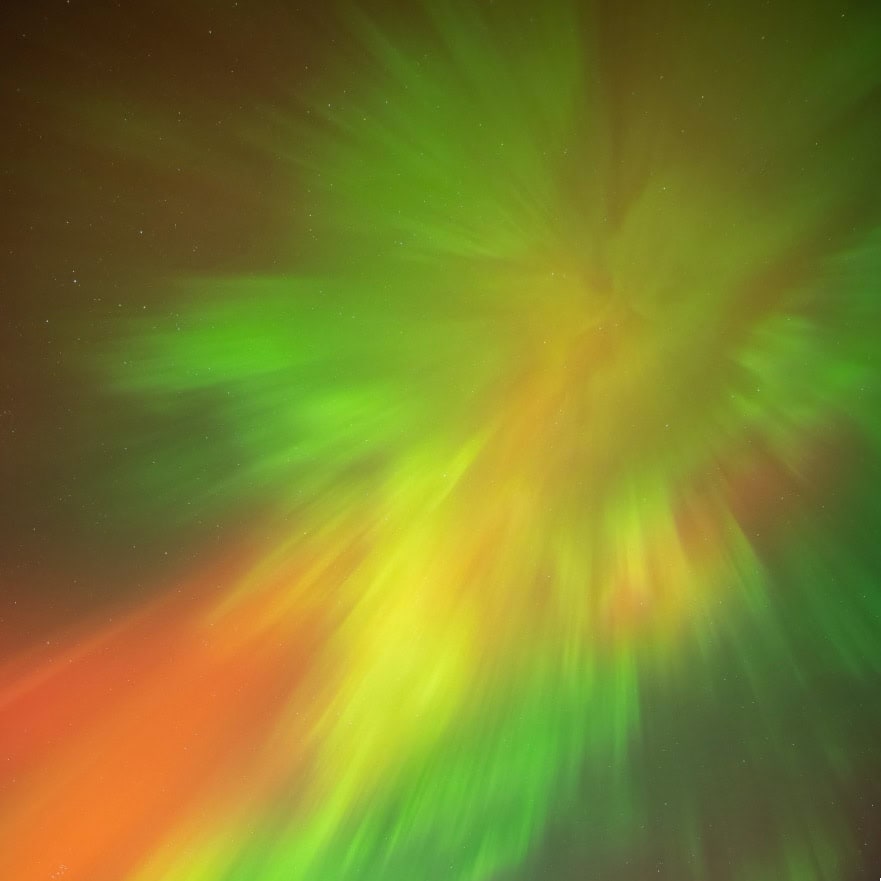
Corona Aurora captured by Andrea Girones
When and Where to See Auroras
What is the KP Index?
The KP index is a scale that measures geomagnetic activity in the Earth’s magnetosphere, which directly affects the visibility and intensity of the aurora (northern lights).
It ranges from 0 (very calm) to 9 (extremely active):
- KP 0–2: Low geomagnetic activity: auroras are rare and usually limited to polar regions.
- KP 3–4: Moderate activity: auroras may be visible at higher latitudes.
- KP 5–6: Strong activity: auroras become more frequent and can be seen further south (mid-latitudes)
- KP 7–9: Severe geomagnetic storms: spectacular aurora displays are possible, even at mid-latitudes.
The KP index is updated regularly and is widely used by aurora chasers to predict the likelihood of seeing the northern lights. Higher KP values (6-9) generally mean brighter, more dynamic aurora displays.
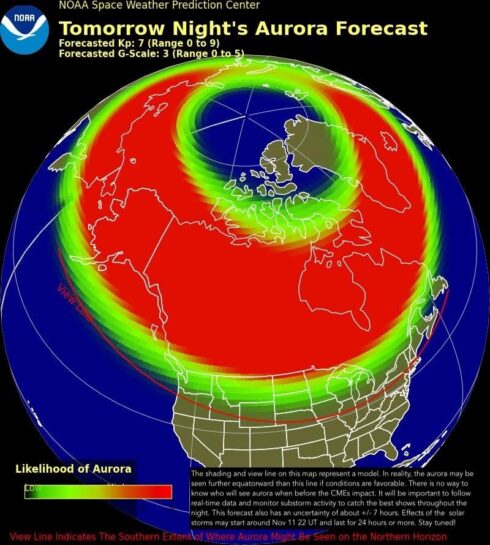
Example of strong aurora activity (KP 7) reaching lower latitudes
Popular apps and websites, such as AuroraWatch, SpaceWeatherLive, and My Aurora Forecast, provide real-time predictions and alerts.
By keeping an eye on the KP index, along with the weather, you can plan your aurora photography trips for the best chance to see this incredible natural phenomenon.
Current KP Index
How Light Pollution Affects Aurora Viewing
By planning your aurora adventures around dark-sky sites, you can enjoy brighter auroras.
Aurora Photography for Beginners with an Interchangeable Lens Camera
Capturing auroras can feel intimidating, but with a few key settings and techniques, you can take stunning, memorable images. Here’s a guide to get you started.
Lens and Aperture
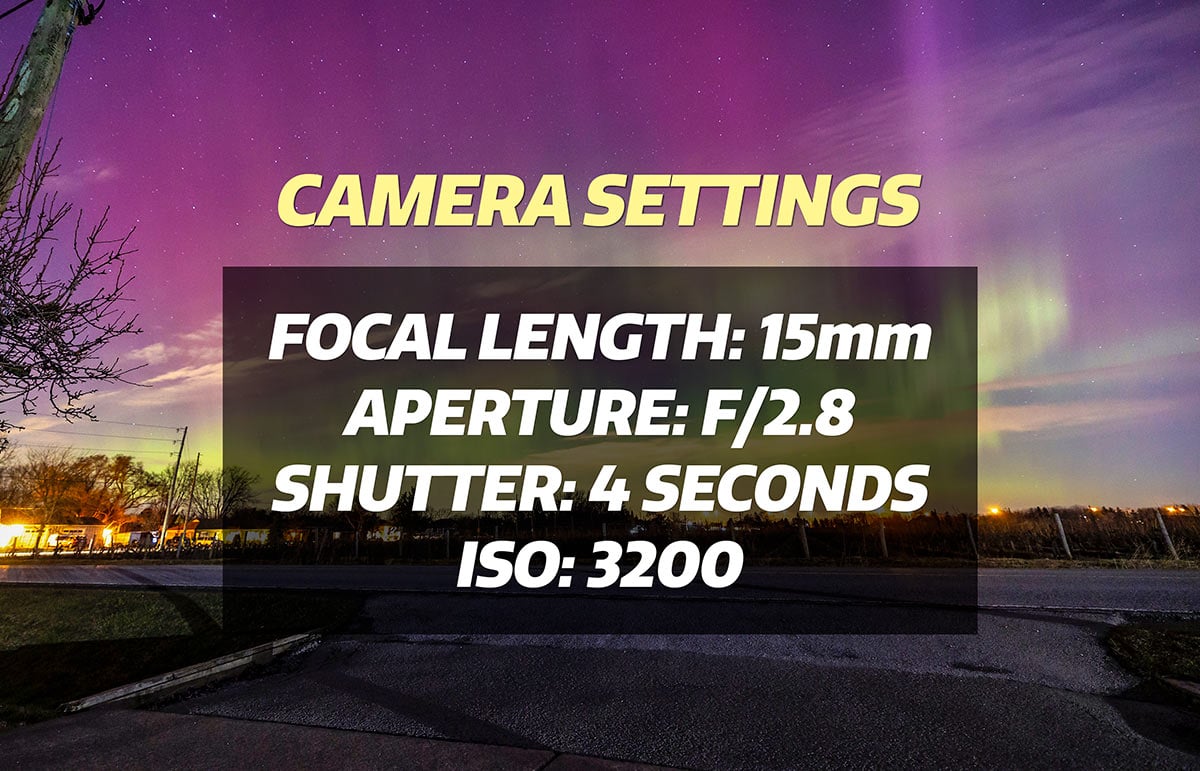
A wide-angle lens is ideal for aurora photography, usually between 14–24mm, because it lets you capture the sweeping sky and any foreground elements like trees, lakes, or mountains.
Use the widest aperture your lens allows to let in as much light as possible. A wider aperture (smaller f-number) allows your camera to capture faint aurora details without having to push ISO too high.
If your camera doesn’t perform well at the widest aperture, you can always crop in post-processing to improve composition.

Shutter Speed
The movement of the aurora determines how long your shutter should remain open.
Longer exposures capture faint auroras and diffuse glows, while shorter exposures are better for fast-moving structures:
- Diffuse auroras: 15–30 seconds, slow, soft glows benefit from longer exposure.
- Bands or ribbons: 5–15 seconds, fast-moving arcs need shorter exposures to avoid streaking.
- Coronas: 1–5 seconds, these move quickly and can become blurred if the exposure is too long.
Adjusting shutter speed ensures your images capture sharp, well-defined aurora structures.
ISO Settings
ISO controls your camera’s sensitivity to light, but it should be your last adjustment after aperture and shutter speed.
Increasing ISO too much can introduce noise in your photos and potentially clip the histogram, causing loss of highlight detail.
The goal is to balance ISO with aperture and shutter speed so your images are bright enough without sacrificing image quality.
Capturing Movement and Timelapses
A simple intervalometer is a huge help for shooting multiple frames over time.
Shooting a series of images allows you to select the frame with the most interesting aurora structure. Or you can use these images to create a timelapse video, which show the aurora’s movement and evolution, a dynamic way to share the full experience beyond a single photo.
Composition Tips
Including foreground elements like trees, lakes, mountains, or cabins can give your aurora photos a sense of scale and place.
Aurora Photography with your Smartphone
Modern smartphones are surprisingly capable if you know how to get the most out of them.
The key is keeping your phone steady, adjusting your settings manually (if possible), and being patient while the camera gathers light.
Aurora from home using iPhone15 (handheld/unedited) - October 2024.
Tips for better results:
- Use a tripod or prop your phone securely. Even small movements can blur long exposures.
- Switch to Night or Pro Mode. If your phone allows manual control, set the ISO between 800–1600 and try a 5–10 second exposure to start.
- Focus at infinity. Tap on a distant light or star before shooting.
- Turn off flash and HDR. They can wash out faint aurora detail.
- Use a remote shutter or timer. This helps avoid camera shake when you press the button.
- Shoot in RAW if possible. You’ll have more flexibility to edit colors and contrast later.
After you’ve captured your shots, use a simple photo editor or mobile app like Snapseed or Lightroom Mobile to fine-tune exposure and contrast. Sometimes, a subtle adjustment is all it takes to bring out the natural glow of the aurora.
Preparing for Aurora Viewing
Don’t forget to use astronomy apps and tools such as aurora forecasts, weather trackers, and star charts to maximize your chances of a successful viewing.

Aurora Myths
- Auroras are only green: Myth! They can appear green, red, pink, purple, and blue, depending on the gases and altitude
- Auroras happen every night: Nope. They depend on solar activity, geomagnetic storms, and the season. Peak chances are around equinoxes and solar maximums
- You can see auroras from anywhere: Only at high latitudes do they appear reliably. Occasionally, strong solar storms allow sightings farther south
- City lights don’t matter: They do! Light pollution reduces contrast, making faint auroras hard to see. Head to dark-sky areas for the best viewing
- Auroras are dangerous: False. They occur in the upper atmosphere and are completely safe to watch from the ground.
Resources
Stay updated on Aurora activity and KP index predictions using Aurora websites and weather forecast apps.
- NOAA: Real-time KP index and aurora forecasts showing detailed maps of the aurora around the magnetic poles.
- SpaceWeatherLive: a dial showing the current KP level, additional forecast data, and alerts
- Stellarium: Plan your night sky viewing with interactive star charts
- Clear Outside/Astrospheric: Detailed weather and sky conditions for aurora hunting
- Aurorasaurus: A citizen‑science oriented platform where aurora chasers around the world report sightings, track phenomena, and network.
Discover nearby dark-sky skies to optimize your viewing using the Light Pollution Map, which provides a map of dark-sky sites worldwide
Join stargazing clubs or astrophotography communities for tips, meetups, and shared experiences. Facebook can be a great place to find nearby aurora chasers.
These resources will help you plan your aurora adventure safely and effectively while connecting with like-minded enthusiasts.
Conclusion
Catching a glimpse of an aurora or northern lights is one of the most unforgettable experiences you can have under the night sky. I still get giddy when I see them!
Whether you’re stepping outside for a quick look or heading out with your camera, the key is patience, preparation, and a bit of luck.
Keep an eye on the KP index and plan for clear skies. When those shimmering greens or reds finally appear on the horizon, you’ll be glad you were ready.

Ashley is an environmental educator, communication professional, and astrophotographer. She has extensive experience writing for diverse audiences to increase public awareness and engagement. Ashley is an active Advocate and Delegate with DarkSky International, helping to protect the nighttime environment from the harmful effects of light pollution through advocacy and outreach.